Page 2 of 3
Re: Andy's 95UrS6 Face Lift
Posted: Sat Nov 15, 2014 5:56 pm
by A20V200
Well…it's been a fun week. Clutch went to the floor pulling away from my business parking lot. Turns out my clutch master cylinder decided to tap out and call it quits. So now its back together and feels better….just a PITA!!
Still playing with the front suspension and trying out different length springs and spring weights. I have 8" 380# springs in there now…I was trying out a 9" 380# spring and must say the ride felt nice. Just couldn't go as low as I wanted with the collars turned all the way down.
Bought some ABS mesh and did the lower LLTEK and modified my grill in the same fashion..all finished up…turned out really well IMHO.


Re: Andy's 95UrS6
Posted: Sat Nov 15, 2014 6:00 pm
by alxdgr8
Looks great! Where did you buy it from?
Re: Andy's 95UrS6
Posted: Sat Nov 15, 2014 6:07 pm
by A20V200
Thanks…
Ebay…came in a big sheet…good quality stuff and easy to work with
http://www.ebay.com/itm/Mesh-Grill-ABS- ... 52?vxp=mtr
Re: Andy's 95UrS6
Posted: Sun Nov 16, 2014 7:48 am
by AudiQuattros
A20V200 wrote:

There was the idea of a European put the hood ?

Re: Andy's 95UrS6
Posted: Mon Nov 17, 2014 1:58 am
by PRY4SNO
Love that mesh. Well done.
Re: Andy's 95UrS6
Posted: Mon Nov 17, 2014 8:23 pm
by A20V200
Thanks for the compliments...
I might have to spray paint the radiator and other items behind it except for the relocated PS cooler to make it "dark" behind it.
Re: Andy's 95UrS6
Posted: Mon Nov 17, 2014 9:39 pm
by loxxrider
That looks good!
Re: Andy's 95UrS6
Posted: Mon Nov 17, 2014 10:32 pm
by UrSobsessed
A20V200 wrote:Thanks for the compliments...
I might have to spray paint the radiator and other items behind it except for the relocated PS cooler to make it "dark" behind it.
Are you talking about painting heat transfer surfaces as well? If so, I wouldn't do that. It still looks nice, even with the silver behind the grille.
Re: Andy's 95UrS6
Posted: Mon Nov 17, 2014 11:49 pm
by A20V200
UrSobsessed wrote:A20V200 wrote:Thanks for the compliments...
I might have to spray paint the radiator and other items behind it except for the relocated PS cooler to make it "dark" behind it.
Are you talking about painting heat transfer surfaces as well? If so, I wouldn't do that. It still looks nice, even with the silver behind the grille.
Just the end tanks and such..not the actual fins etc.
Re: Andy's 95UrS6
Posted: Tue Nov 18, 2014 12:48 am
by UrSobsessed
A20V200 wrote:Just the end tanks and such..not the actual fins etc.
Gotcha.
Re: Andy's 95UrS6
Posted: Tue Nov 18, 2014 1:59 am
by alxdgr8
Awesome, thanks! Going to have to pick some up for my RS2 bumper as I've never liked the metal mesh I have.
Re: Andy's 95UrS6
Posted: Tue Nov 18, 2014 4:22 am
by Afterthought
What did you use to fasten that mesh? Turned out great.
Re: Andy's 95UrS6
Posted: Tue Nov 18, 2014 10:24 am
by A20V200
Afterthought wrote:What did you use to fasten that mesh? Turned out great.
thanks..It's a 2 part ABS/flexible epoxy used for bumper repairs etc….you could also use a flexible polyurethane as well
Re: Andy's 95UrS6 Broken EM studs..
Posted: Sun Feb 08, 2015 5:35 pm
by A20V200
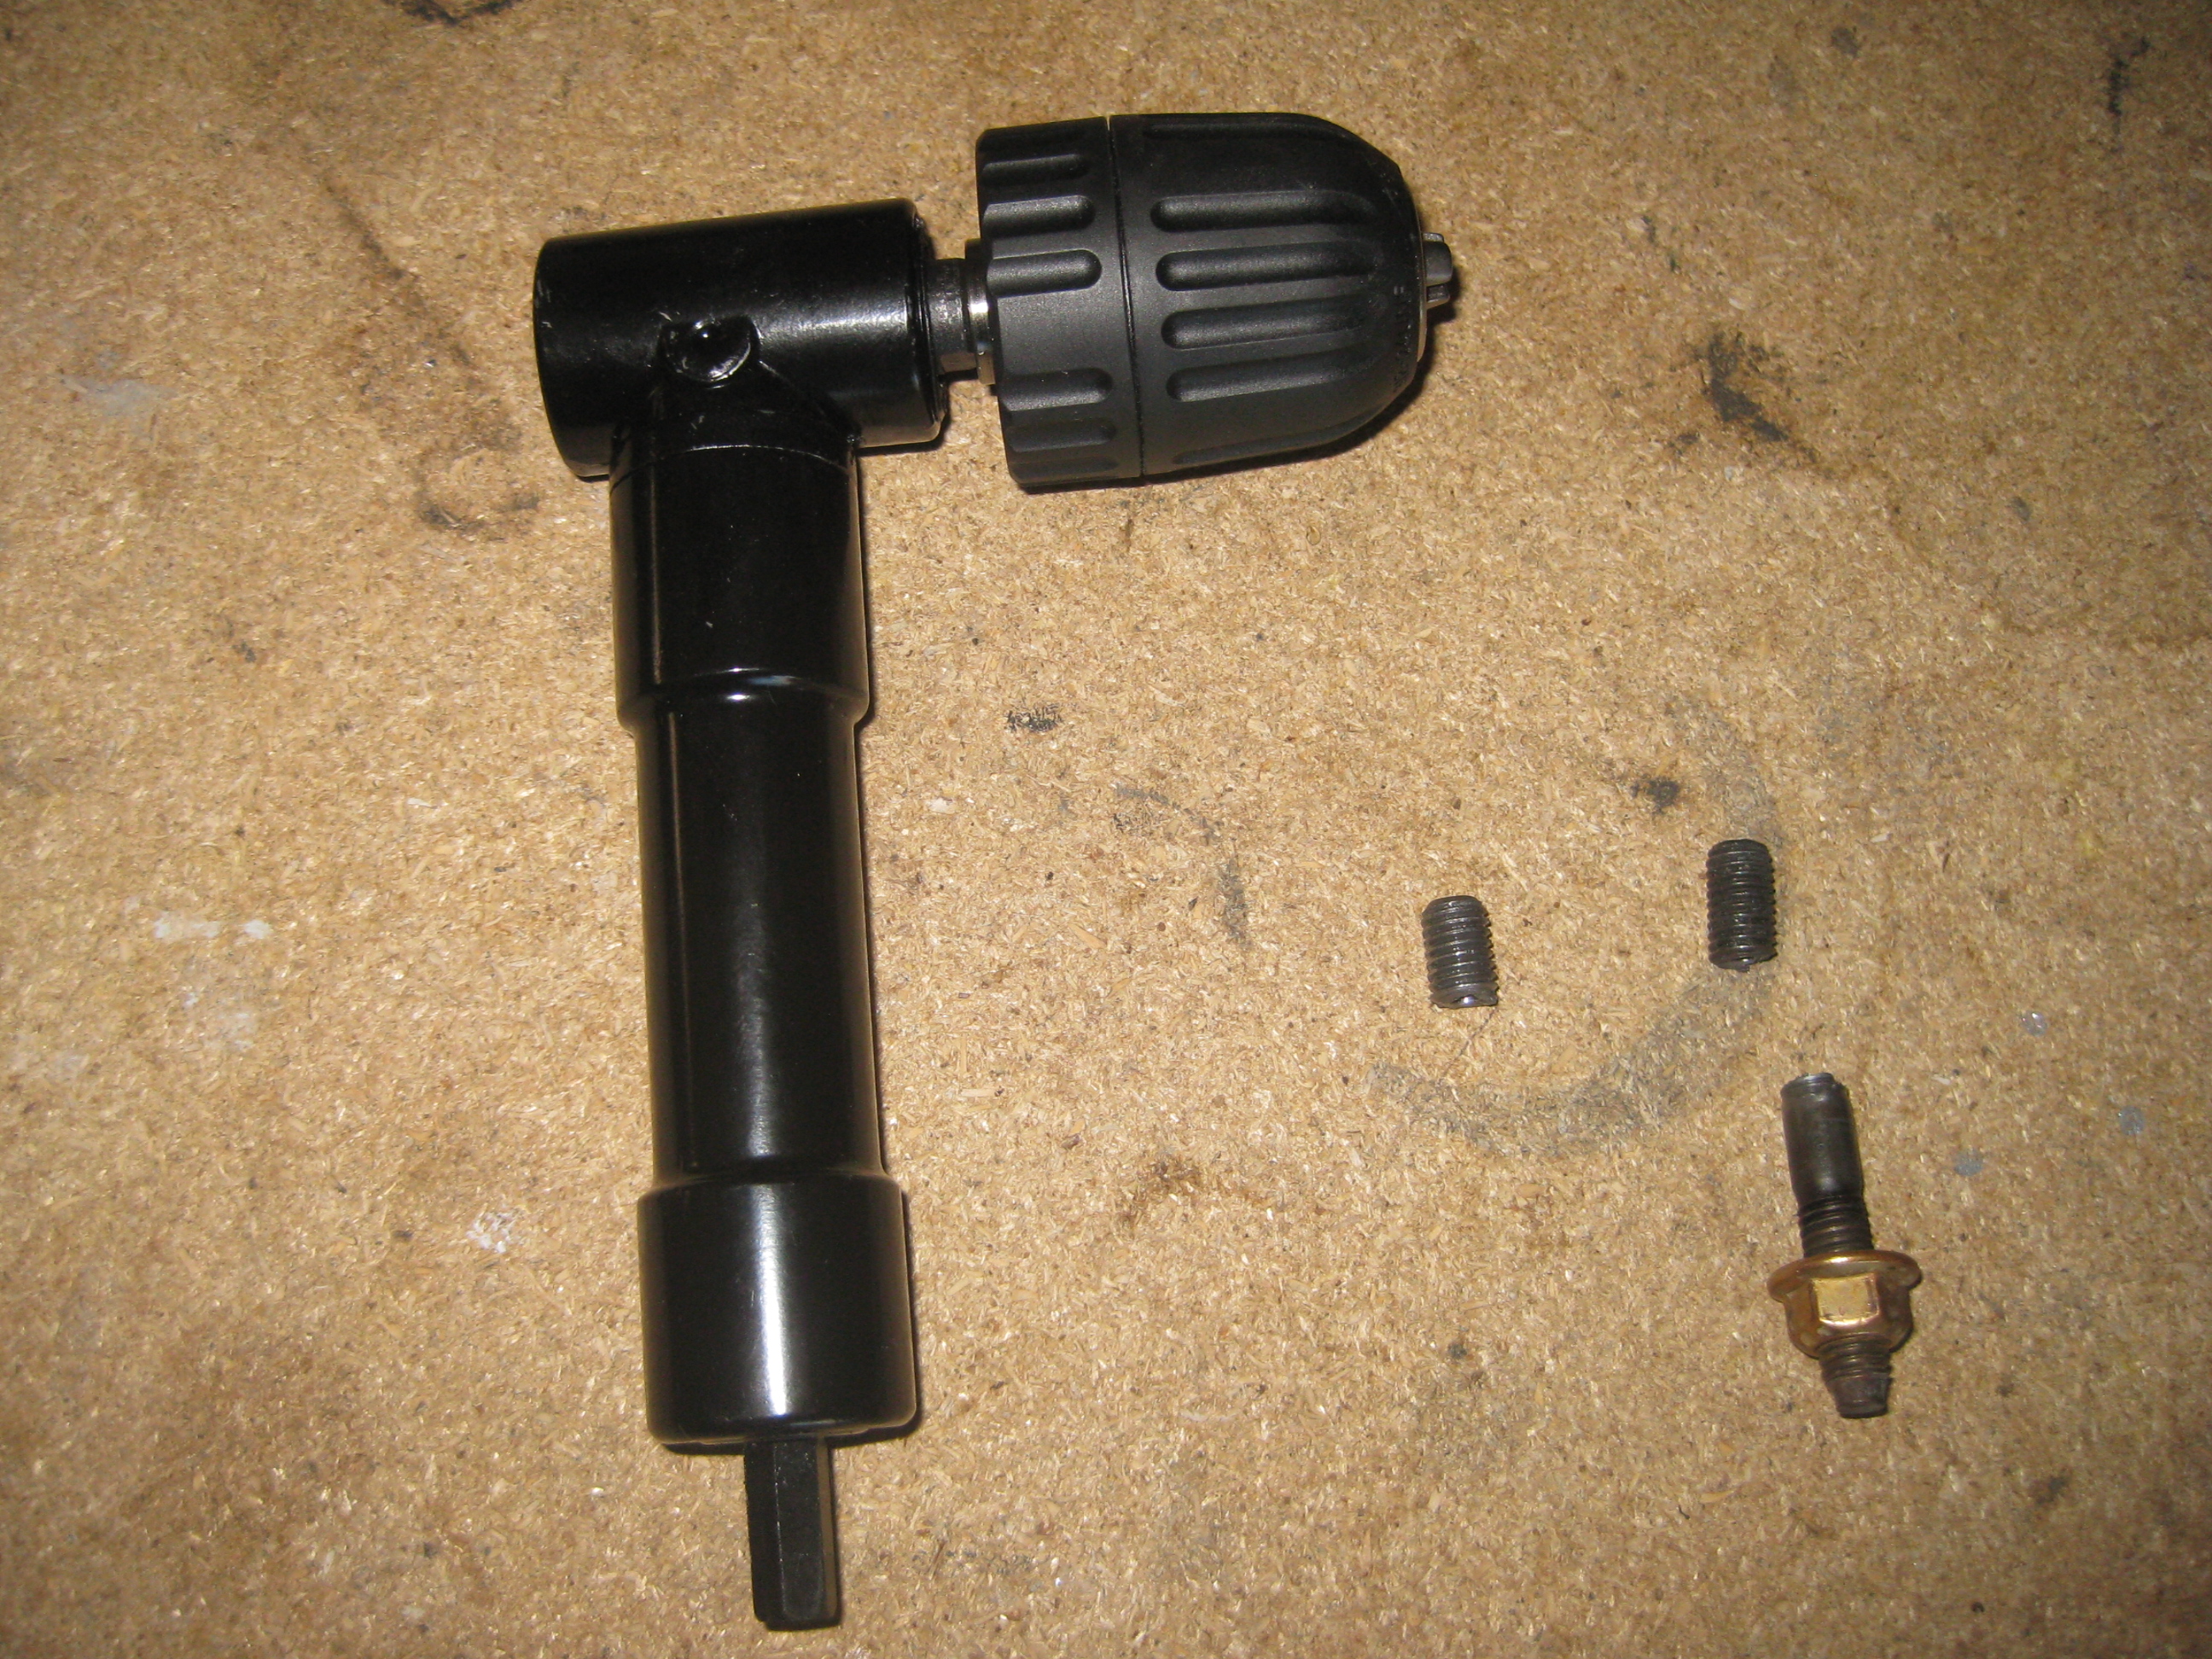
- IMG_3536.JPG (2.71 MiB) Viewed 38799 times
So I had a second EM stud break off in the same area. Decided to take a shot at drilling them out while the head is still in the car. Against a lot of people that said " hell no...I wouldn't do it"....I did it anyway with success on both broken studs. The biggest PITA was removing the DP to get better access to drill. They came out rather easily. With a 90 degree drill from HF and a borrowed set of drill extraction bits...15 minutes later and some helper hands from the wife...done deal!!!
Re: Andy's 95UrS6 Broken EM studs..
Posted: Wed Mar 18, 2015 6:00 pm
by A20V200
Just ordered a V8 Torsen rear diff from ...plan to do a poly mount and bushings from Apikol while at it. Maybe get the rear sway bar as well if my budget allows.....Gonna clean it up and apply some new paint or POR 15 as well. Anything else to do while I'm swapping things out?
And the car is back to being all black again. Peeled of the Plastidip about a month ago. Feels like the Plastidip acted like a clay bar and the pulled all the crap off the paint surface. Applied some wax and good to go.
Re: Andy's 95UrS6 - V8 Rear Torsen coming soon
Posted: Wed Mar 18, 2015 6:35 pm
by ringbearer
Do the 034 diff carrier bushings and front trap arms too
Re: Andy's 95UrS6 - V8 Rear Torsen coming soon
Posted: Fri Aug 21, 2015 6:17 pm
by A20V200
Got the V8 Torsen Diff and some other goodies to go along with it for the install. Apikol Diff Mount and support diff mounts. Replaced the passenger side seal cause it was leaking a bit...easier while it's out.
Waiting for it to cool down here in Arizona. Hopefully bang it out in a couple of hours on a weekend morning.

Also had a KONI insert take a crap on me in the last week..waiting for 2B for a response for a warranty????
Re: Andy's 95UrS6 - V8 Rear Torsen coming soon
Posted: Mon Oct 26, 2015 8:15 pm
by A20V200
Haven't had much time to "work" on the S6 but managed to find and hour or so to do the rear trap mounts. Will be doing the V8 Torsen rear diff in the next couple of weeks...might pick up a driveshaft and just knock them out at the same time. The carrier bearing is shot and there is some play end to end.


Re: Andy's 95UrS6 - V8 Rear Torsen coming soon
Posted: Sun Dec 06, 2015 10:30 pm
by A20V200
Re: Andy's 95UrS6 - V8 Rear Torsen Diff Installed
Posted: Sun Dec 06, 2015 10:42 pm
by A20V200
Re: Andy's 95UrS6 - V8 Rear Torsen Diff Installed
Posted: Mon Dec 07, 2015 12:23 pm
by A1QSHIP
Both vacuum lines at the diff lock actuator go to the diff lock controller under the rear seat. Should not be a problem to connect them together..... Actuating the diff lock switch may confuse the controller, remember it is reporting to the ABS control module. You may want to be certain that the wires to the diff lock switch are taped up to prevent corrosion.
HTH, Chris
Re: Andy's 95UrS6 - V8 Rear Torsen Diff Installed
Posted: Sun Dec 13, 2015 11:28 am
by A20V200
I was thinking about the last 3 years with this car and going over all the items that I upgraded or replaced. The list is staggering. The items in RED are upgrades to the car when I took over ownership and were already done...I'm sure there's more that I'm forgetting...little maintenance things here and there...but dang....The list is long!!!
1995 Audi UrS6 upgrade and information sheet
1) AAN w/ Garrett T04E turbo .50 trim built by Dave Jones @ RevSport
2) 7A cams
3) 42lb injectors
4) REAL RS2 Exhaust Manifold
5) Samco Hoses
6) Stebro Downpipe and 3” exhaust w/ V-bands with Magnaflow HF Cat and Magnaflow Muffler
7) 2Bennett Coil Over with Koni Inserts - 380# springs F - 400# R w/ 2B Camber Plates Etc.
8) Apikol Poly Snub Mount/Rear Diff /Crossmember/Rear Subframe
9) Energy Suspension Rear Trap Poly Mounts
10) V8 Rear TORSEN Differential w/ New Seals Pass/ Front
11) New Front CV Assemblies
12) New motor and Transmission Mounts Slater Style - Poly Filled
13) New LLTEK Front Bumper
14) Front Mount Intercooler w/ Piping 3”x 18”x 28”
15) 55wHID ballast and bulbs
16) Euro Headlight Lenses – ECS
17) Neuspeed RS10 Lightweight Wheels 18x8 17.8 #’s
18) Bridgestone Potenza tires 235/40/18
19) Stereo system w/ IPOD connect
20) 3M Tint
21) Euro License Plate Holder
22) European Smoked Rear Taillights
23) 034 Lightweight Aluminum Flywheel 12#s
24) Southbend Stage 3 Clutch w/ 140K mile 5spd O1E trans
25) EFI Express LS2 Coil Kit
26) Hella Clear Front Corner lenses
27) RS2 MAF
28) 044 Fuel Pump
29) 3M Clear Bra
30) Boost Gauge w/ pod
31) A/F Gauge
32) Adjustable Fuel Pressure Regulator
33) 034 Short Shift Kit
34) Custom Front RS Style Grill
35) New RS Style Mesh in lower LLTEK
36) Porsche 996 Twin Turbo BBK w/ new pads
37) New Front UrS6 Badge
38) SAAB Side Marker Lights
39) Chrome Side Mirror caps
40) Timing Belt and Water Pump /Belts/Fan bearing
41) New Master Clutch Cylinder w/ System Flush
42) Brake Fluid Flush
43) Speed Bleeder Brake Bleeders - All 4 Corners
44) New Rear Brake Pads
45) New Front Lower Control Arms and Front Bushings Etc.
46) ECS Hub centric Wheel Spacers12mm
47) New Starter 9/15
48) 034 Phenolic Spacer
49) FUBA Roof Antenna
50) New battery
51) Samco Hoses for Intercooler
Re: Andy's 95UrS6 - V8 Rear Torsen Diff Installed
Posted: Sun Dec 13, 2015 8:03 pm
by chaloux
So what you're saying is, it's basically stock.
Lol
Nice work!
Re: Andy's 95UrS6 - V8 Rear Torsen Diff Installed
Posted: Sat Dec 26, 2015 11:32 am
by A20V200
Next up is a remanned driveshaft from Colorado Driveshaft. Should be here in about a week. Another item to add to the list.
Re: Andy's 95UrS6 Face Lift
Posted: Mon Dec 28, 2015 10:38 am
by Draky
A20V200 wrote:
That looks great! I need a new bumper (snow damaged mine last winter) but I love how you have no gaps in there and it looks nice and tight.

