Page 2 of 13
Re: Kevin's Monumentally Slow 200 20v Project
Posted: Thu Jul 10, 2014 10:47 pm
by Aktapod
Haha, yeah, that might be a bit much for me. It was actually because of my ride that I thought to ask!

Those 70A-80A mounts from HPR are looking awfully tempting. I'll have to take a look at those motor mounts
Re: Kevin's Monumentally Slow 200 20v Project
Posted: Fri Jul 11, 2014 10:04 am
by themagellan
Kevin(Sven) 100% go with the HPR stuff, the build quality is impeccable and they are powdercoated to boot!
Also stupid question, i'm sure it's somewhere but can you explain in good detail how you went about adjusting your clutch grab point?
Re: Kevin's Monumentally Slow 200 20v Project
Posted: Fri Jul 11, 2014 10:32 am
by vt10vt
Nice project and well written! I like how you're building this car, especially for the amount of time you've been "in the game" you seem to have patience, solid foresight and planning and even as I mature (...sorta

) I find the patience especially hard to come by so kudos, maybe I can pick up on a thing or two here.
Now get VEMS and start turning up the boost!
Re: Kevin's Monumentally Slow 200 20v Project
Posted: Fri Jul 11, 2014 10:37 am
by vt10vt
Also there is a budget option for engine mounts which is Fox body Mustang transmission mounts. I've had a set and they've held up great with all the beatings and launchings my avant has taken, they're noticeably stiffer than OEM (and than OEM filled like I have in my 5k) and, most of all, if they're good enough for Jim Green they're good enough for me! Plus you can get both for the cost of a single of most other aftermarket mounts. Super mild modification necessary but where's the fun if there isn't?
http://www.summitracing.com/search/year ... ion-mounts
How to adjust clutch engagement point
Posted: Fri Jul 11, 2014 1:18 pm
by Aktapod
themagellan wrote:Kevin(Sven) 100% go with the HPR stuff, the build quality is impeccable and they are powdercoated to boot!
Also stupid question, i'm sure it's somewhere but can you explain in good detail how you went about adjusting your clutch grab point?
Not a stupid question at all! In fact, when I first asked on MG, I was told it was not possible.
Start out by taking off the panel in front of the driver's knees (not sure what it's called) - the same one that's covering the relays. There are a couple of allen screws around the whole thing keeping it on, including two on the side underneath the cover on the left side that's against the door.
I'm sure if the next part is necessary from memory, but it'll help to gain access if you take the vent tube for the driver's footwell and rotate it out of the way or remove it completely. There are two phillips head screws that hold it in, on one either end of it. The left one just needs to be loosened and the other removed.
Now you just have to disconnect the vacuum lines leading to the clutch and brake switches, or remove the switches completely. They should be in the big metal assembly that the clutch MC is attached to. That should be it for disassembly!
On that same metal piece, you should see a little window between the switches that shows the a part of the pushrod from the master cylinder. It looks like this:
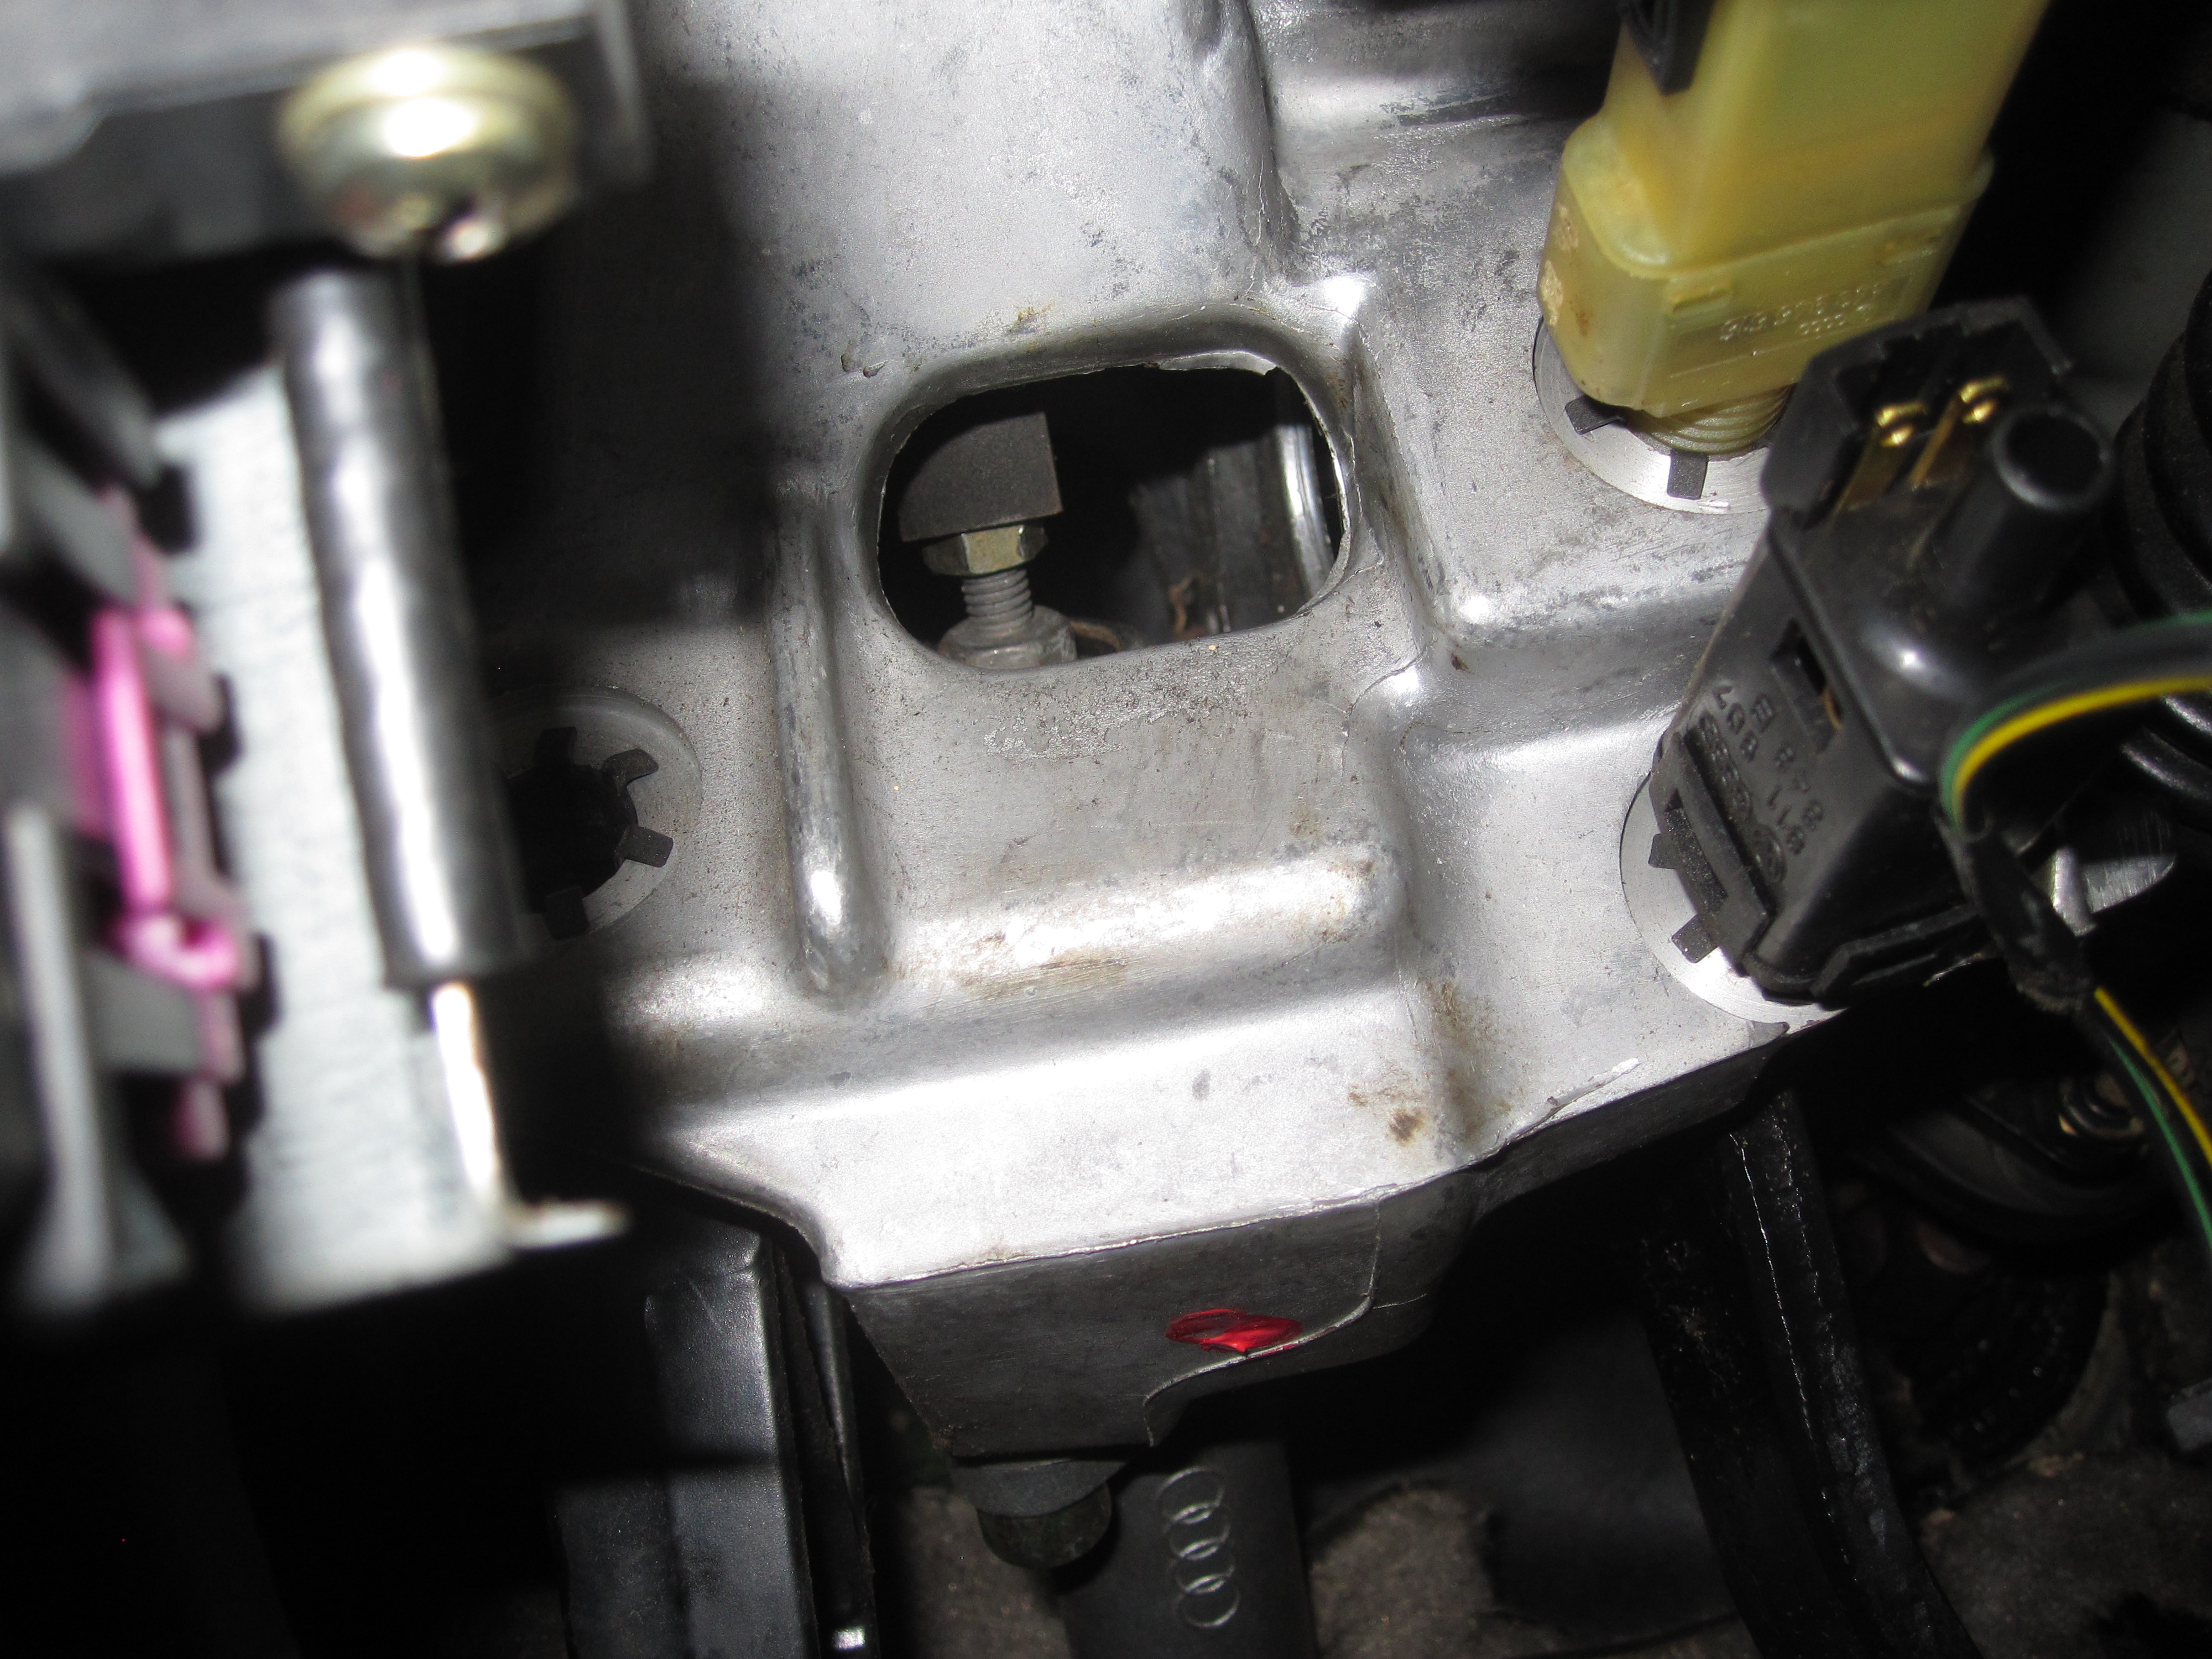
- IMG_5108.JPG (2.59 MiB) Viewed 46697 times
The top bronze-colored one is just a lock nut - loosen it in order to be able to adjust the pushrod. I think it's a 10mm. Then you just turn the lower grey nut (11mm?) to move the clutch. A little goes a long way, as it's pretty close to the axis of rotation. From the perspective of the picture, counter clock-wise will lower the clutch, and vice versa. There's not much space in the window, so I had to take my open-end wrench to turn part of the way, flip it over to get the rest, then rinse and repeat.
Then just lock the nut and reassemble.
The only problem I ran into is that my clevis (the dark thing it screws into) has a little play, so about 1cm of the clutch travel doesn't actually do anything to actuate the pushrod, so even though it looked just like I wanted it, I brought it back out 1 cm so it felt like I wanted it to. I'll problem tighten that up when the time comes for a new MC.
Anyways, that's that! Hope this helps!
Re: Kevin's Monumentally Slow 200 20v Project
Posted: Fri Jul 11, 2014 1:28 pm
by Aktapod
Thanks for the kind words, Shawn! Believe me, sometimes the patience wears thin on my end as well. Especially when I have to do something over again because I messed it up the first time. These are the times when I just turn to my non-car projects, but in the end, it's totally worth it!
Re: Kevin's Monumentally Slow 200 20v Project
Posted: Fri Jul 11, 2014 2:06 pm
by themagellan
Damn thanks dude - clever!
Re: Kevin's Monumentally Slow 200 20v Project
Posted: Fri Jul 11, 2014 3:03 pm
by scubadave
Nice work Kevin. I started out in life like you, learn how to do it by diving in head first. I cant tell you how many times I have had to redo things I have already redone. This is just part of the learning process. It still happens even now.
And to add to the clutch adjustment, there should be about an inch of play from the top of pedal travel to where it hits pressure. Dont adjust the play out of it or it will be under constant pressure, wearing the clutch prematurely. I was an automotive tech for 18yrs, so you can trust that info is accurate.
Im currently in the middle of upgrades to my engine, and I feel the same about my coupe as you do about the 200. I have owned my coupe since 95 and it has been a long road to its current configuration. I Love my car and cant imagine life without it.
Kudos to you for your personal success.
Re: Kevin's Monumentally Slow 200 20v Project
Posted: Sat Jul 12, 2014 10:20 pm
by Aktapod
Thanks, man! Major props to you for holding on to that coupé for so long! I think it's really cool how this community forms from everyone's separate, but similar roots - in which we all somehow rationalize dumping a ton of time and money into our cars.
Sorry, I realize now the ambiguity of what I said. What I meant was to clean up the slop in the linkage from the clutch pedal to the master cylinder. It has a little play independent of the MC, both in the direction of travel and even some side-to-side.
Re: Kevin's Monumentally Slow 200 20v Project
Posted: Wed Sep 17, 2014 1:45 pm
by Aktapod
Okay, so this isn't really much of an update. I'm back in school, so between studying, holding a part-time job, and staying in shape, I have approximately zero free time to work on the car.
Fortunately, the 200 has been a shockingly reliable daily as of late! I drove her 3000 miles to Colorado and back without a single hiccup - even at 9400 feet loaded with 6 people (Shhh. don't tell the cops) and backpacking gear. In fact, aside from an oil change and a wash, I haven't had to do a single thing to keep her running like a top since I put in the turbo gasket! What a beast!

I did pick up a bunch of little stuff off a V8 in a CO scrapyard, as well as a box of UrS4 stuff I have absolutely no need for, but was so stupidly cheap on Craigslist that I couldn't pass it up. Also got a set of 7A cams from a MGer! So I suppose this is my hoarding phase. I'll install parts as I get the time. I'm not even sure if I'll install the cams until I get a bigger turbo. Would it be worth it on a chipped K24, or would I just end up losing some bottom end?
In other news, my dad's S4 started singing the wonderful tune of dying turbos. Despite him already looking intently for a new car, I somehow managed to convince him that the only thing
really missing in his life was two K04's. And that I should put them in. Stay tuned for winter as I remove an engine with a spare cylinder!
Re: Kevin's Monumentally Slow 200 20v Project
Posted: Wed Sep 17, 2014 2:26 pm
by ringbearer
If you like to do WOT passes to redline often install the 7A cams, if not keep the power down low and leave the stock cams.
Re: Kevin's Monumentally Slow 200 20v Project
Posted: Wed Sep 17, 2014 5:46 pm
by chaloux
Nice! Have fun with the k04 swap, take your time and everything will be fine
The k24 already has so much down low listing a little bit is hardly noticeable. You gain more than you lose. My opinion, but look at my avatar...
Re: Kevin's Monumentally Slow 200 20v Project
Posted: Mon Sep 22, 2014 12:24 pm
by loxxrider
I'd throw them in when you have some spare time because you will definitely want them later when you definitely put a bigger turbo on
As Matt said, you won't lose much down low. It's hardly noticeable. You gain a lot up top though with a bigger turbo. My h1c wouldn't run out of steam even at 8k rpm when I had those cams.
Glad the 200 has been reliable for you. Mine never failed me after several multi thousand mile trips and constant 500 mile round trips to school and back while I was at UF. If you take care of your t44, it will take good care of you
Re: Kevin's Monumentally Slow 200 20v Project
Posted: Thu Sep 25, 2014 11:48 pm
by Aktapod
Thanks for the replies! I guess I'll go ahead and order a VC gasket set so I'll be ready if I get a moment. Maybe a new cam chain too.
Re: Kevin's 200 19v Project
Posted: Sun Nov 09, 2014 12:45 am
by Aktapod
I've had an internal debate on whether or not I should even post this, because of how dumb I'll look. Then I realized: Oh wait; I'll only see some of you once a year, so who cares? Here we go.
I finally got a free moment to install my 7A cams! But when I threw it all together, I just could not get the timing to line up on all counts. There was a huge series of cause/effect stemming from one central problem, but it's a veeery long detailed story, and, to be honest, not very interesting anyways, so I'll skip the specifics.
Initially, I missed a HUGE red flag when the cam pulley had play with respect to the exhaust cam before tightening the bolt. I figured it was normal. Afterwards, though, I could not line up the dots on the camshafts and the pulley's TDC mark at the same time. I got it as close as possible and chalked the difference to my bad perspective, so I buttoned it up. No start.

Pretty sure it's the dizzy, so I went back in to fix the timing.
After far too much trial and error doing the timing again, I took the cam bolt back off and found this:
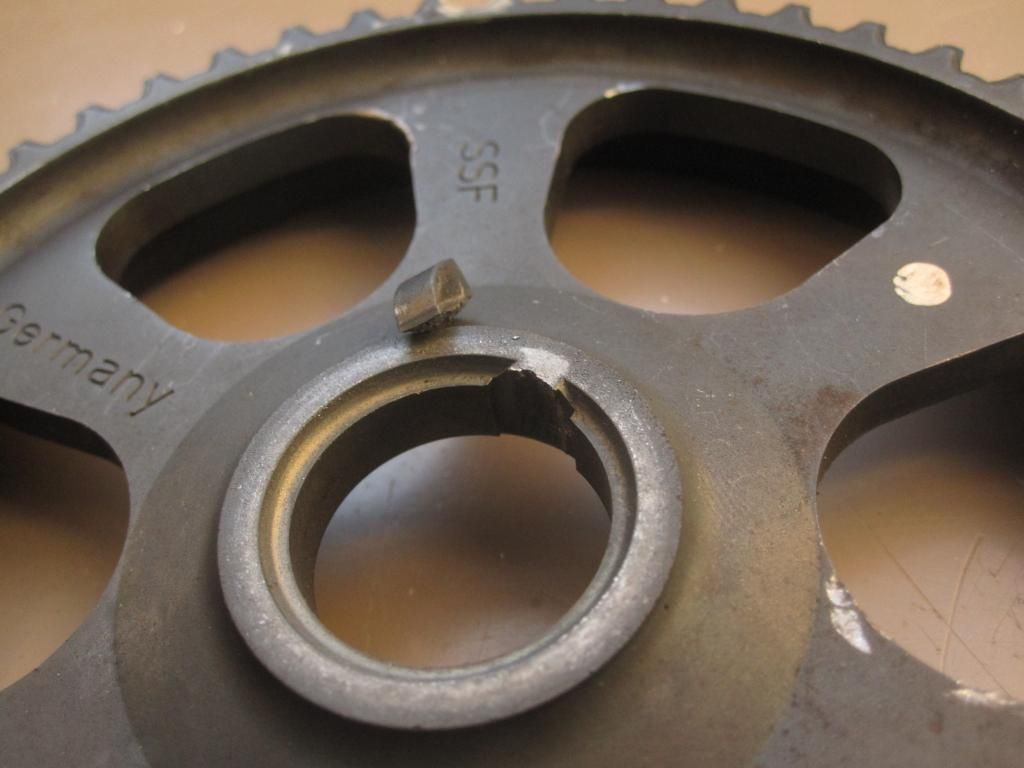
Wowwwwwwww, I am so glad I caught that. I used a spare pulley from the new cams and everything lined up! With everything lined roughly to TDC, I walked the cam caps down in the specified sequence. And then - hmmm... do I admit this?
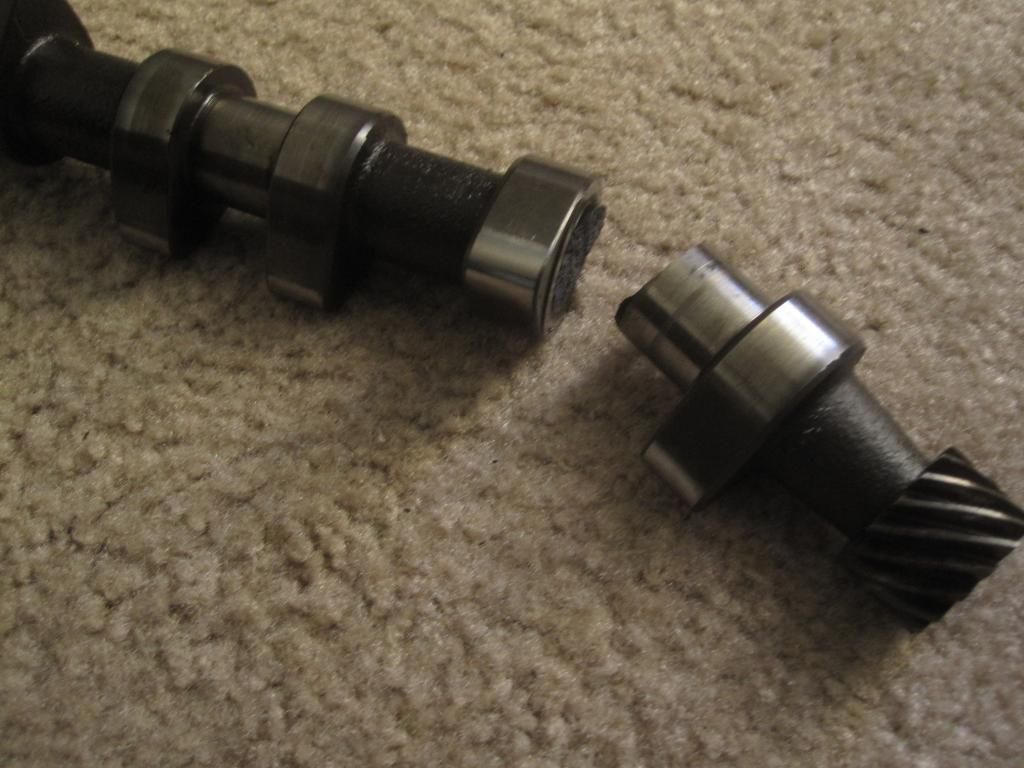
I
forgot to change the distributor to match the slight change in cam timing. 
Hardly had a warning. There was no extra resistance from the nuts until the end. It got slightly tighter from palm-turning a ratchet and I figured the bearing was binding. I flipped the ratchet to reverse to back it off and suddenly
BANG! Didn't know what it was at first, but I thought I'd ruined my engine.
I should never be allowed to touch a car again. Now running on stock intake and 7A exhaust cam and immensely frustrated with myself.
Re: Kevin's 200 19v Project
Posted: Sun Nov 09, 2014 2:06 am
by 20VAvant
Don't get too down about it, we've all been there before. I destroyed a CV joint when I first got the car on the front passenger axle. It was a stupid mistake on my end and it cost me $250 to fix. I almost sold the car I was so frustrated.
Don't let it burn your desire for large amounts of boost

Also, I love the change to 19V
Re: Kevin's 200 19v Project
Posted: Sun Nov 09, 2014 1:14 pm
by pilihp2
Hey my first 200 I picked up I didn't tighten the lugs on after a brake job and the driver side wheel fell off at about 20 mph. Things happen!
God I made so many mistakes with that car. Sometimes I wonder how I made it through high school with the stupid shit I did. Wow I was dumb. Thinking back is embarrassing. Jeeze.
oh right.
I'll admit. I have not seen that happen before. That's hardcore. The exhaust cam is the more important one though, I believe. So could be worse!
Re: Kevin's 200 19v Project
Posted: Sun Nov 09, 2014 2:40 pm
by Wilford Brimley
How did you reattach the headliner?
Re: Kevin's 200 19v Project
Posted: Sun Nov 09, 2014 7:20 pm
by 88a5tq
Wow Seven really sorry that happened. Keep your chin up and keep at it. At least you didn't trust someone else with your motor and watched them drop it and destroyed two valves right in front of you. I find it better to ruin my own car instead of letting someone else do it lol. Enjoy the cams and the least important one broke anyway
Re: Kevin's 200 19v Project
Posted: Sun Nov 09, 2014 8:37 pm
by chaloux
Shit son, shoulda got an AAN
Re: Kevin's 200 19v Project
Posted: Sun Nov 09, 2014 8:52 pm
by 88a5tq
Didn't you get those cams for $100 shipped on MG or didnt you buy from that guy? My jaw dropped when I saw that price.
Re: Kevin's 200 19v Project
Posted: Sun Nov 09, 2014 9:02 pm
by loxxrider
Wow, that's a good one! Those things are hardened and thus don't like bending much. Just chalk it up to another lesson learned.
Re: Kevin's 200 19v Project
Posted: Mon Nov 10, 2014 1:23 pm
by Aktapod
chaloux wrote:Shit son, shoulda got an AAN
Lol, there was more than one time I was thinking the same. Especially after disassembling the intake tract 5000 times to fix a mysterious oil leak that sprung up. Turns out it has nothing to do with the cam seal as I suspected. Looks like the crank seal is leaking pretty bad when it's running. Not sure how I managed that, but it started right after I did the cams.

Re: Kevin's 200 19v Project
Posted: Mon Nov 10, 2014 1:27 pm
by Aktapod
88a5tq wrote:Didn't you get those cams for $100 shipped on MG or didnt you buy from that guy? My jaw dropped when I saw that price.
Yeah buddy! I wasn't planning on getting cams any time soon, but I couldn't say no to that. I guess, in the end, I'll just make up for it when I find new intake cam to fix my error.
Re: Kevin's 200 19v Project
Posted: Mon Nov 10, 2014 1:42 pm
by Aktapod
Oh well. At the time, I wanted to push the car off a cliff, but retrospectively, it's kind of funny. Plus I have a cool paperweight. I'll have to be a good student for once and wait until after finals to tackle the (probably) crank seal.