Page 10 of 17
Re: 24vVR6T CQ Project: EATSGTR, chassis FAB
Posted: Sat Aug 10, 2013 1:53 pm
by glibobbo21
Damn cheater holds on to his updates for a couple months and makes it look like this is 3 days of straight work lol. FINISH THE OTHER CAR THATS ALMOST DONE.
Re: 24vVR6T CQ Project: EATSGTR, chassis FAB
Posted: Sat Aug 10, 2013 1:53 pm
by glibobbo21
Ooh and... *pleasant and encouraging remark*
Re: 24vVR6T CQ Project: EATSGTR, chassis FAB
Posted: Sat Aug 10, 2013 1:55 pm
by my2000apb
UPDATE!!
Well obviously, the :while you’re in there” has taken its stronghold. A lot of my subframe work motivation/lack of satisfaction with oem/modded, has come from two GREAT build threads over on
http://www.s2forum.com
Terrybullwon’s S2 Racing coupe
http://www.s2forum.com/forum/showthread.php?t=50050
And
G60Rallye’s SWB Qualltro project
http://www.s2forum.com/forum/showthread.php?t=26537
Both very good reads. Terrybullwon has some very nice tubular c-arms and offset/correcting kingpins for control arm angle. He has since developed a tubular subframe, while utilizing oem pickup points. Here are some renderings
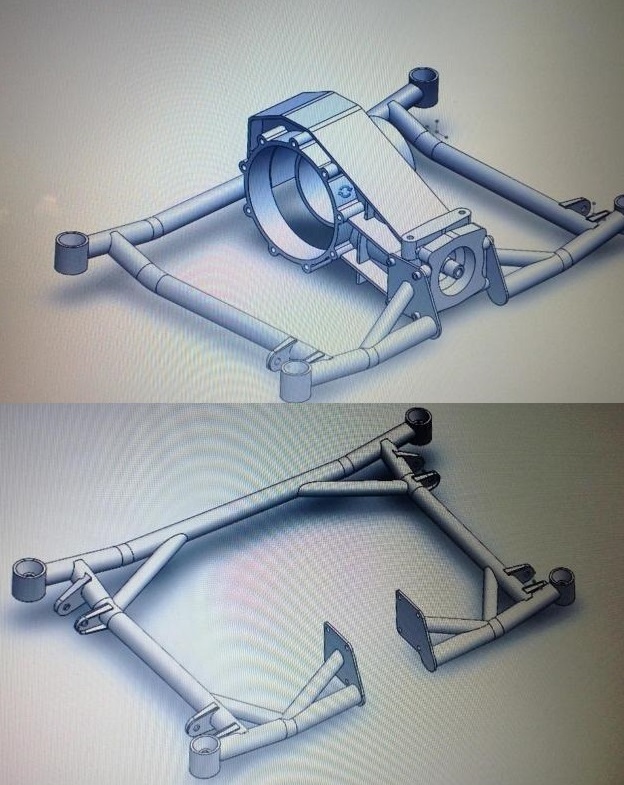
- terrybullwon SF renderings.jpg (154.92 KiB) Viewed 39316 times
G60Rallye, has a very nice relocated rear tie rod setup. They are longer, mounted much further inboard, and are adjustable pickups.
Heres a few pics
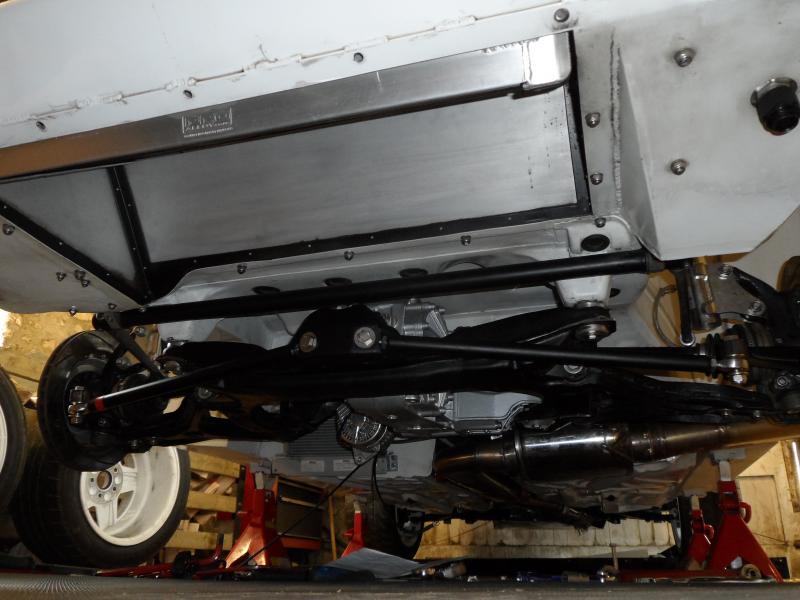
- SAM_0947_zps0e166ee9.jpg (60.05 KiB) Viewed 39316 times
- SAM_0954_zps17085aaa.jpg (51.94 KiB) Viewed 39316 times
- SAM_0952_zps5549da34.jpg (57.28 KiB) Viewed 39316 times
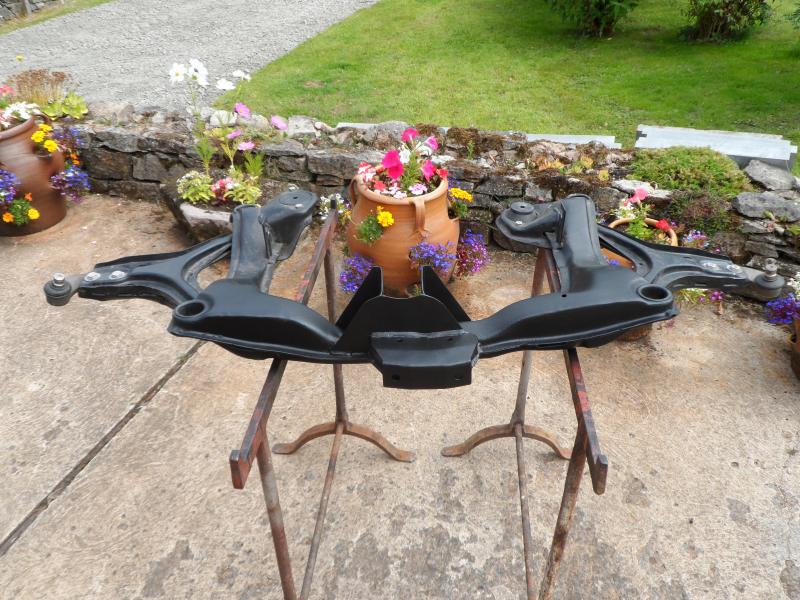
- SAM_0937_zps55a65d25.jpg (104.88 KiB) Viewed 39316 times
Re: 24vVR6T CQ Project: EATSGTR, chassis FAB
Posted: Sat Aug 10, 2013 2:05 pm
by my2000apb
MORE!
With inspiration from these, I wanted to combine all of these great ideas.
Custom subframes will include
-control arm pickup points raised and relocated inboard
-tubular c-arms with adjustable height kingpin to knuckle spherical bearing, 4340 and heated treated for strength
-inners - ¾” rod ends with grease fittings, Seals-It seals and custom 7075-t651 alu. spacers
-outers, FK bearing 1 5/8” spherical bearings with 4130 weld cups and high misalignment spacers w /height adjsutability
-rear tie rods located inboard, longer and height adjustable
-better exhaust clearance
-endless options for sway bar mounting
-give me more room and better mounting options for a rear diff fluid pump and cooler
-debating running a c-arm/trailing arm setup as well
And well, that’s enough benefits to necessitate making custom stuff.
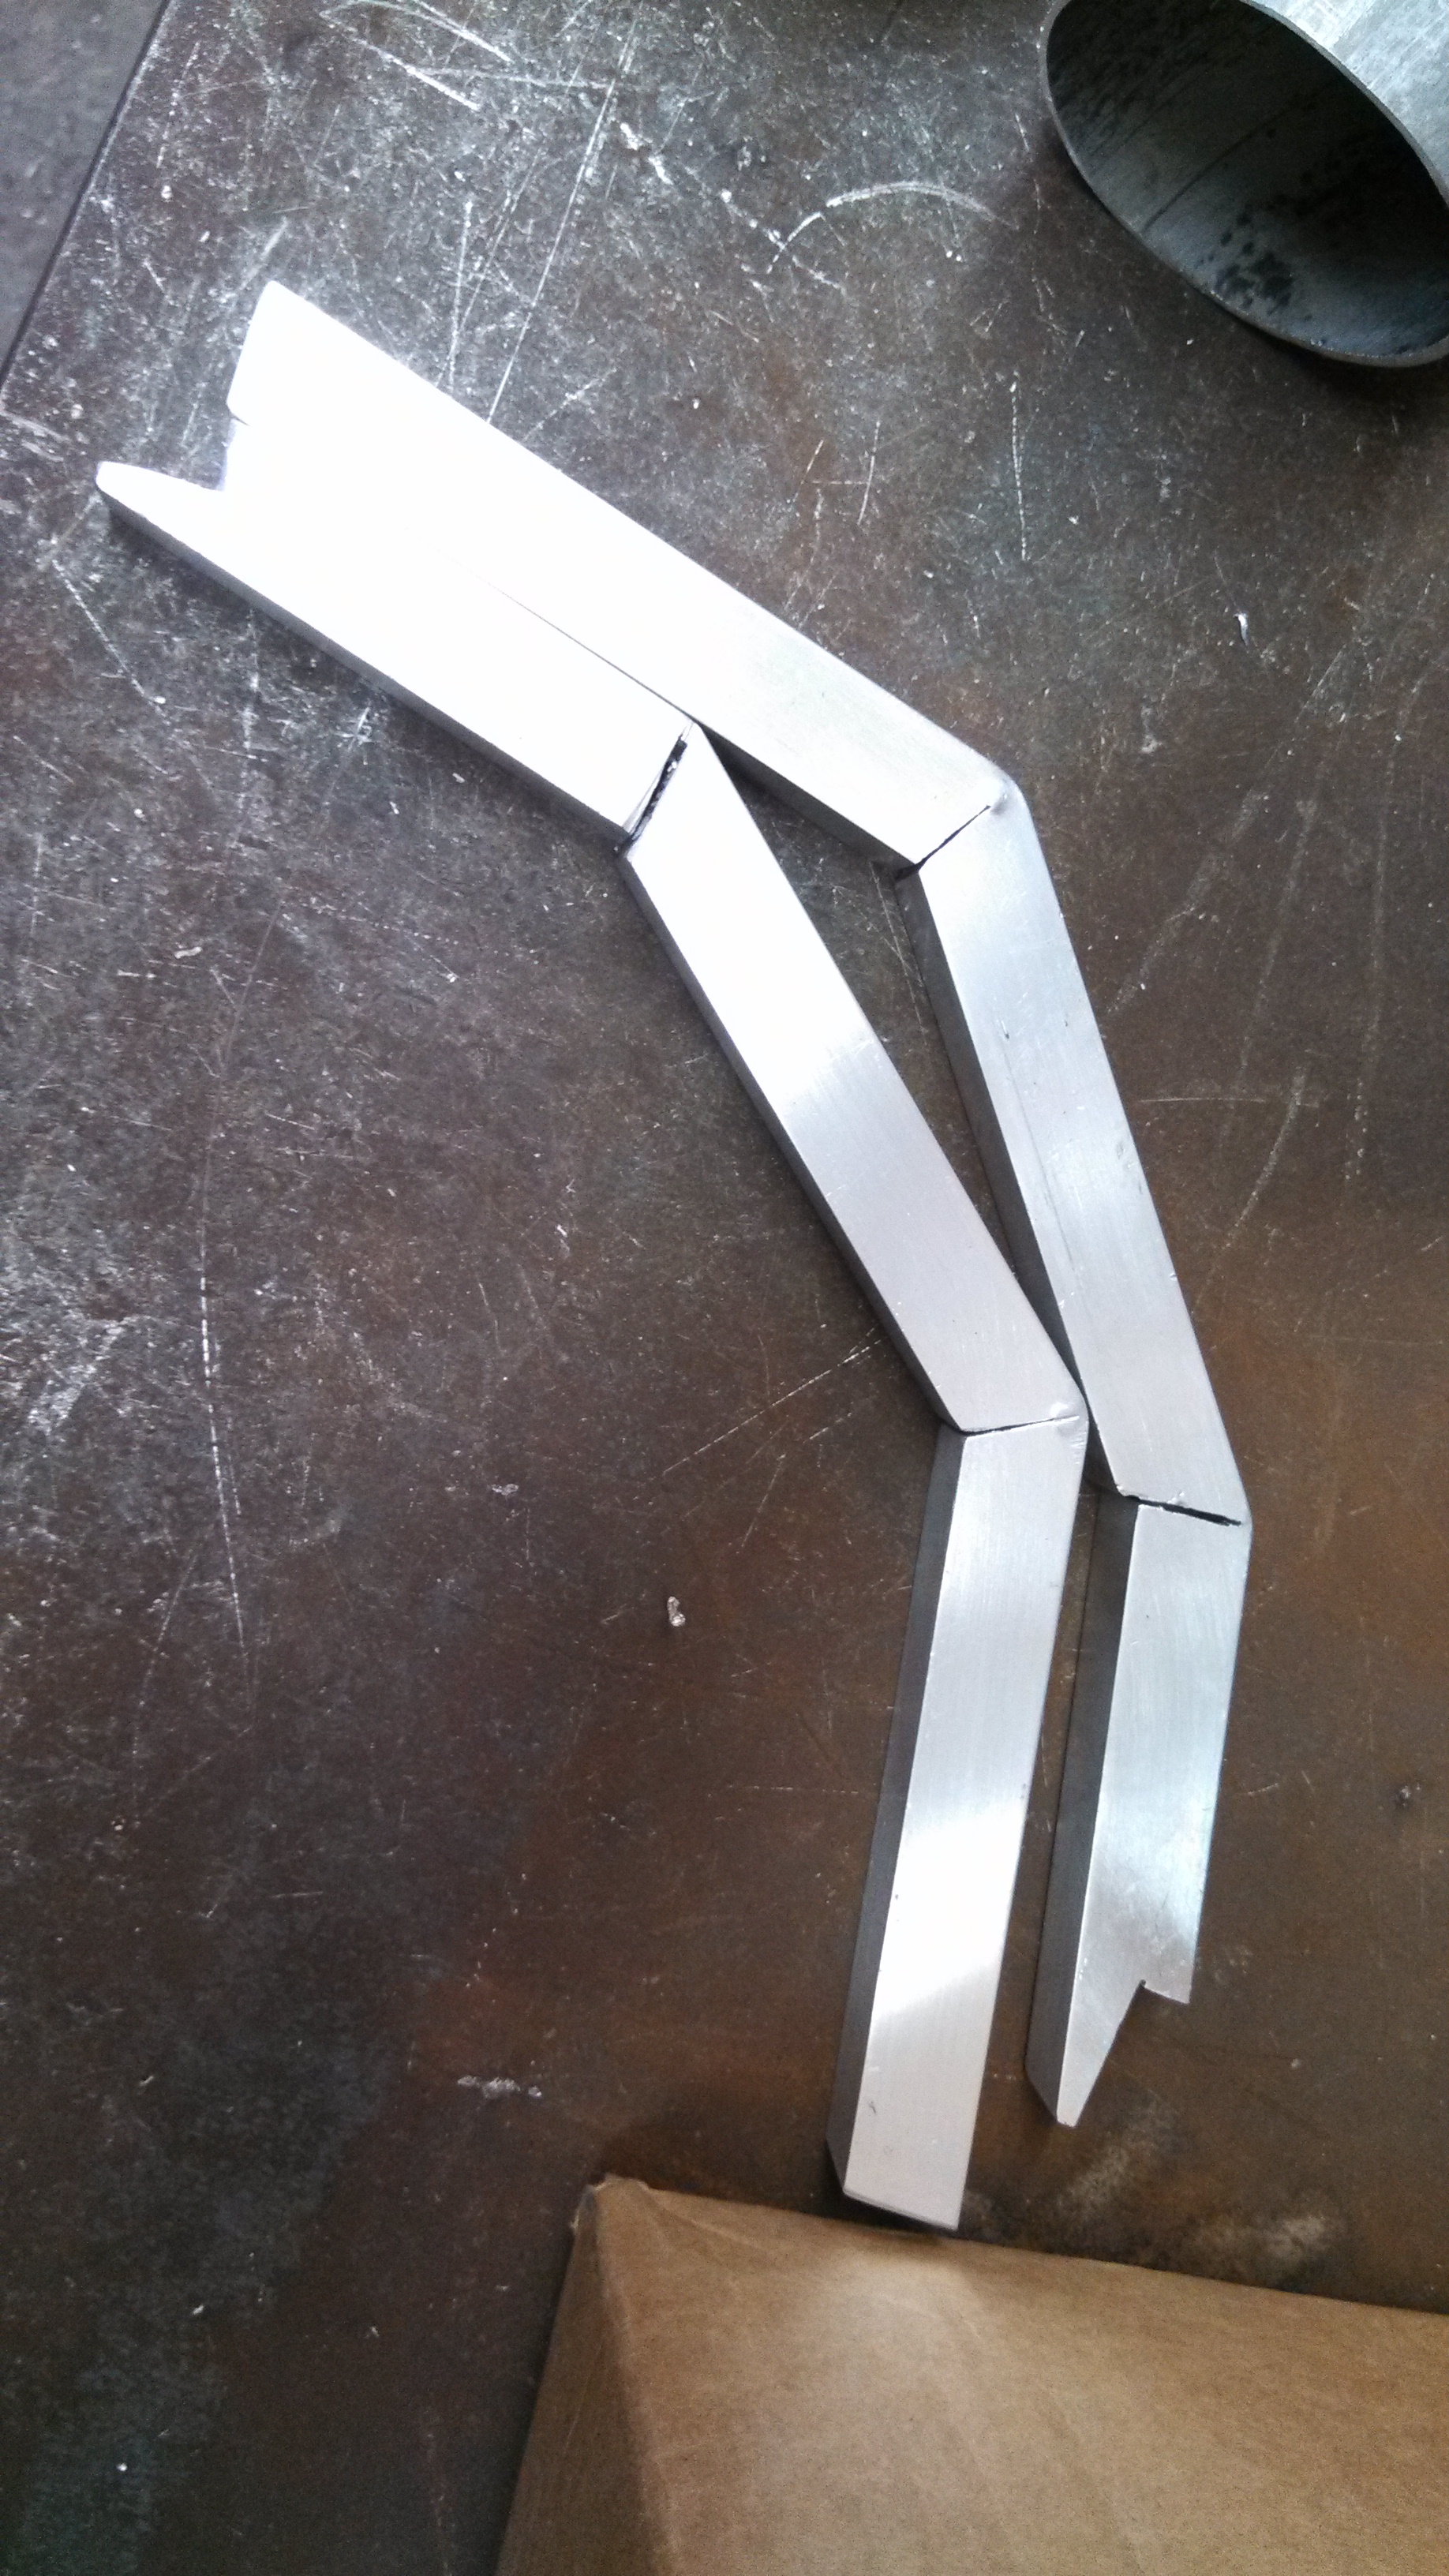
So I sat down and starting drawing up some spacers. I had my buddy the machinist whip up a test pair to check fitment. The spacers were designed to fit perfectly with ¾” head width, ¾” bore rod ends, and Seals-It seals, in factory subframe/c-arm mounts. Using ½”-20 bolts and nylocks. So some enlarging of stock subframe bolt holes would be required. So I can use the same design to make c-arms for stock subframe applications
Here are some pics of the spacers in test fit mode.
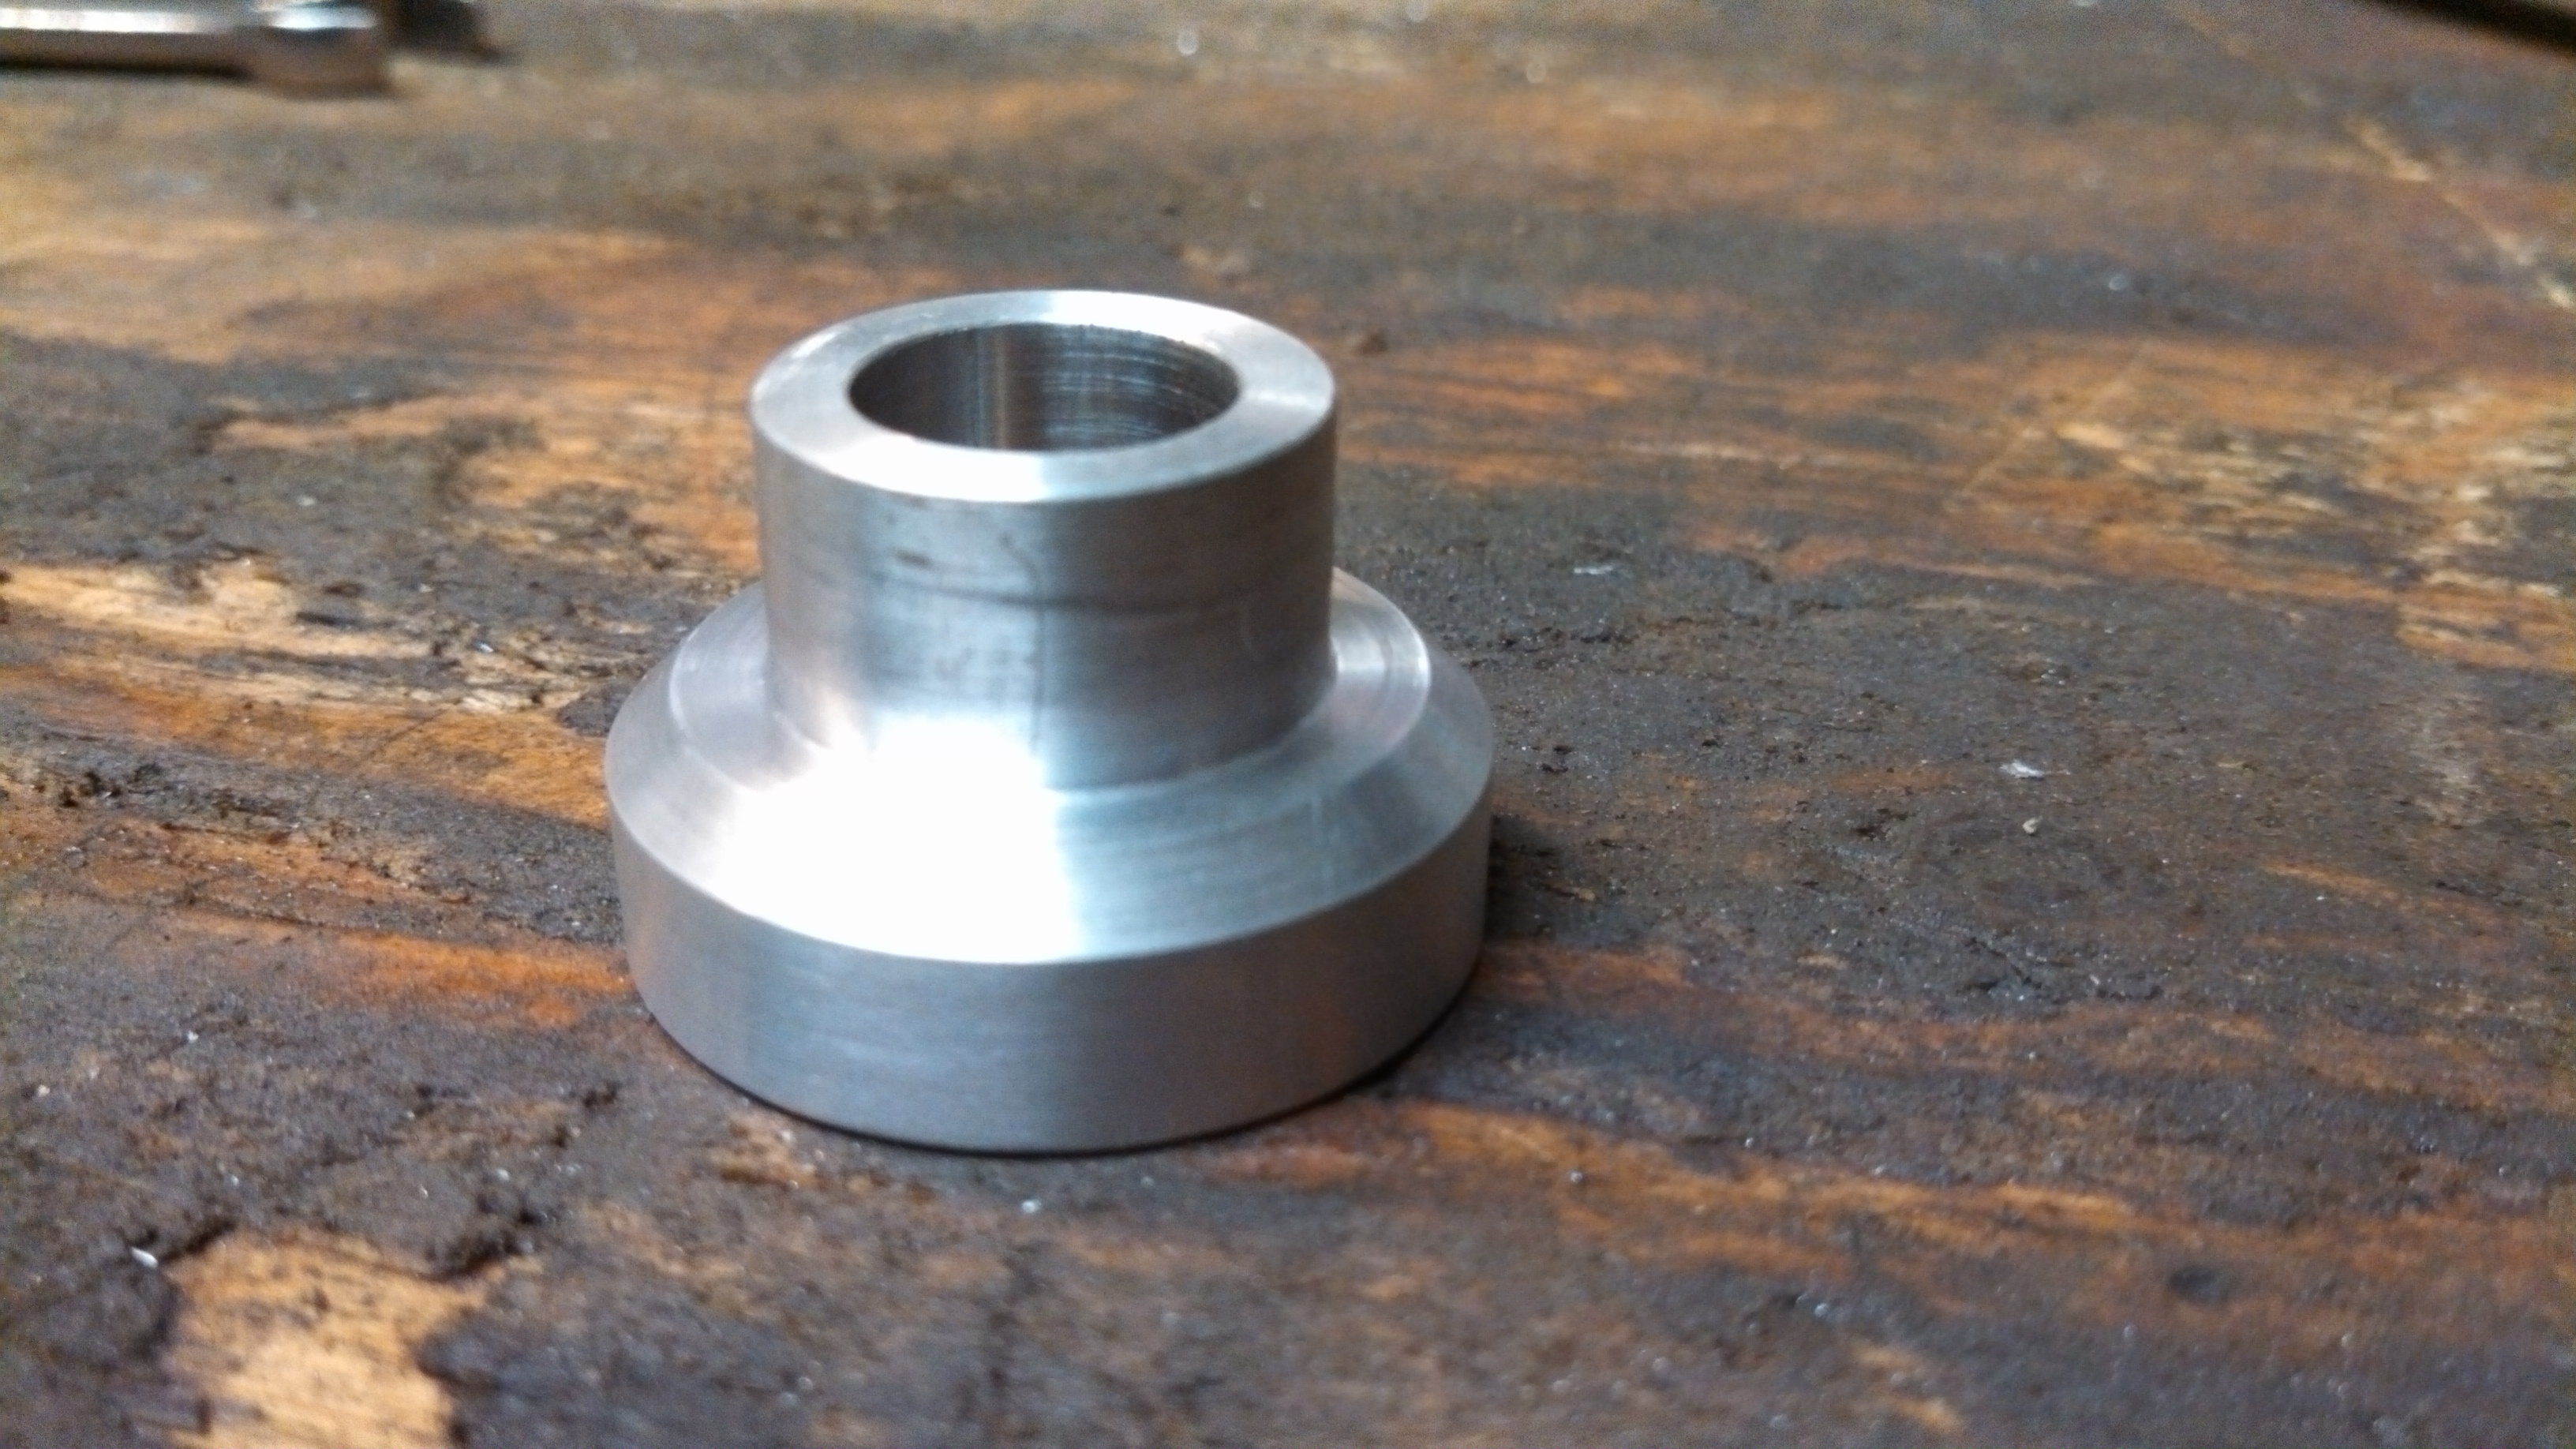
- c-arm rod end spacer.jpg (1.61 MiB) Viewed 39316 times
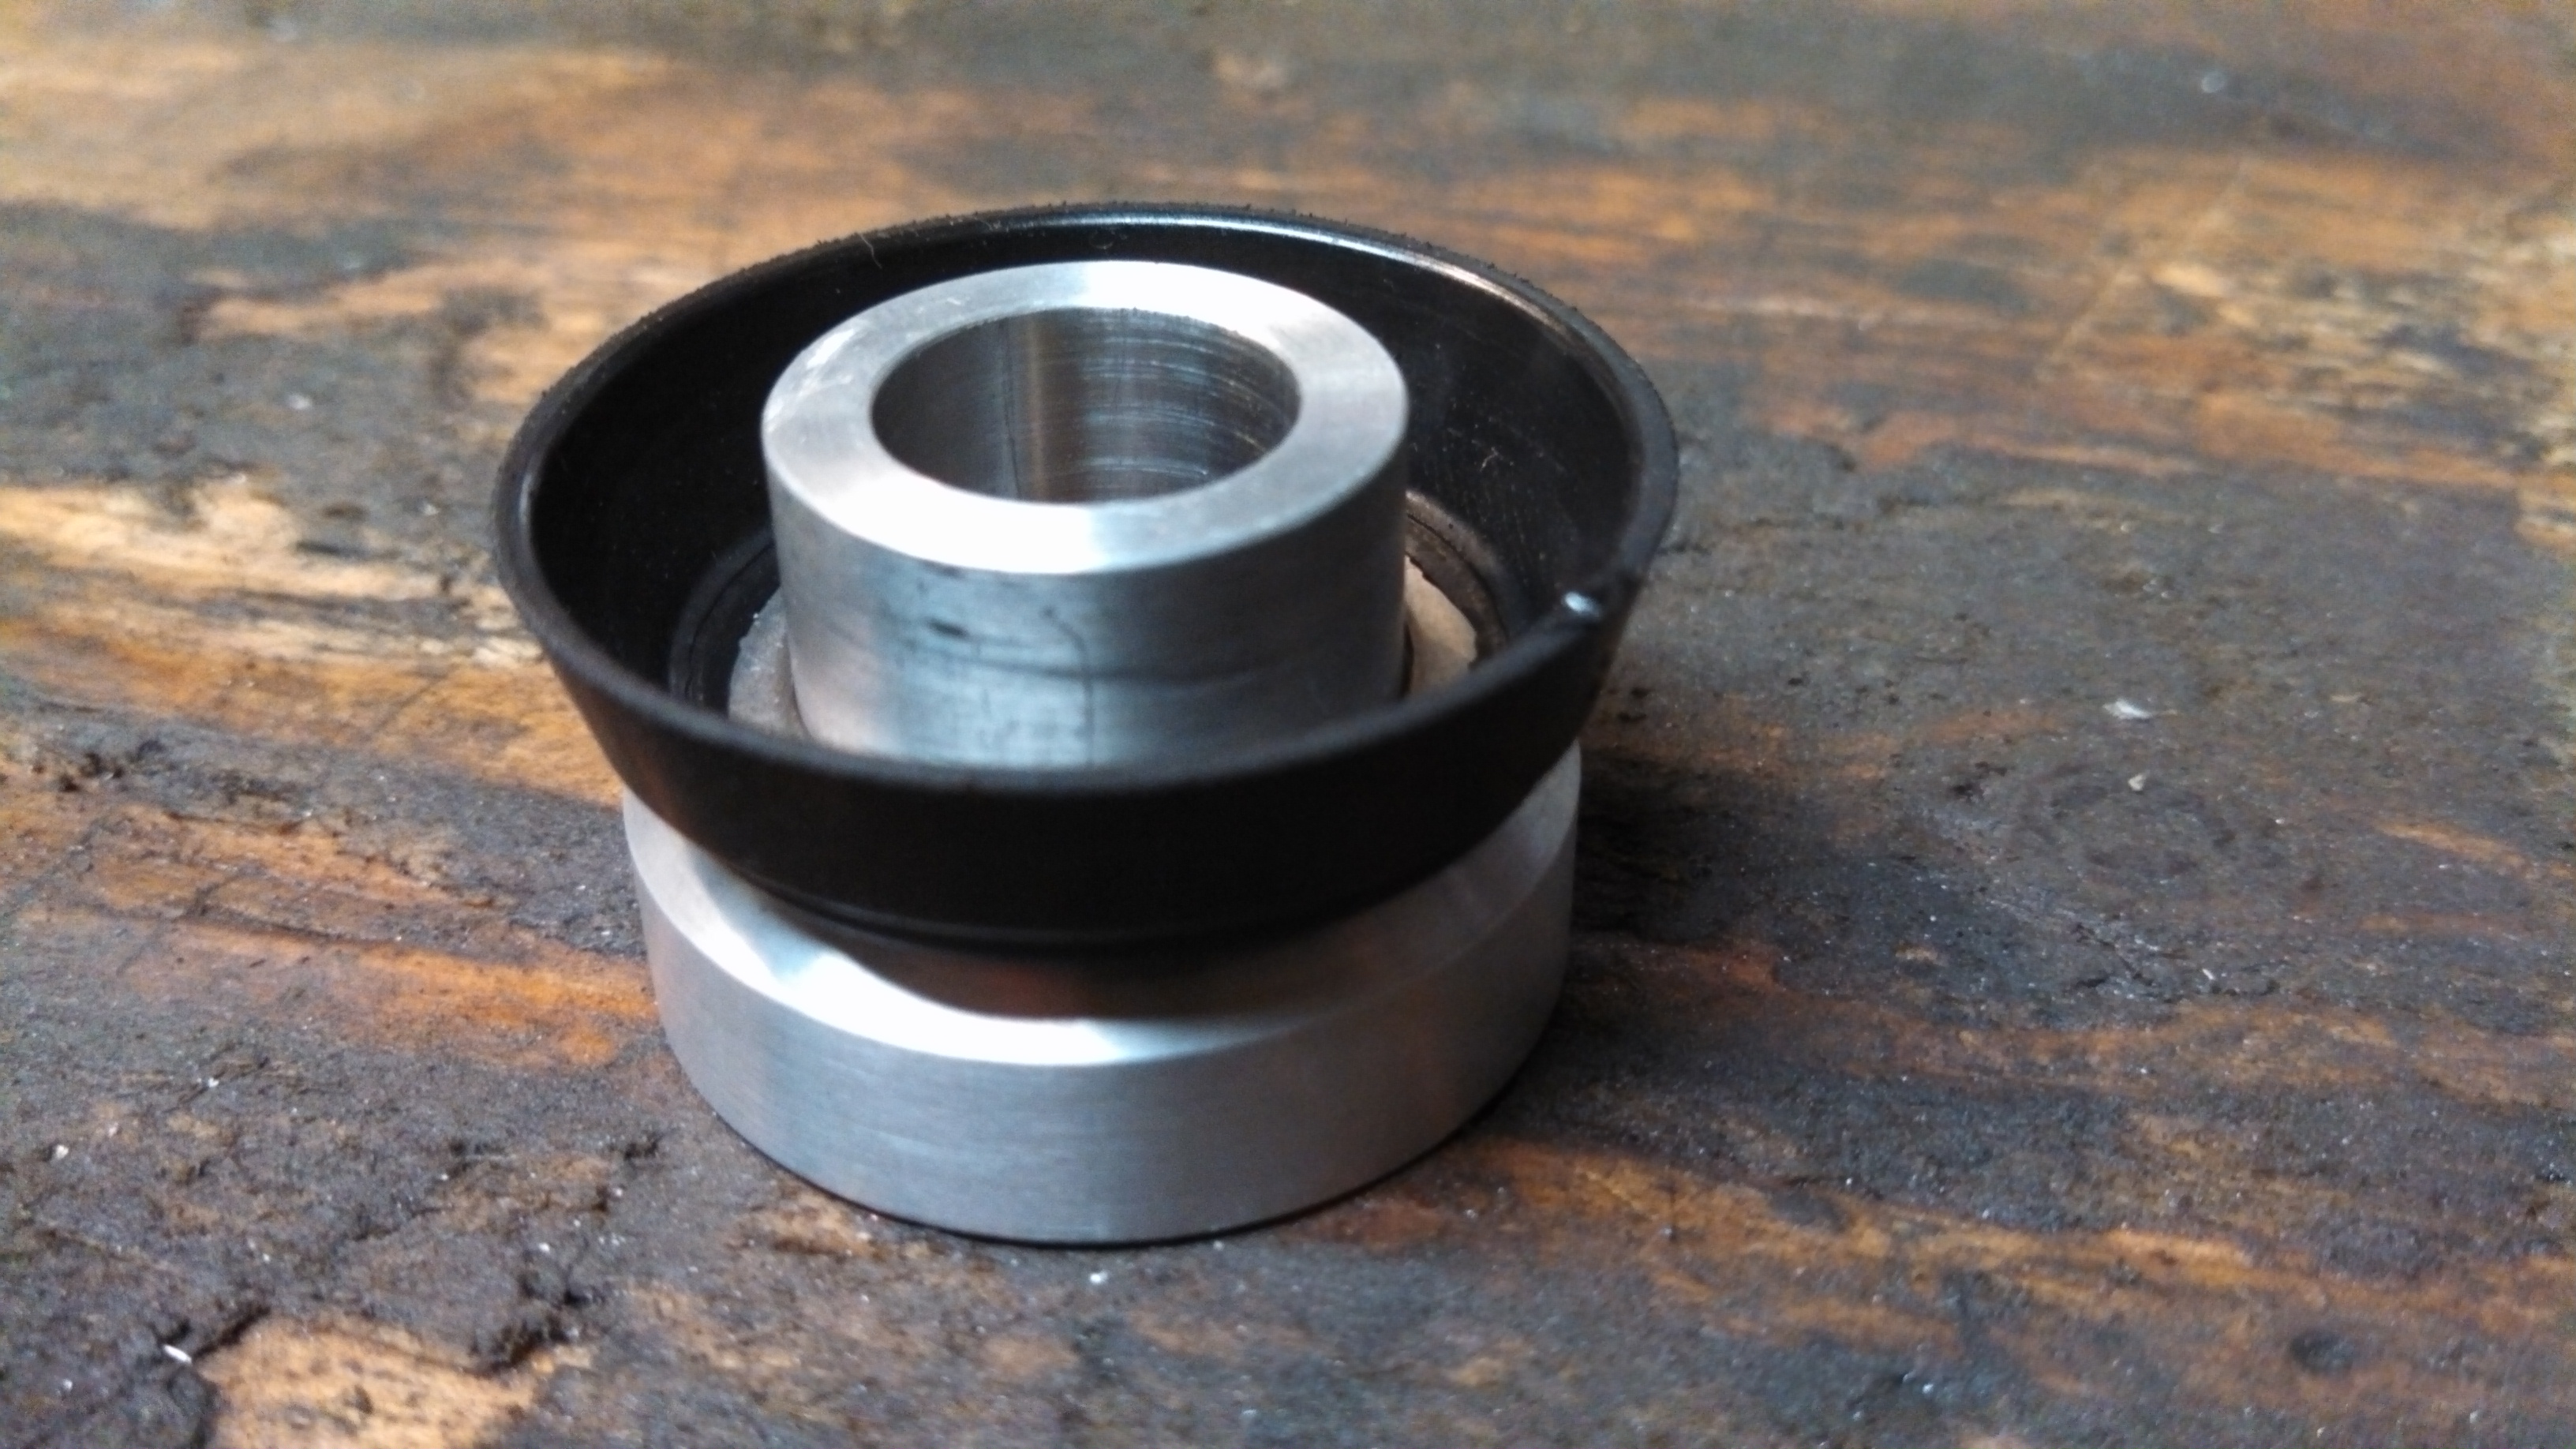
- c-arm rod end spacer with seal.jpg (1.45 MiB) Viewed 39316 times
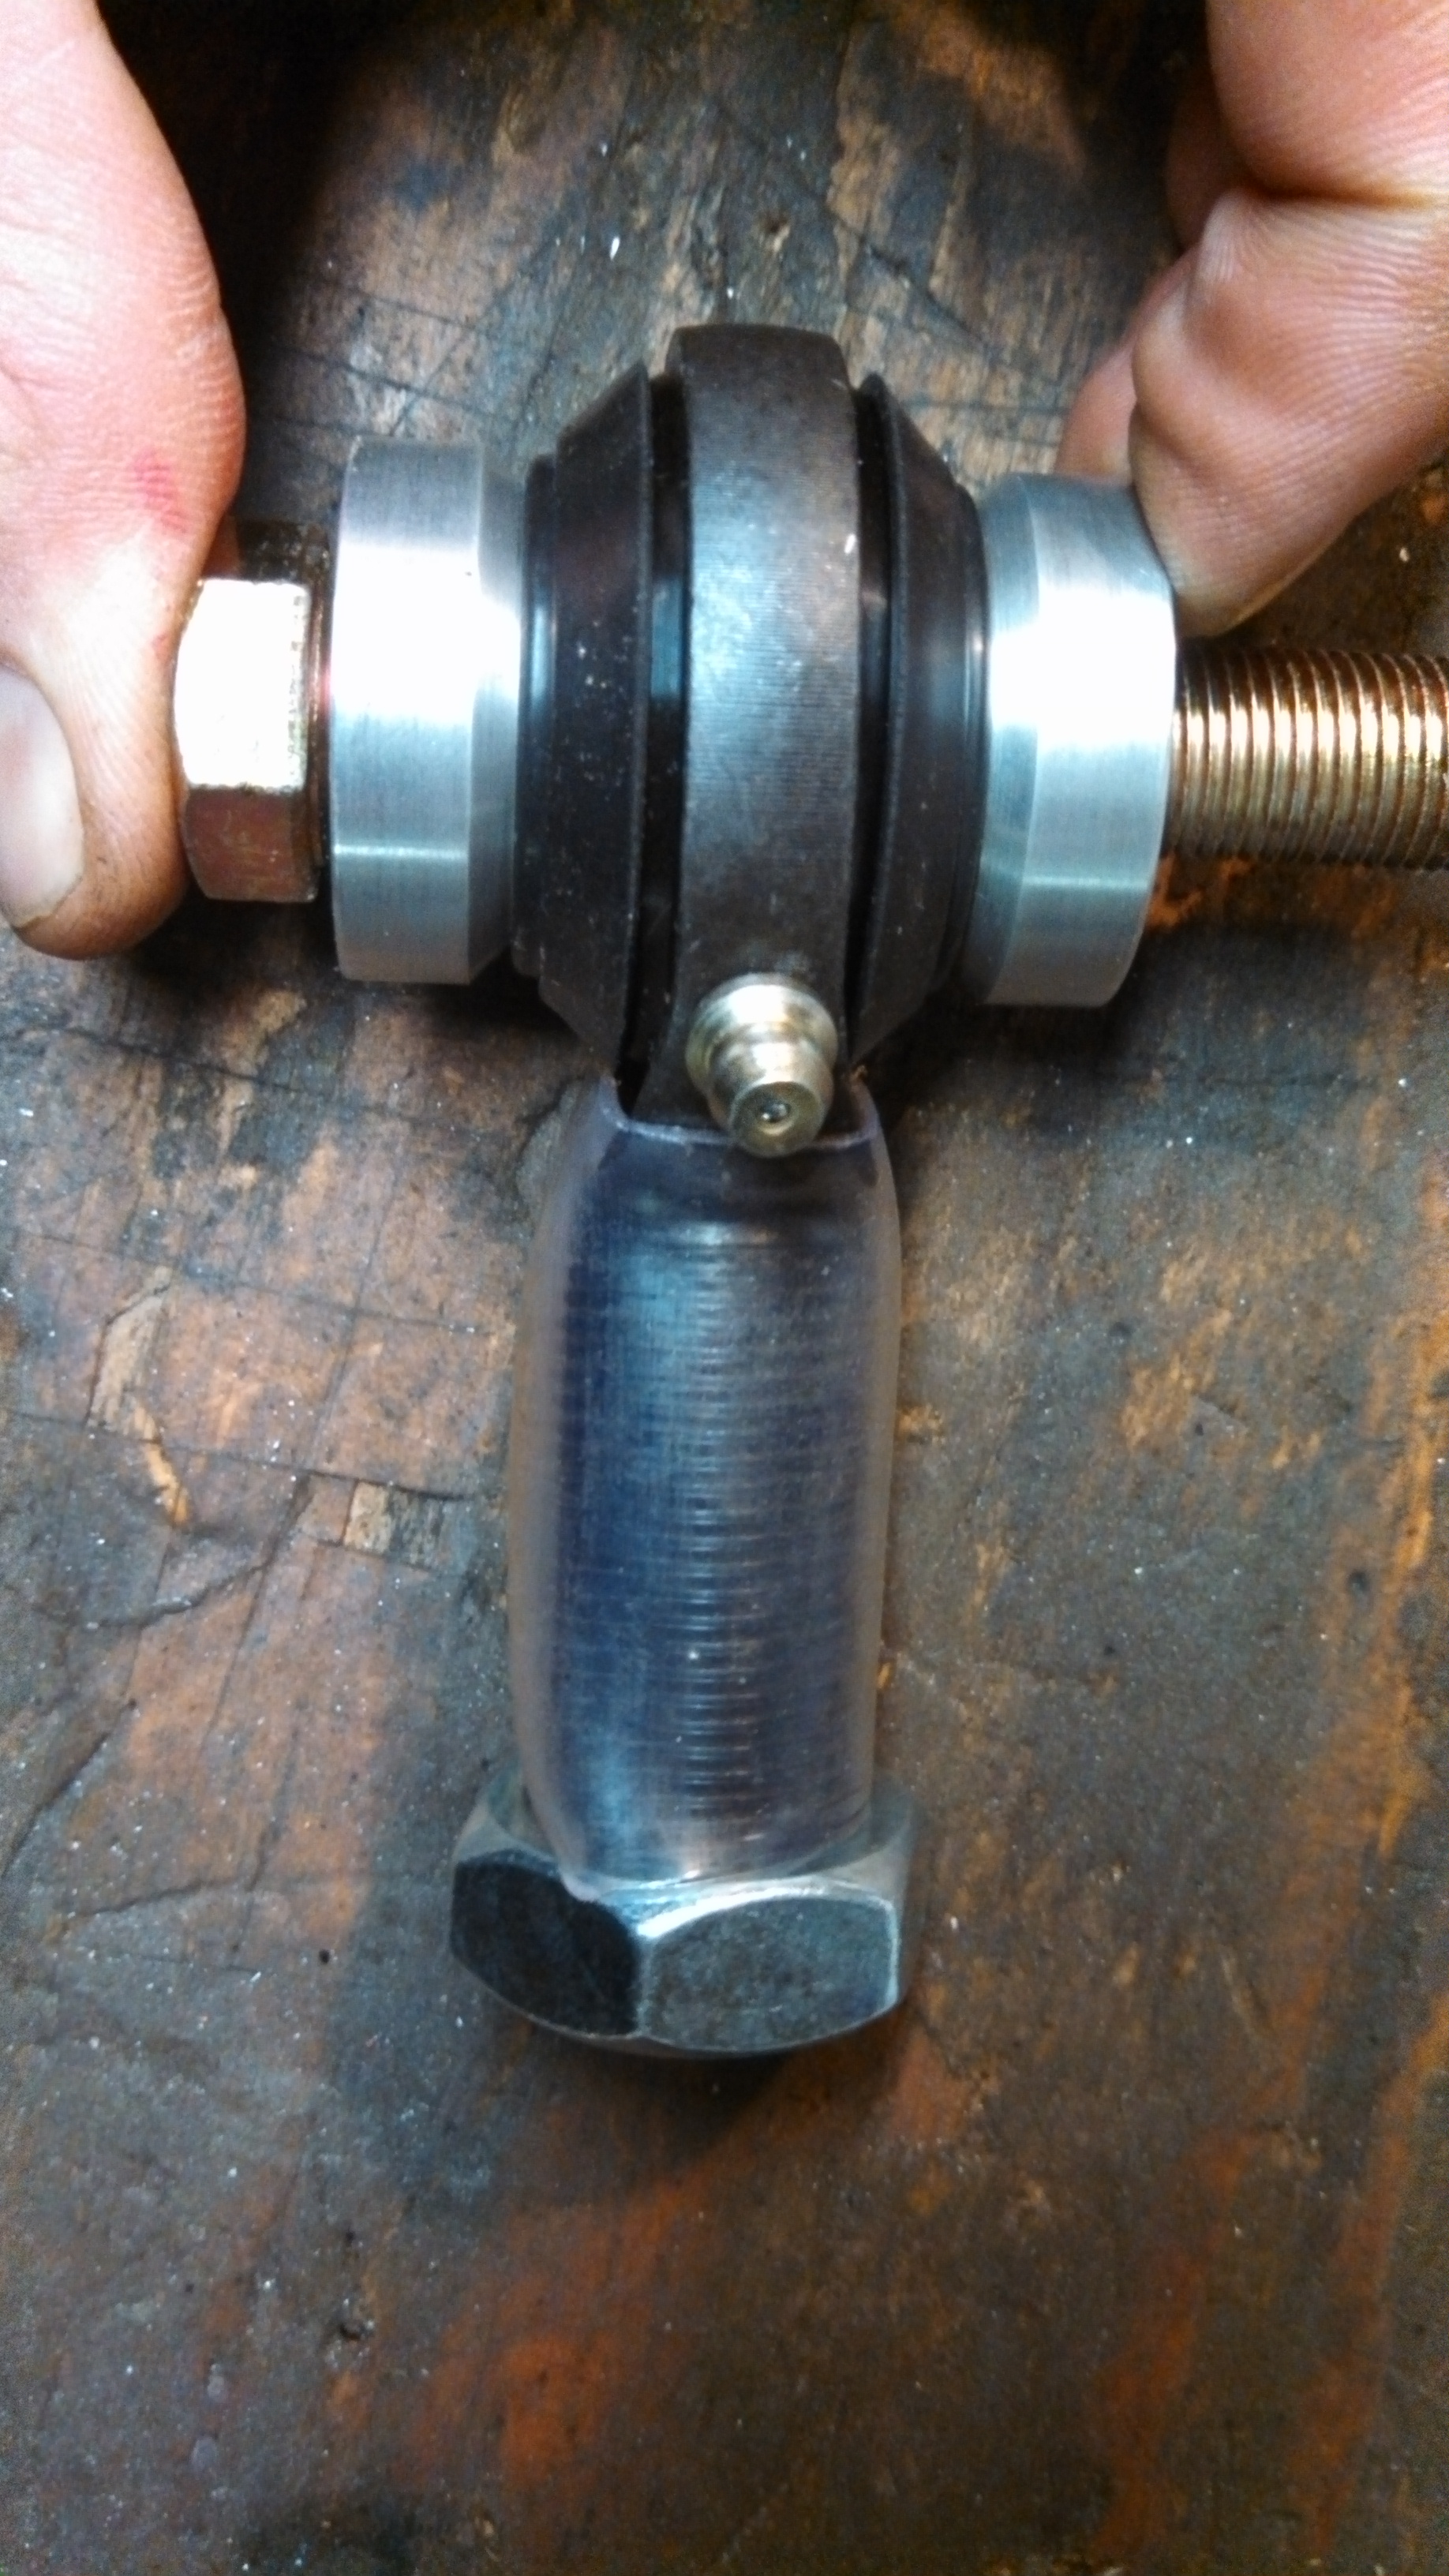
- c-arm rod end with spacers and seals.jpg (1.48 MiB) Viewed 39316 times
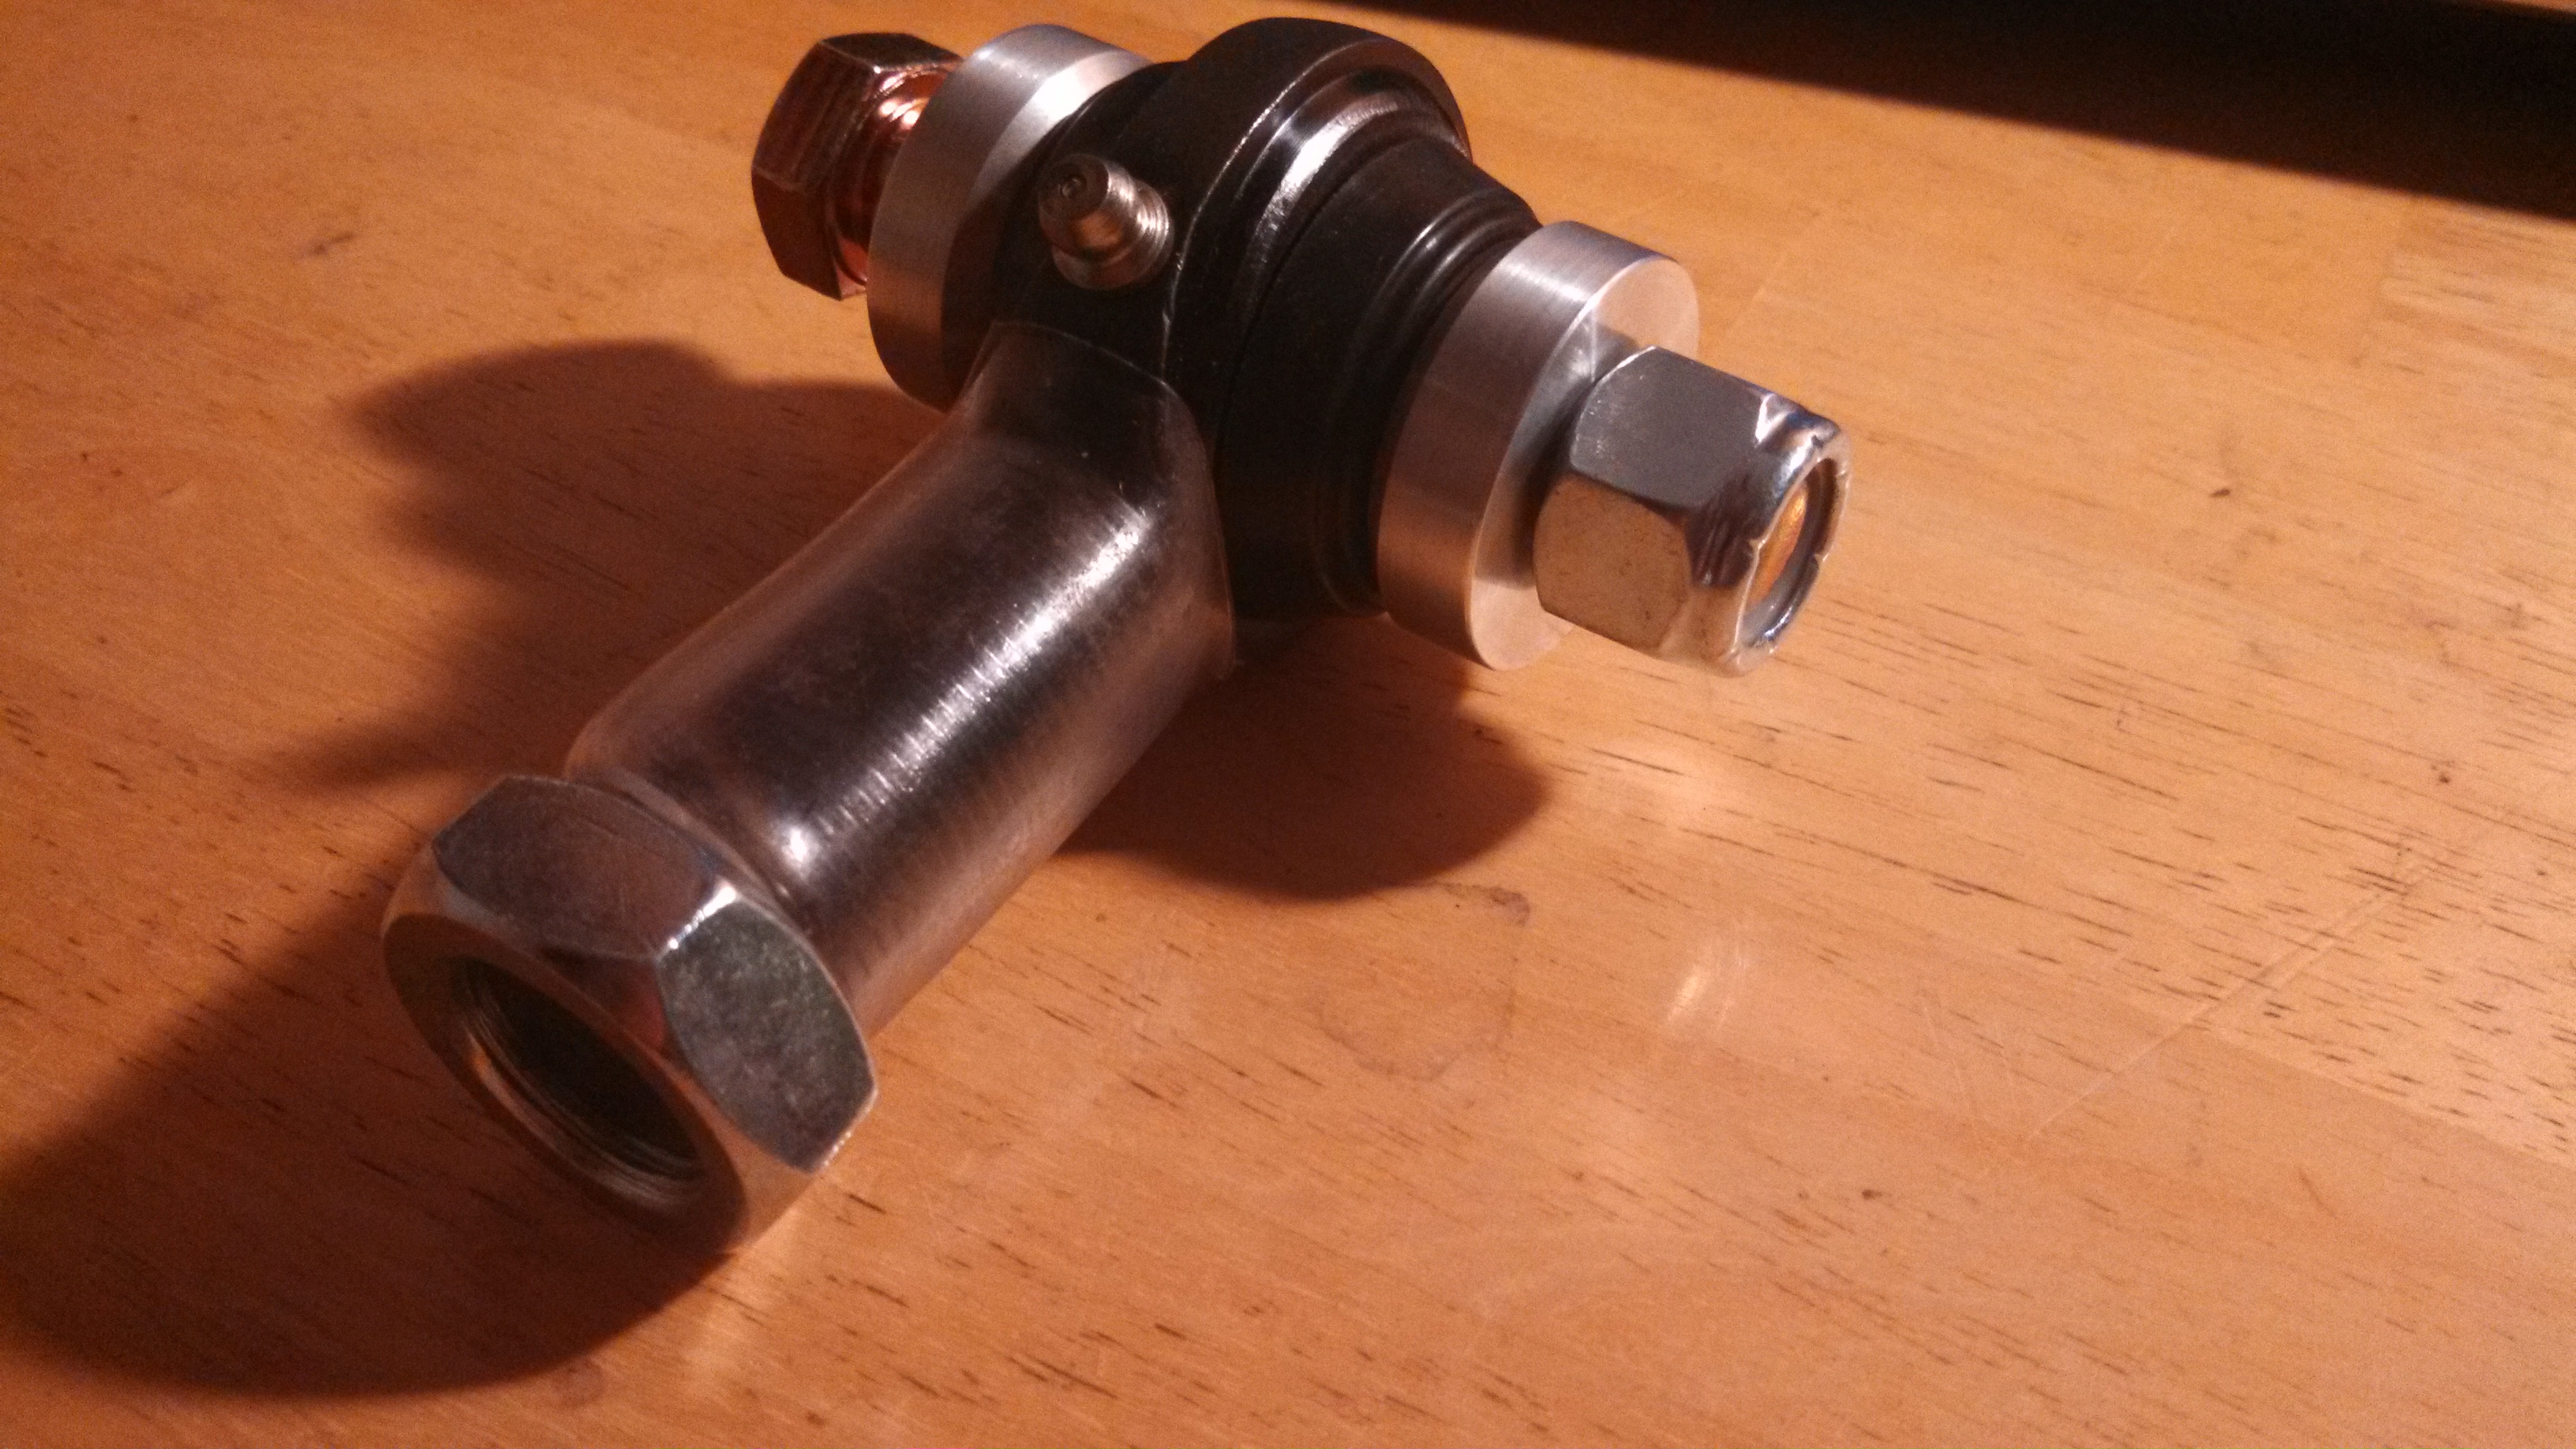
- c-arm rod end with spacers and seals2.jpg (1.87 MiB) Viewed 39316 times
Re: 24vVR6T CQ Project: EATSGTR, chassis FAB
Posted: Sat Aug 10, 2013 2:20 pm
by my2000apb
MORE!!
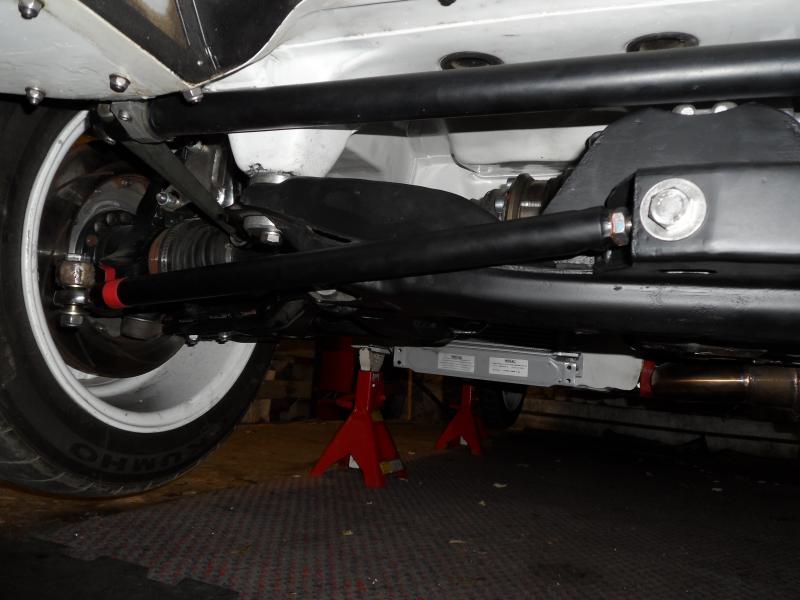
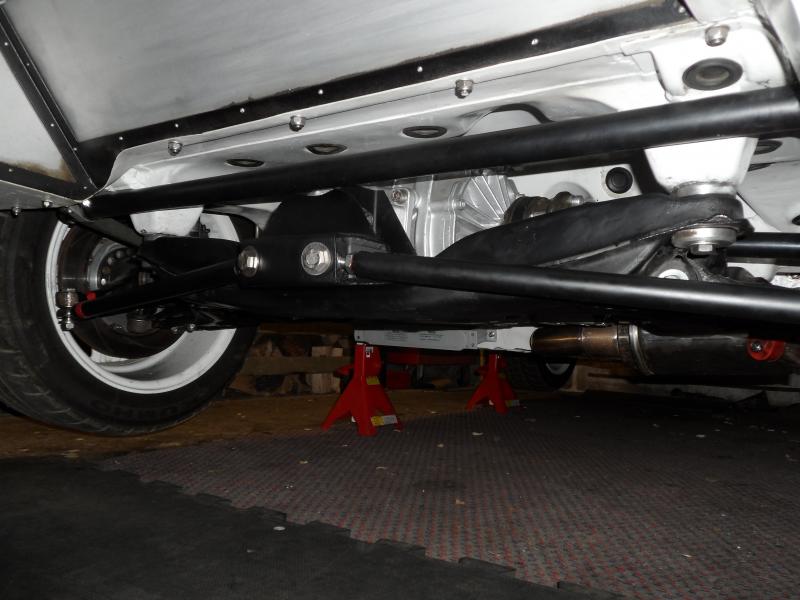
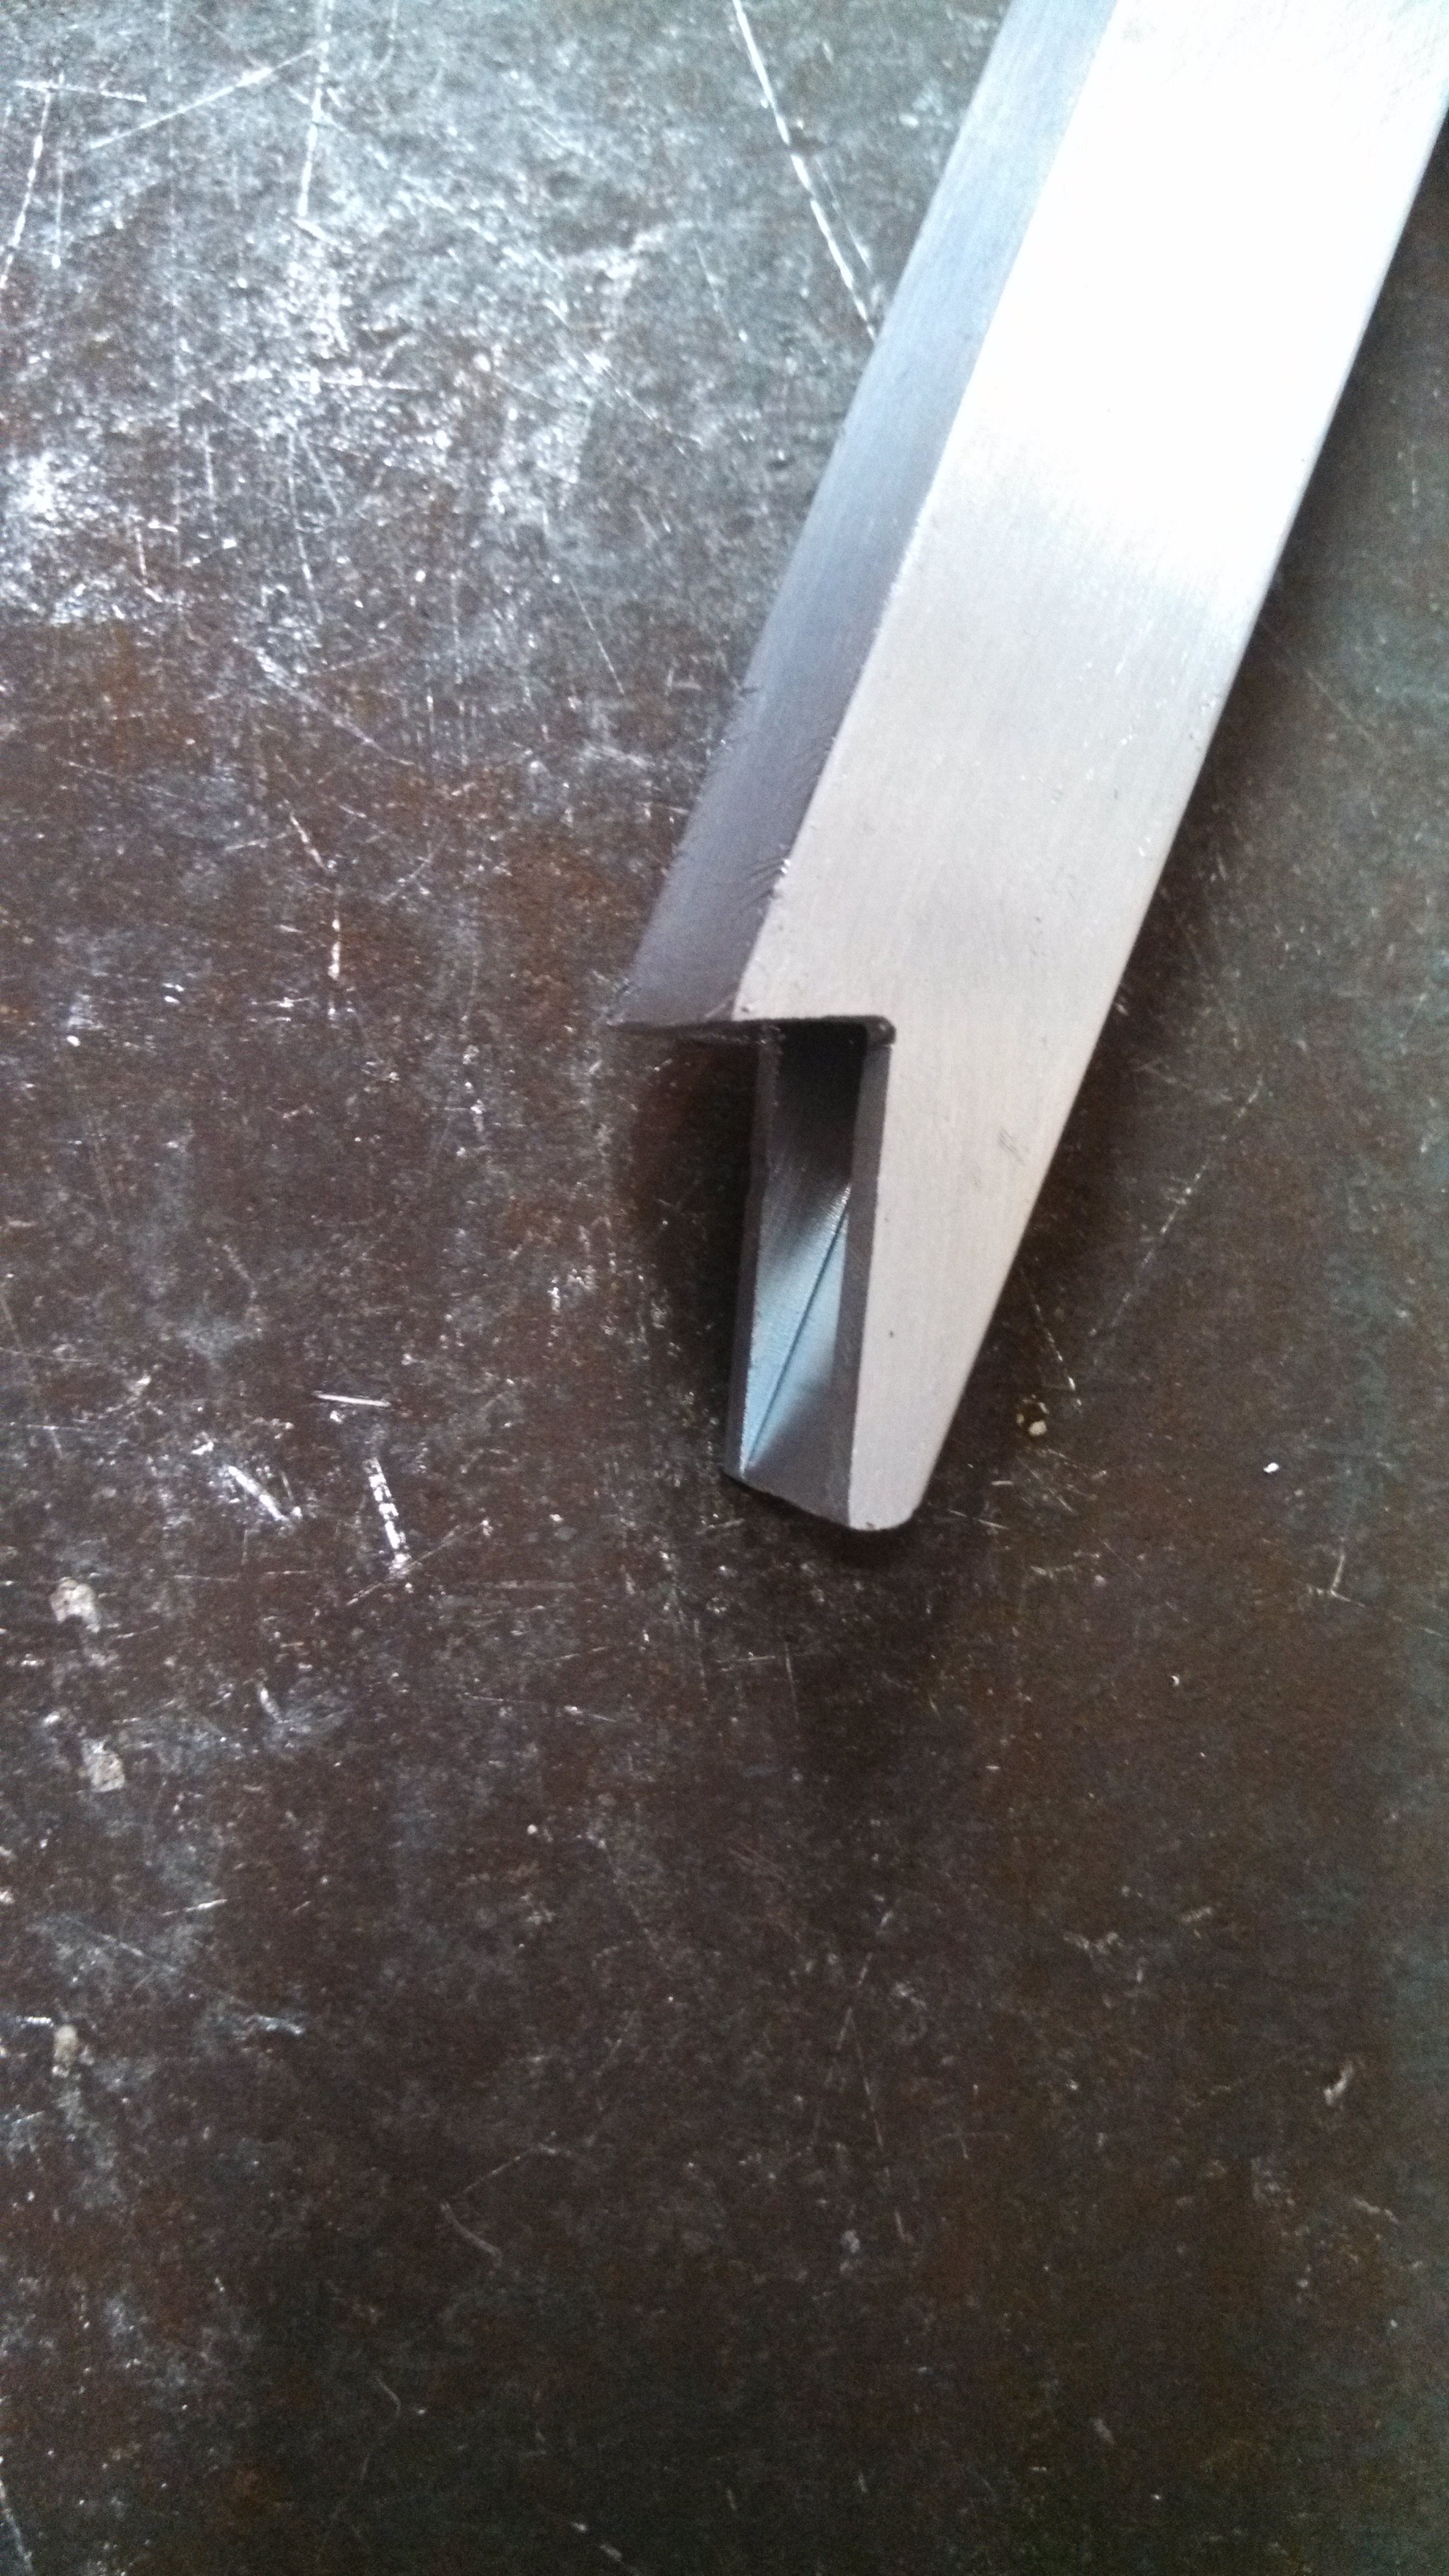
With the rod end/spacer/seal setup all sorted it was time to move on to mounting them onto the subframe. The longitudinal members of the front and rear subframes are 1.75” DOM 0.095”wall. the mounts are cut from 1.5” square, 0.120” wall. Bolt holes are ½” for the ½”-20 bolts.
Ideally the c-arm mounts would be facing directly out towards the hub,to put them in compression, but packaging constraints in the front prevent me from doing this. The front is quite different than the rear as far as mounting the c-arms to the subframe. In the back, the rear diff output flange is located much more centrally between the subframe to chassis mounts.
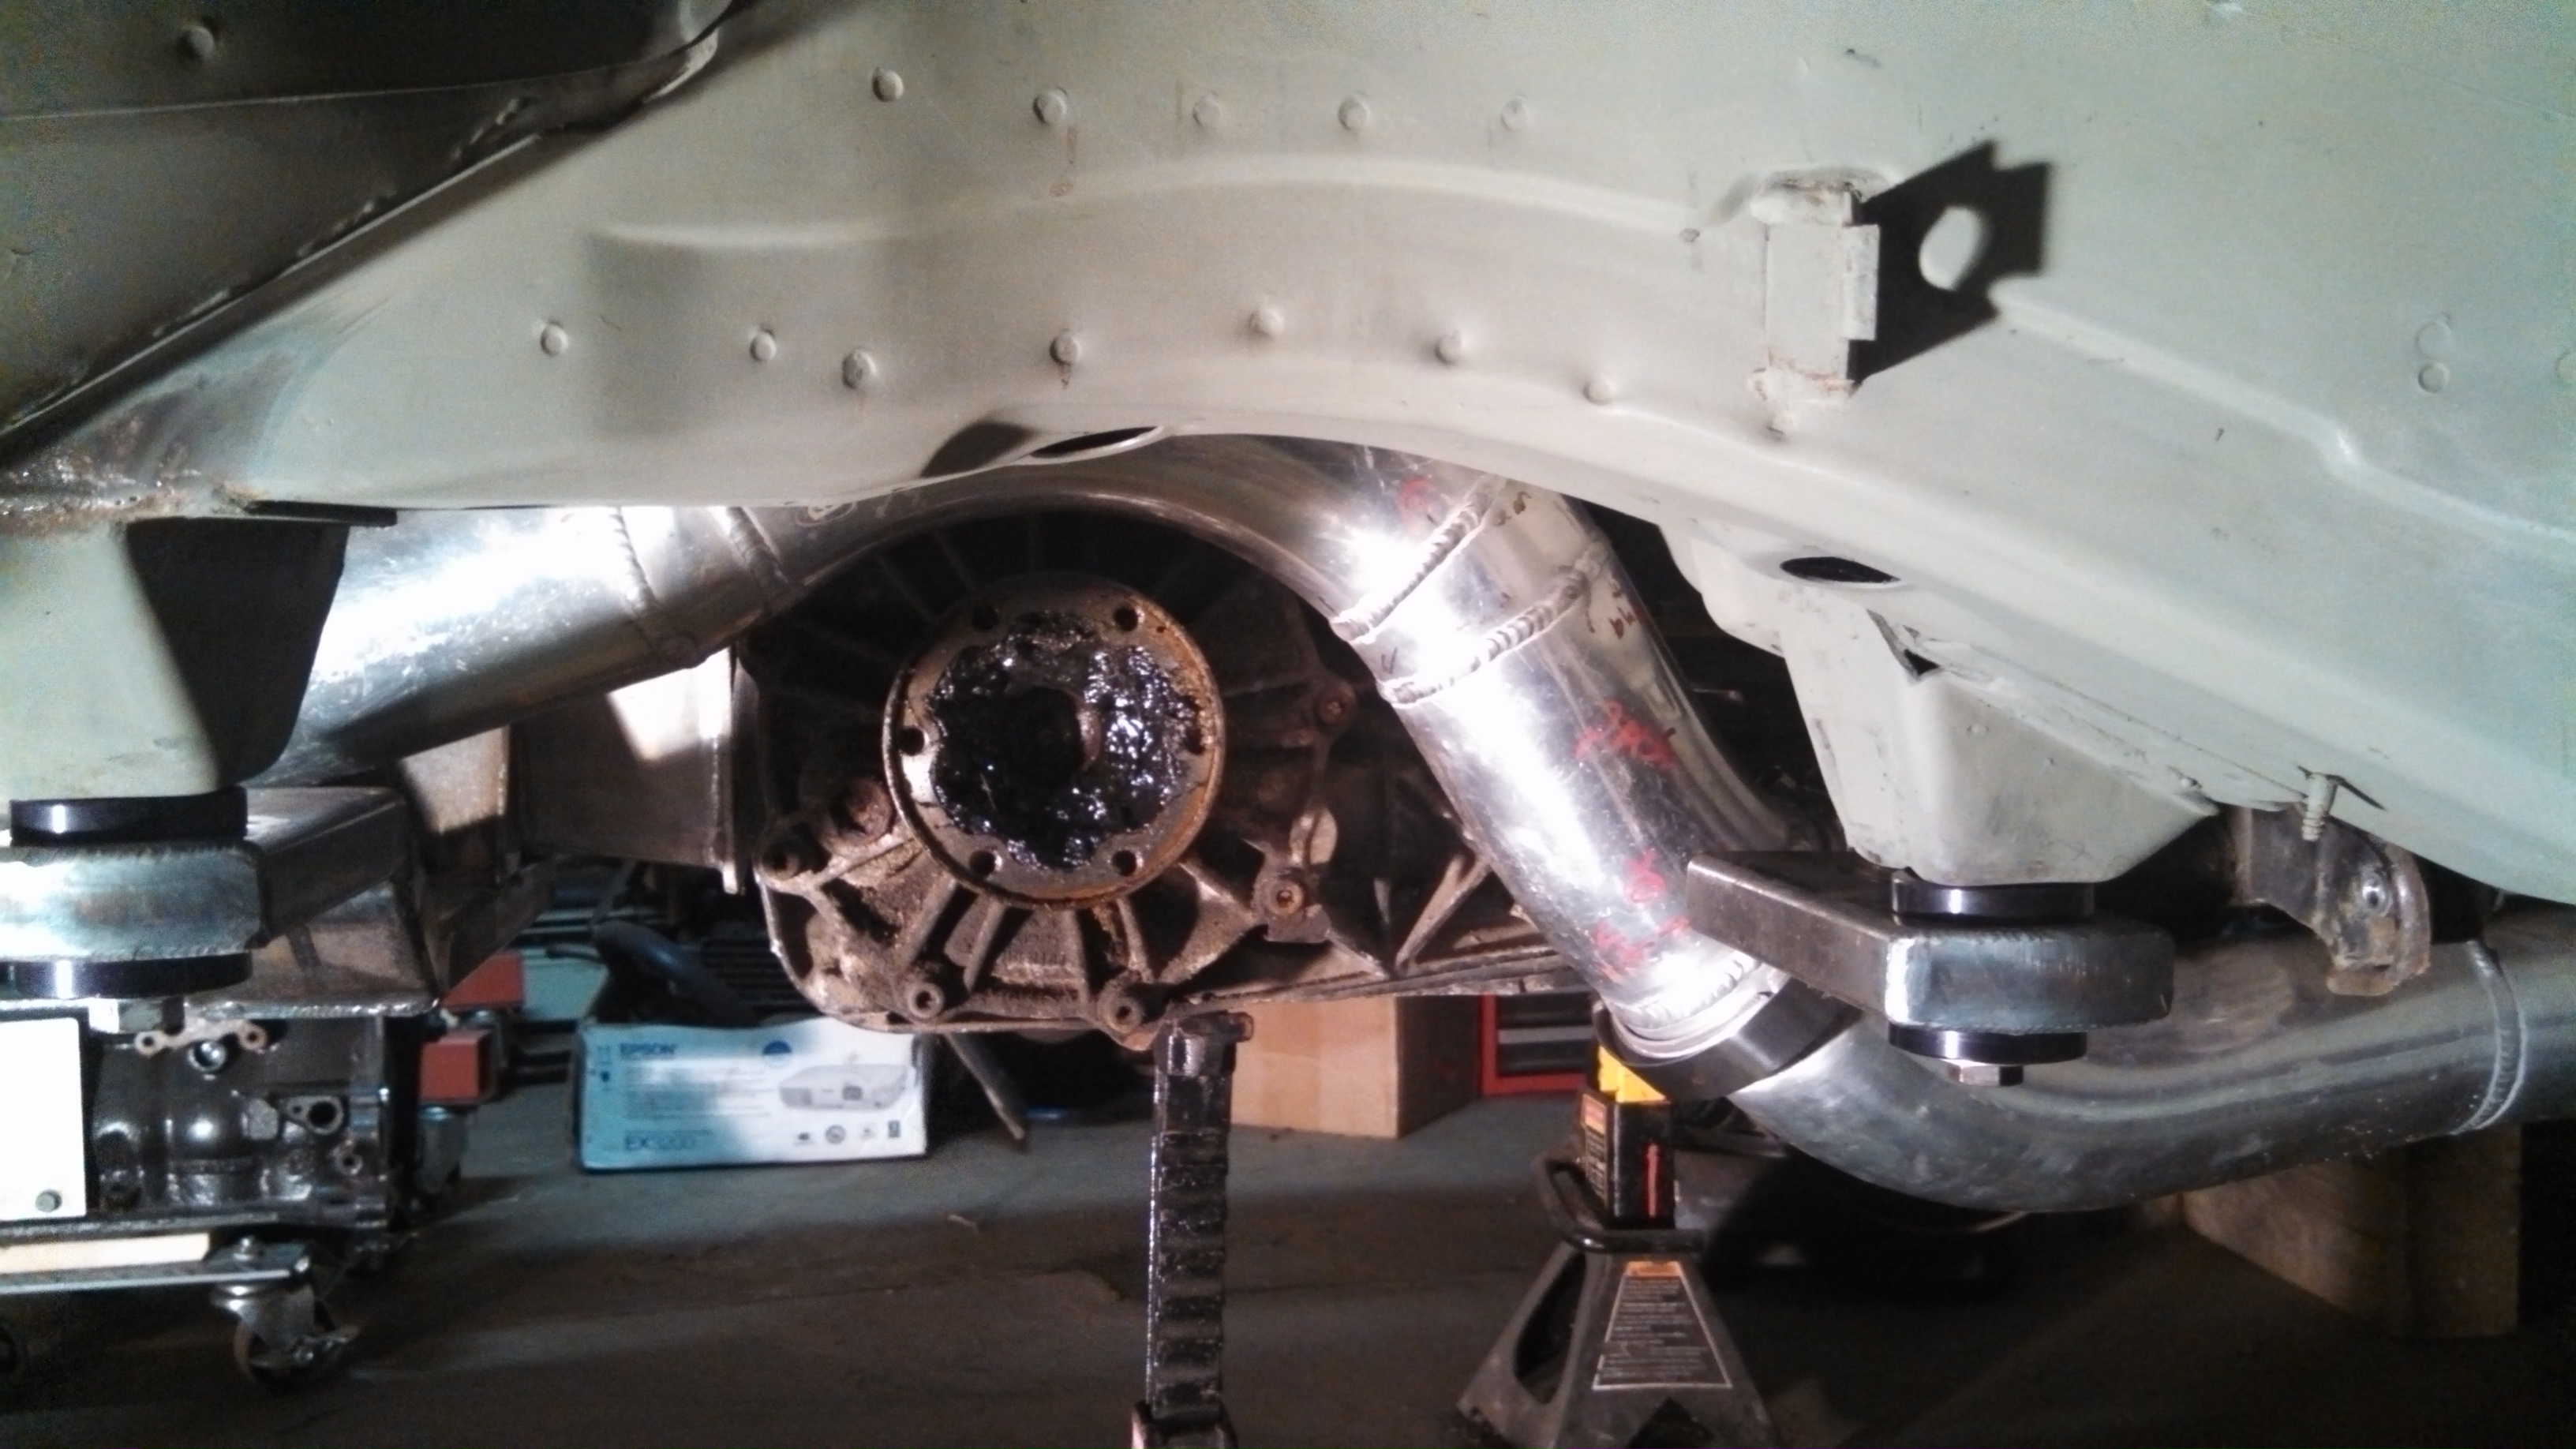
- rear pass side c-arm mounting.jpg (1.35 MiB) Viewed 39316 times
In the front the trans output flange is located lower and much more rearward as the motor and trans have been pushed down and back. In the front atleast ill mount the tabs vertically so I will still have proper axle shaft clearances. In the back I may be able to put the mounts in compression as the flange/cv clearances will be much easier to deal with.
And here we have a good c-arm mount, now to make a bunch more ha
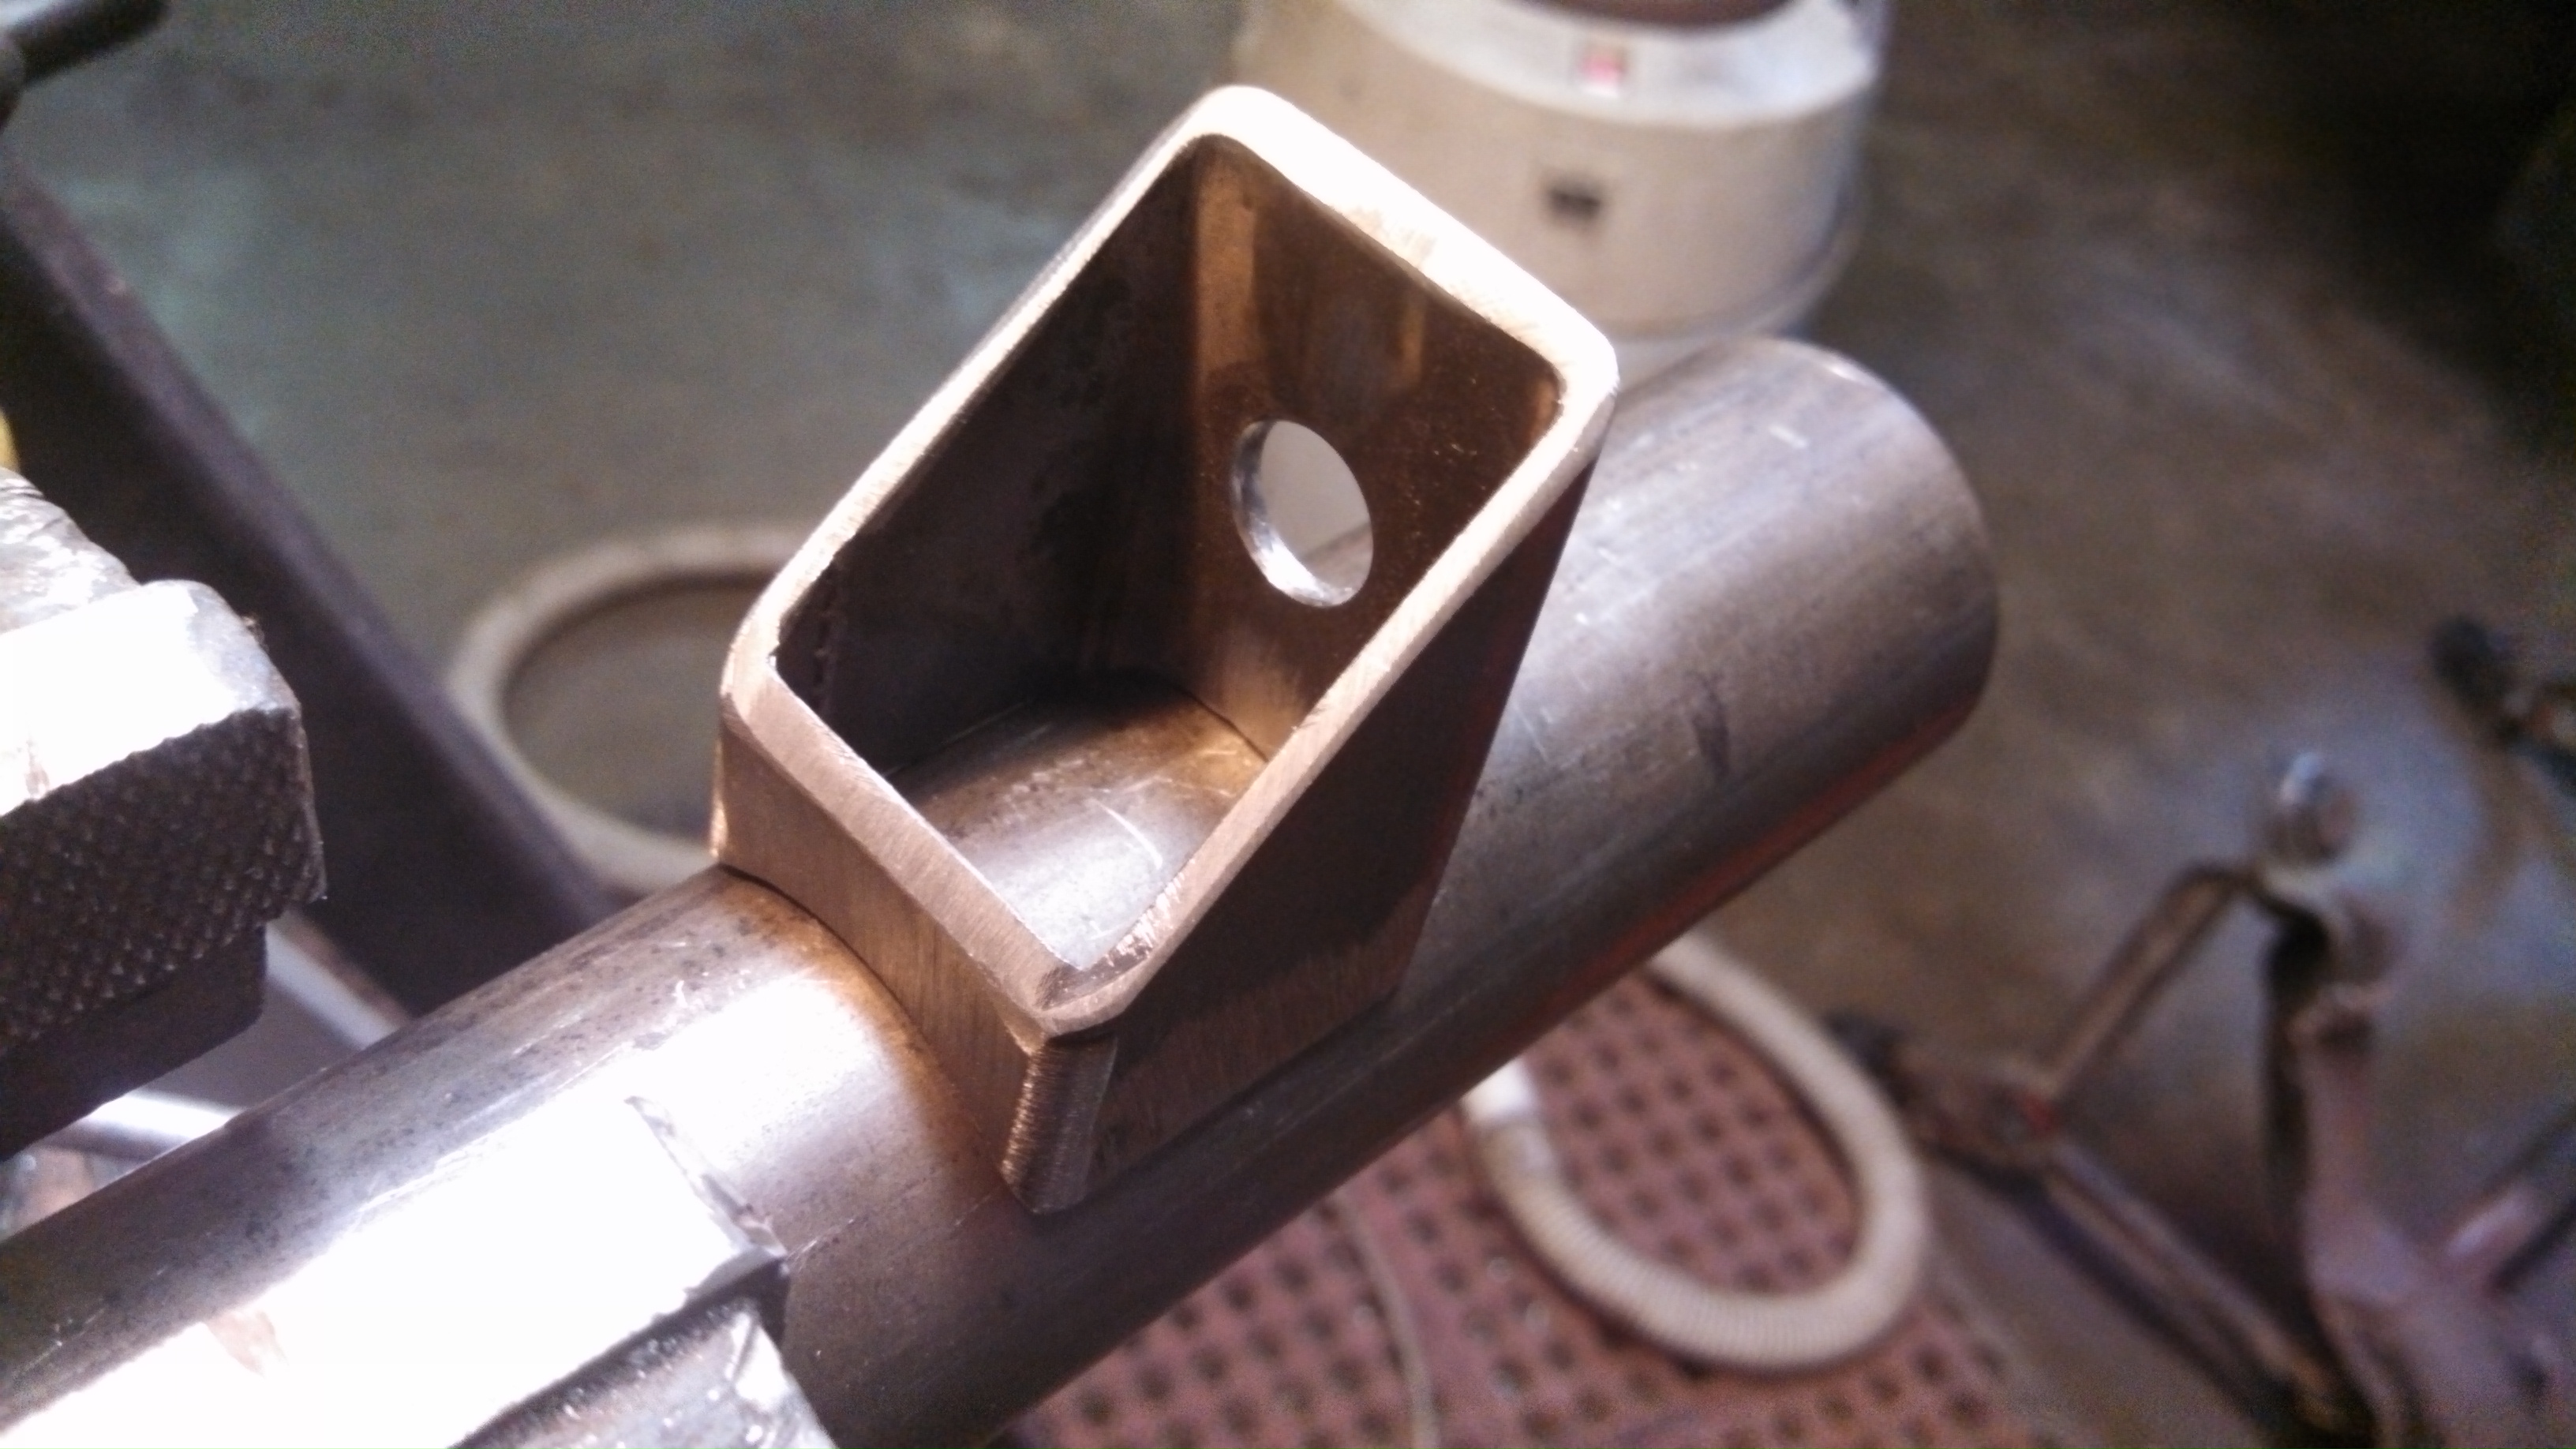
- c-arm rod end mount.jpg (1.23 MiB) Viewed 39316 times

- c-arm rod end mount pair.jpg (1.67 MiB) Viewed 39316 times
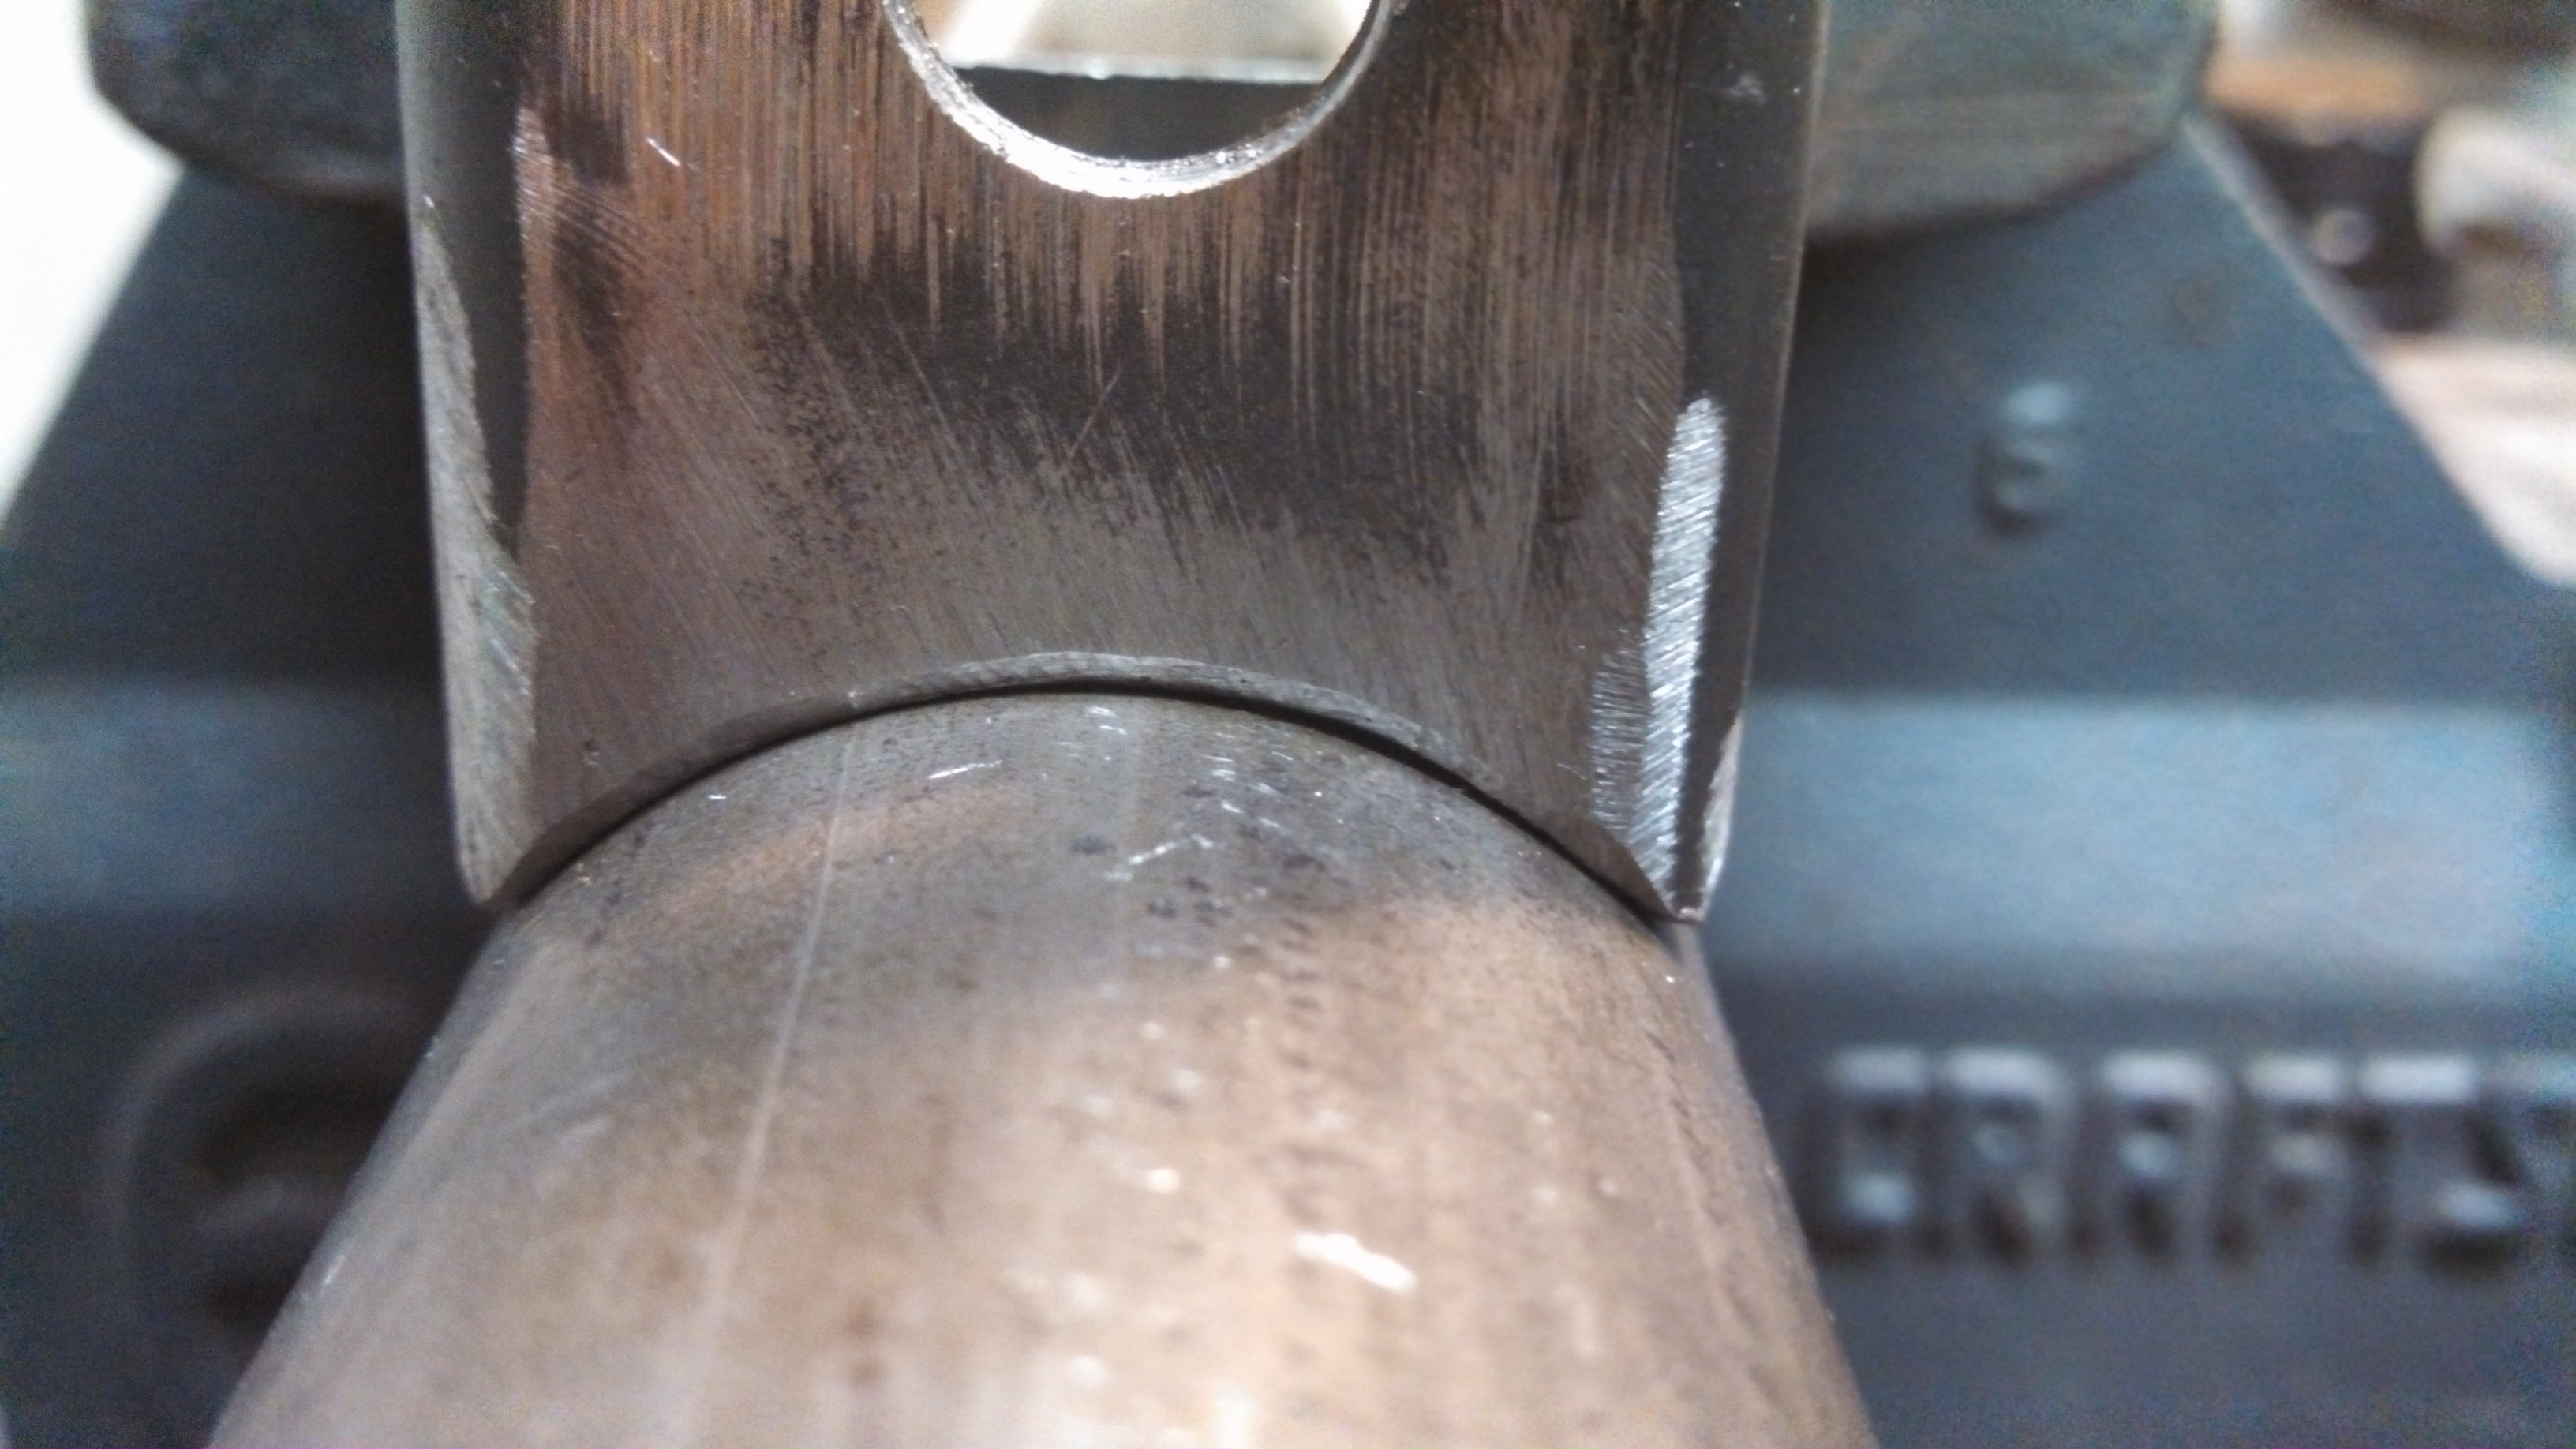
- c-arm rod end mount interface detail.jpg (1.36 MiB) Viewed 39316 times
Re: 24vVR6T CQ Project: EATSGTR, chassis FAB
Posted: Sat Aug 10, 2013 2:24 pm
by my2000apb
Re: 24vVR6T CQ Project: EATSGTR, chassis FAB
Posted: Sat Aug 10, 2013 8:23 pm
by vt10vt
THIS THREAD NEEDS MOAR UPDATES
Re: 24vVR6T CQ Project: EATSGTR, chassis FAB
Posted: Sat Aug 10, 2013 10:53 pm
by glibobbo21
wait, what? that wasnt enough?
Re: 24vVR6T CQ Project: EATSGTR, chassis FAB
Posted: Sun Aug 11, 2013 12:27 am
by vt10vt
Nope, not happy yet, does it run?
Re: 24vVR6T CQ Project: EATSGTR, chassis FAB
Posted: Tue Aug 20, 2013 4:56 pm
by highlander69
Amazing !!!!!
One of my favorite builds on Project Pad at the moment

Fabrication heaven.


Cheers,
Craig
Re: 24vVR6T CQ Project: EATSGTR, chassis FAB
Posted: Tue Aug 20, 2013 6:28 pm
by pilihp2
vt10vt wrote:Nope, not happy yet, does it run?
This. k.
Re: 24vVR6T CQ Project: EATSGTR, chassis FAB
Posted: Fri Sep 13, 2013 12:28 am
by my2000apb
UPDATE!!!!
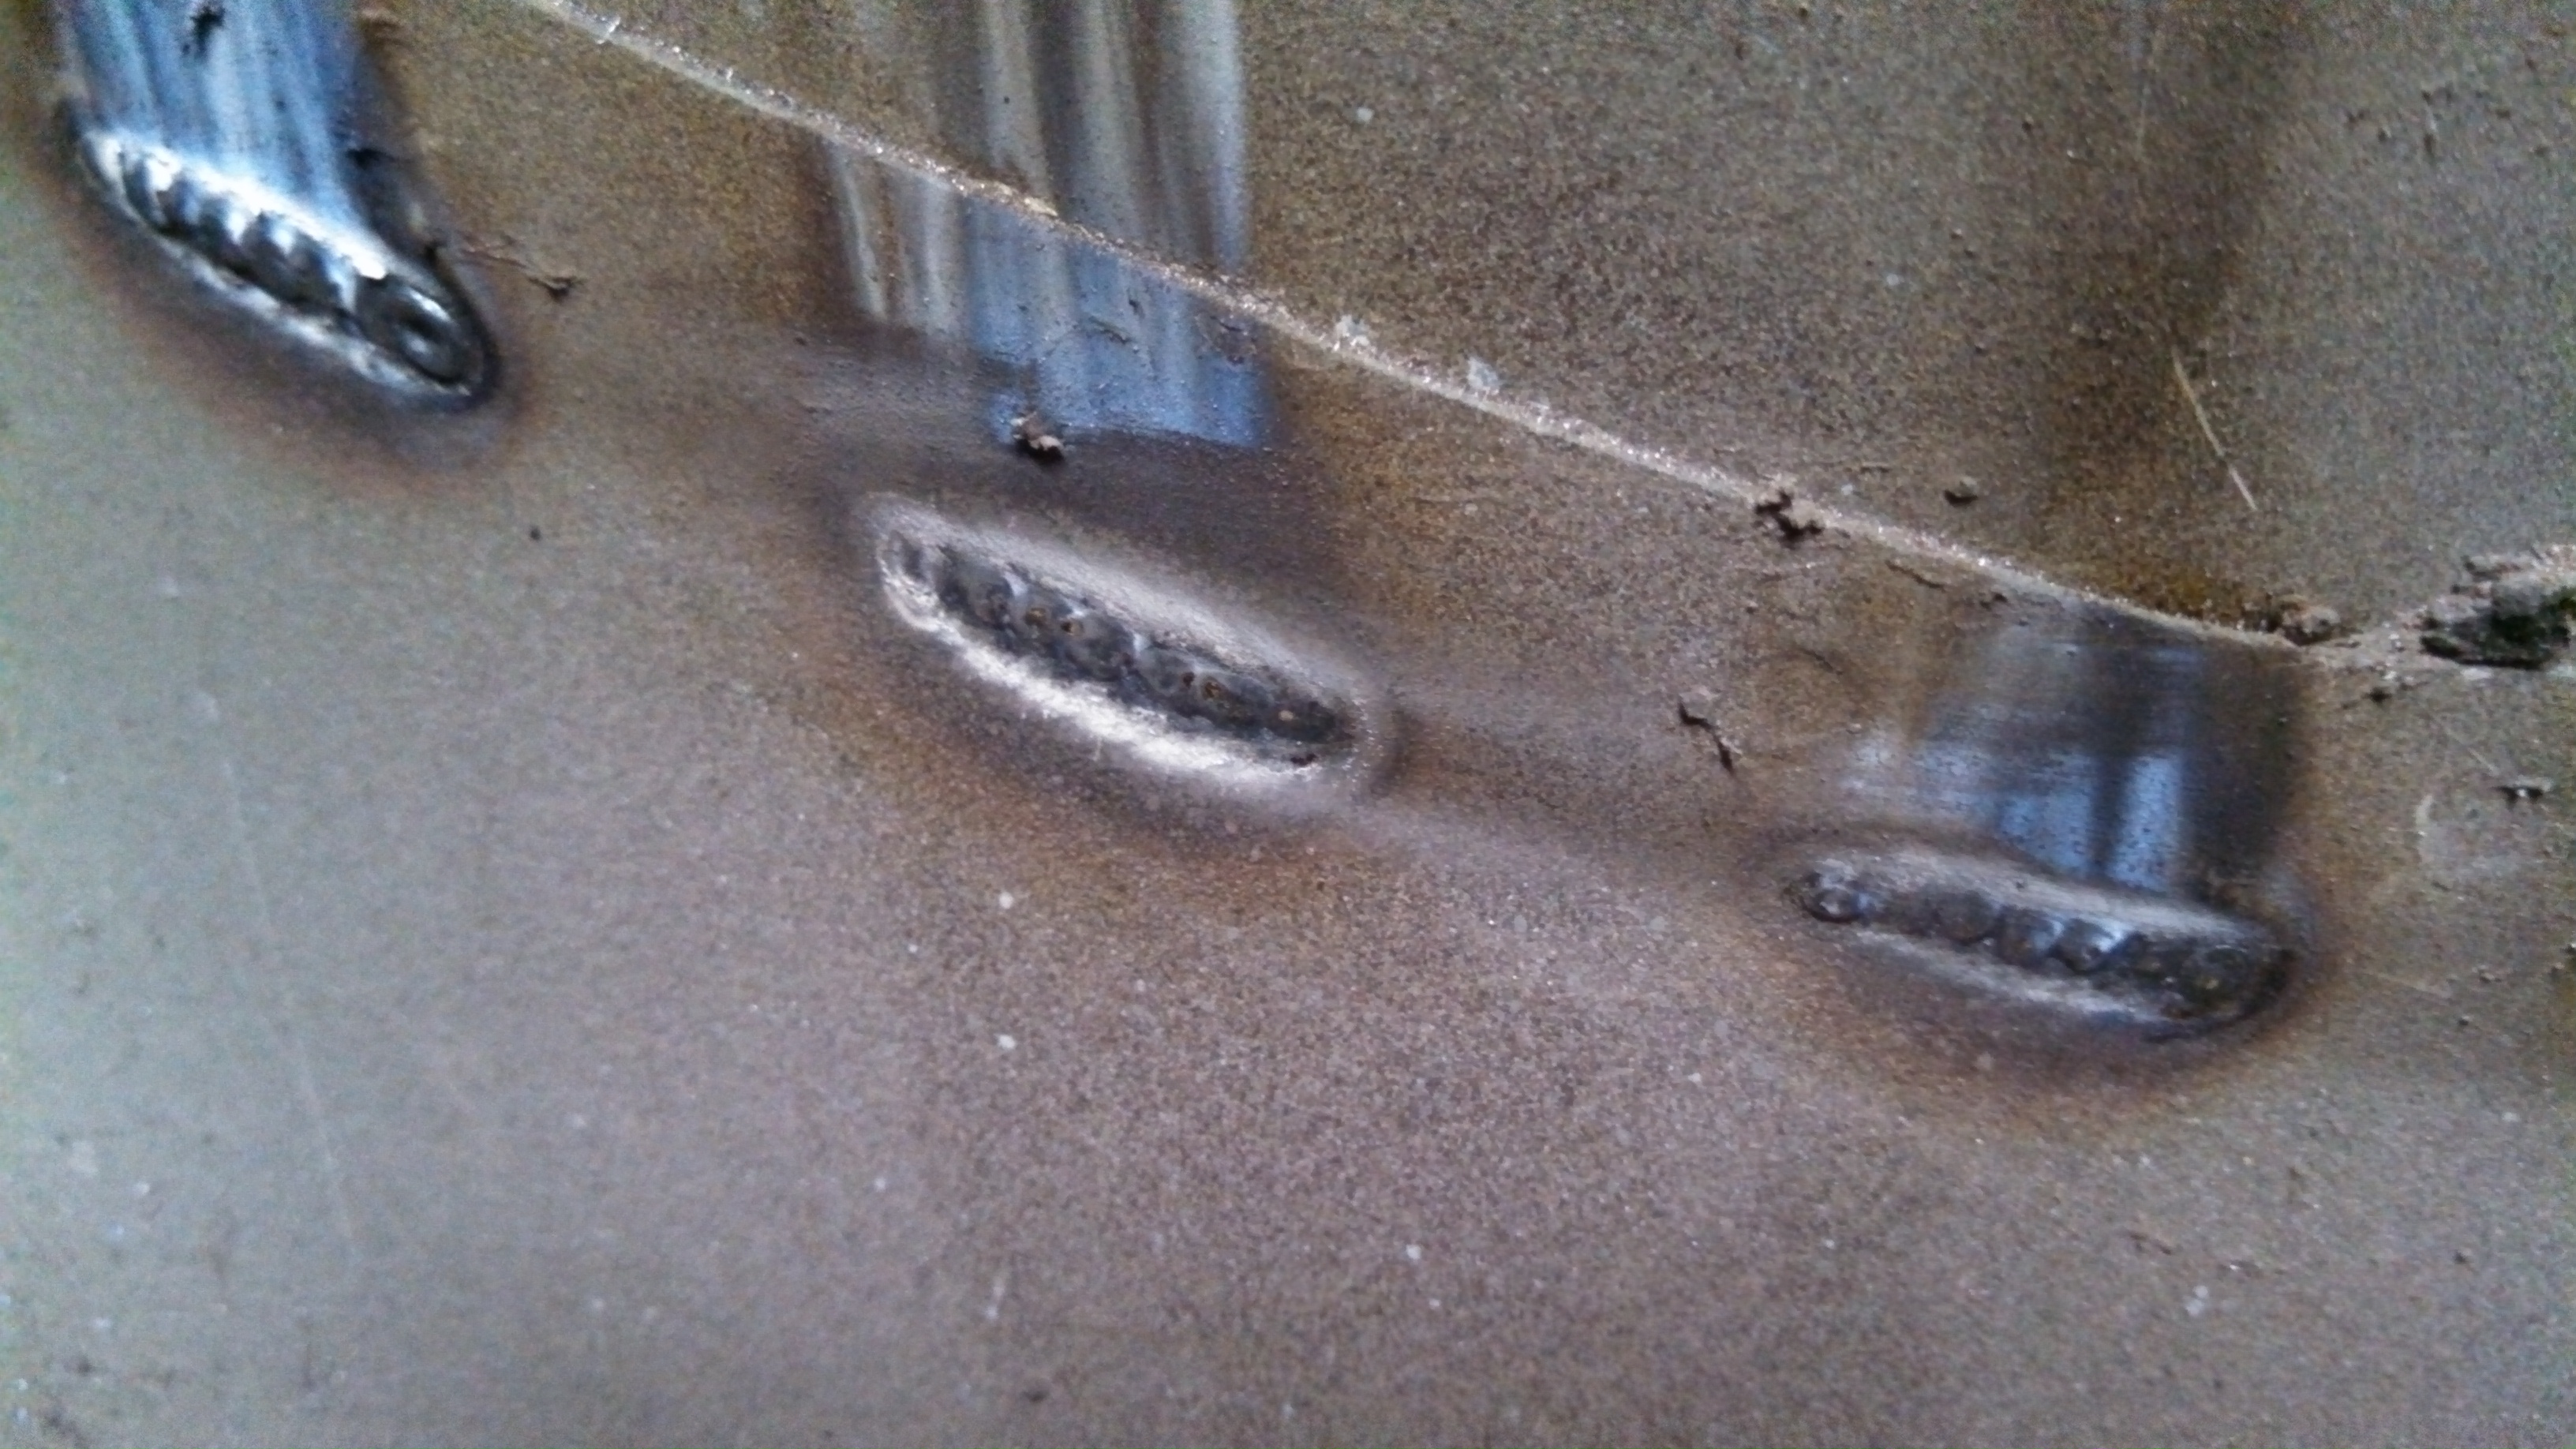
After welding up the rear strut tops, I wire wheeled the inner wheel wells and seam stitched them up. I welded about every other inch.
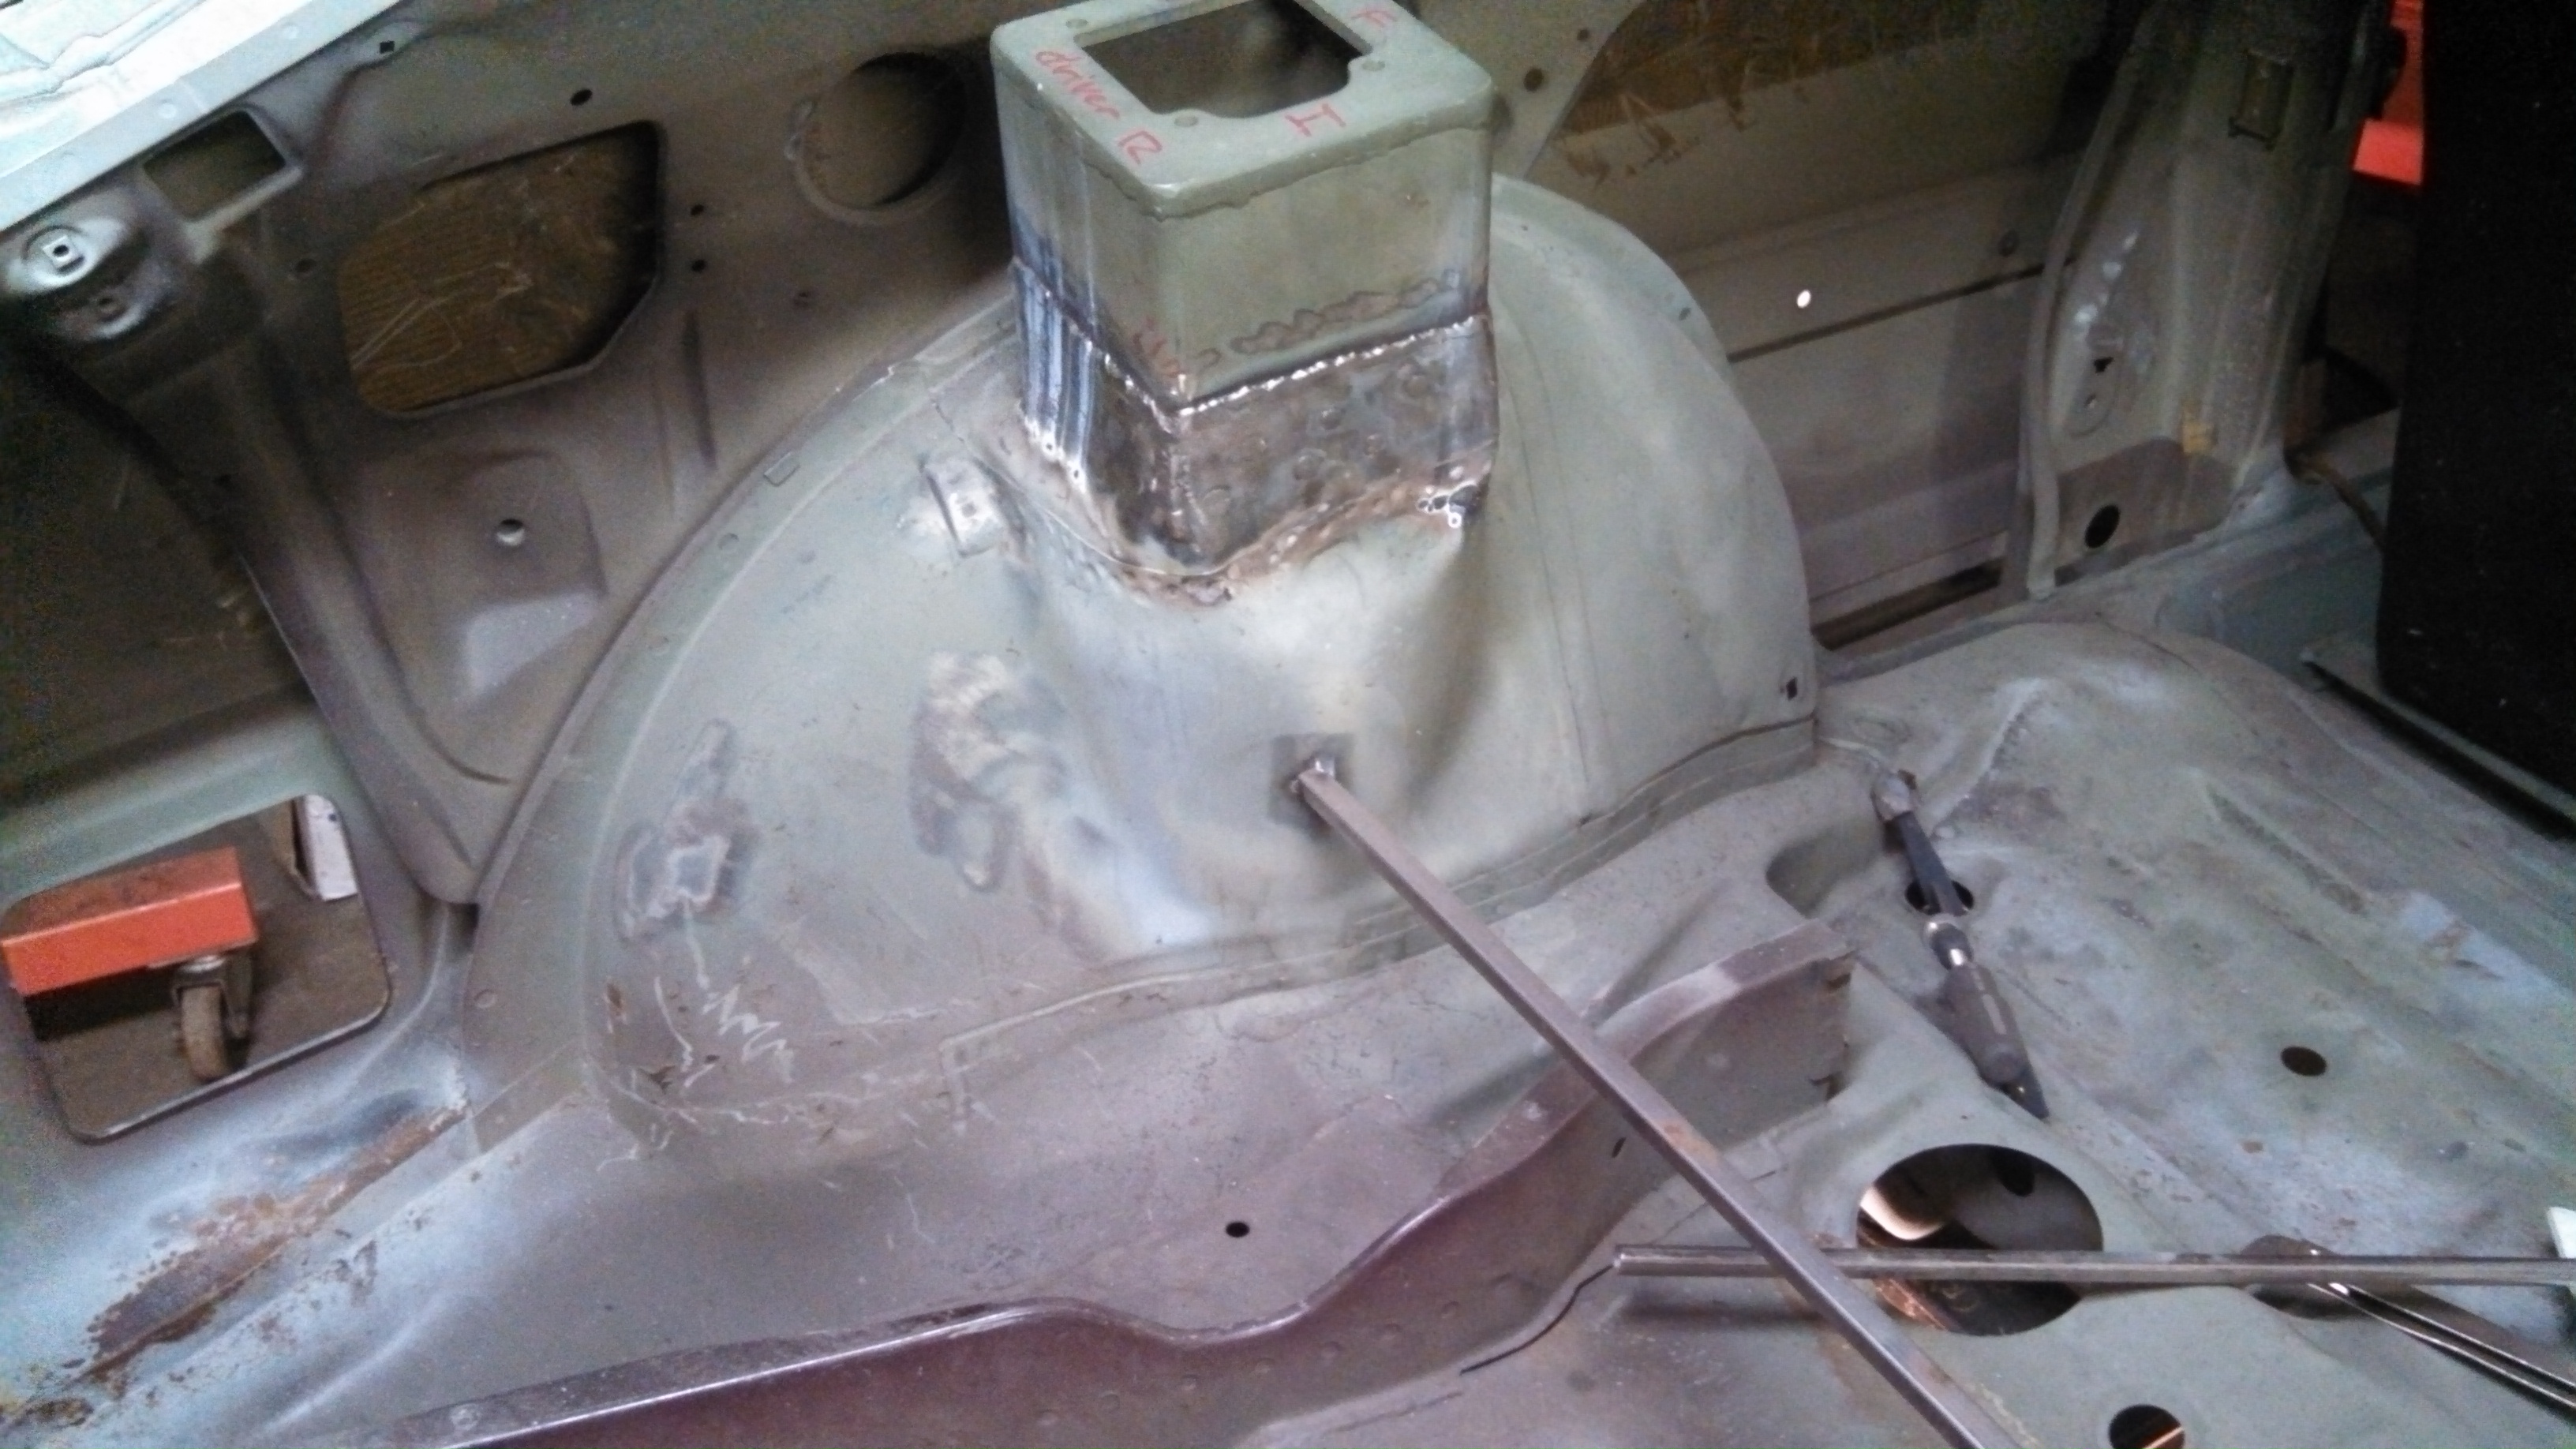
- seam stitched inner driver rear wheel well.jpg (1.37 MiB) Viewed 39155 times
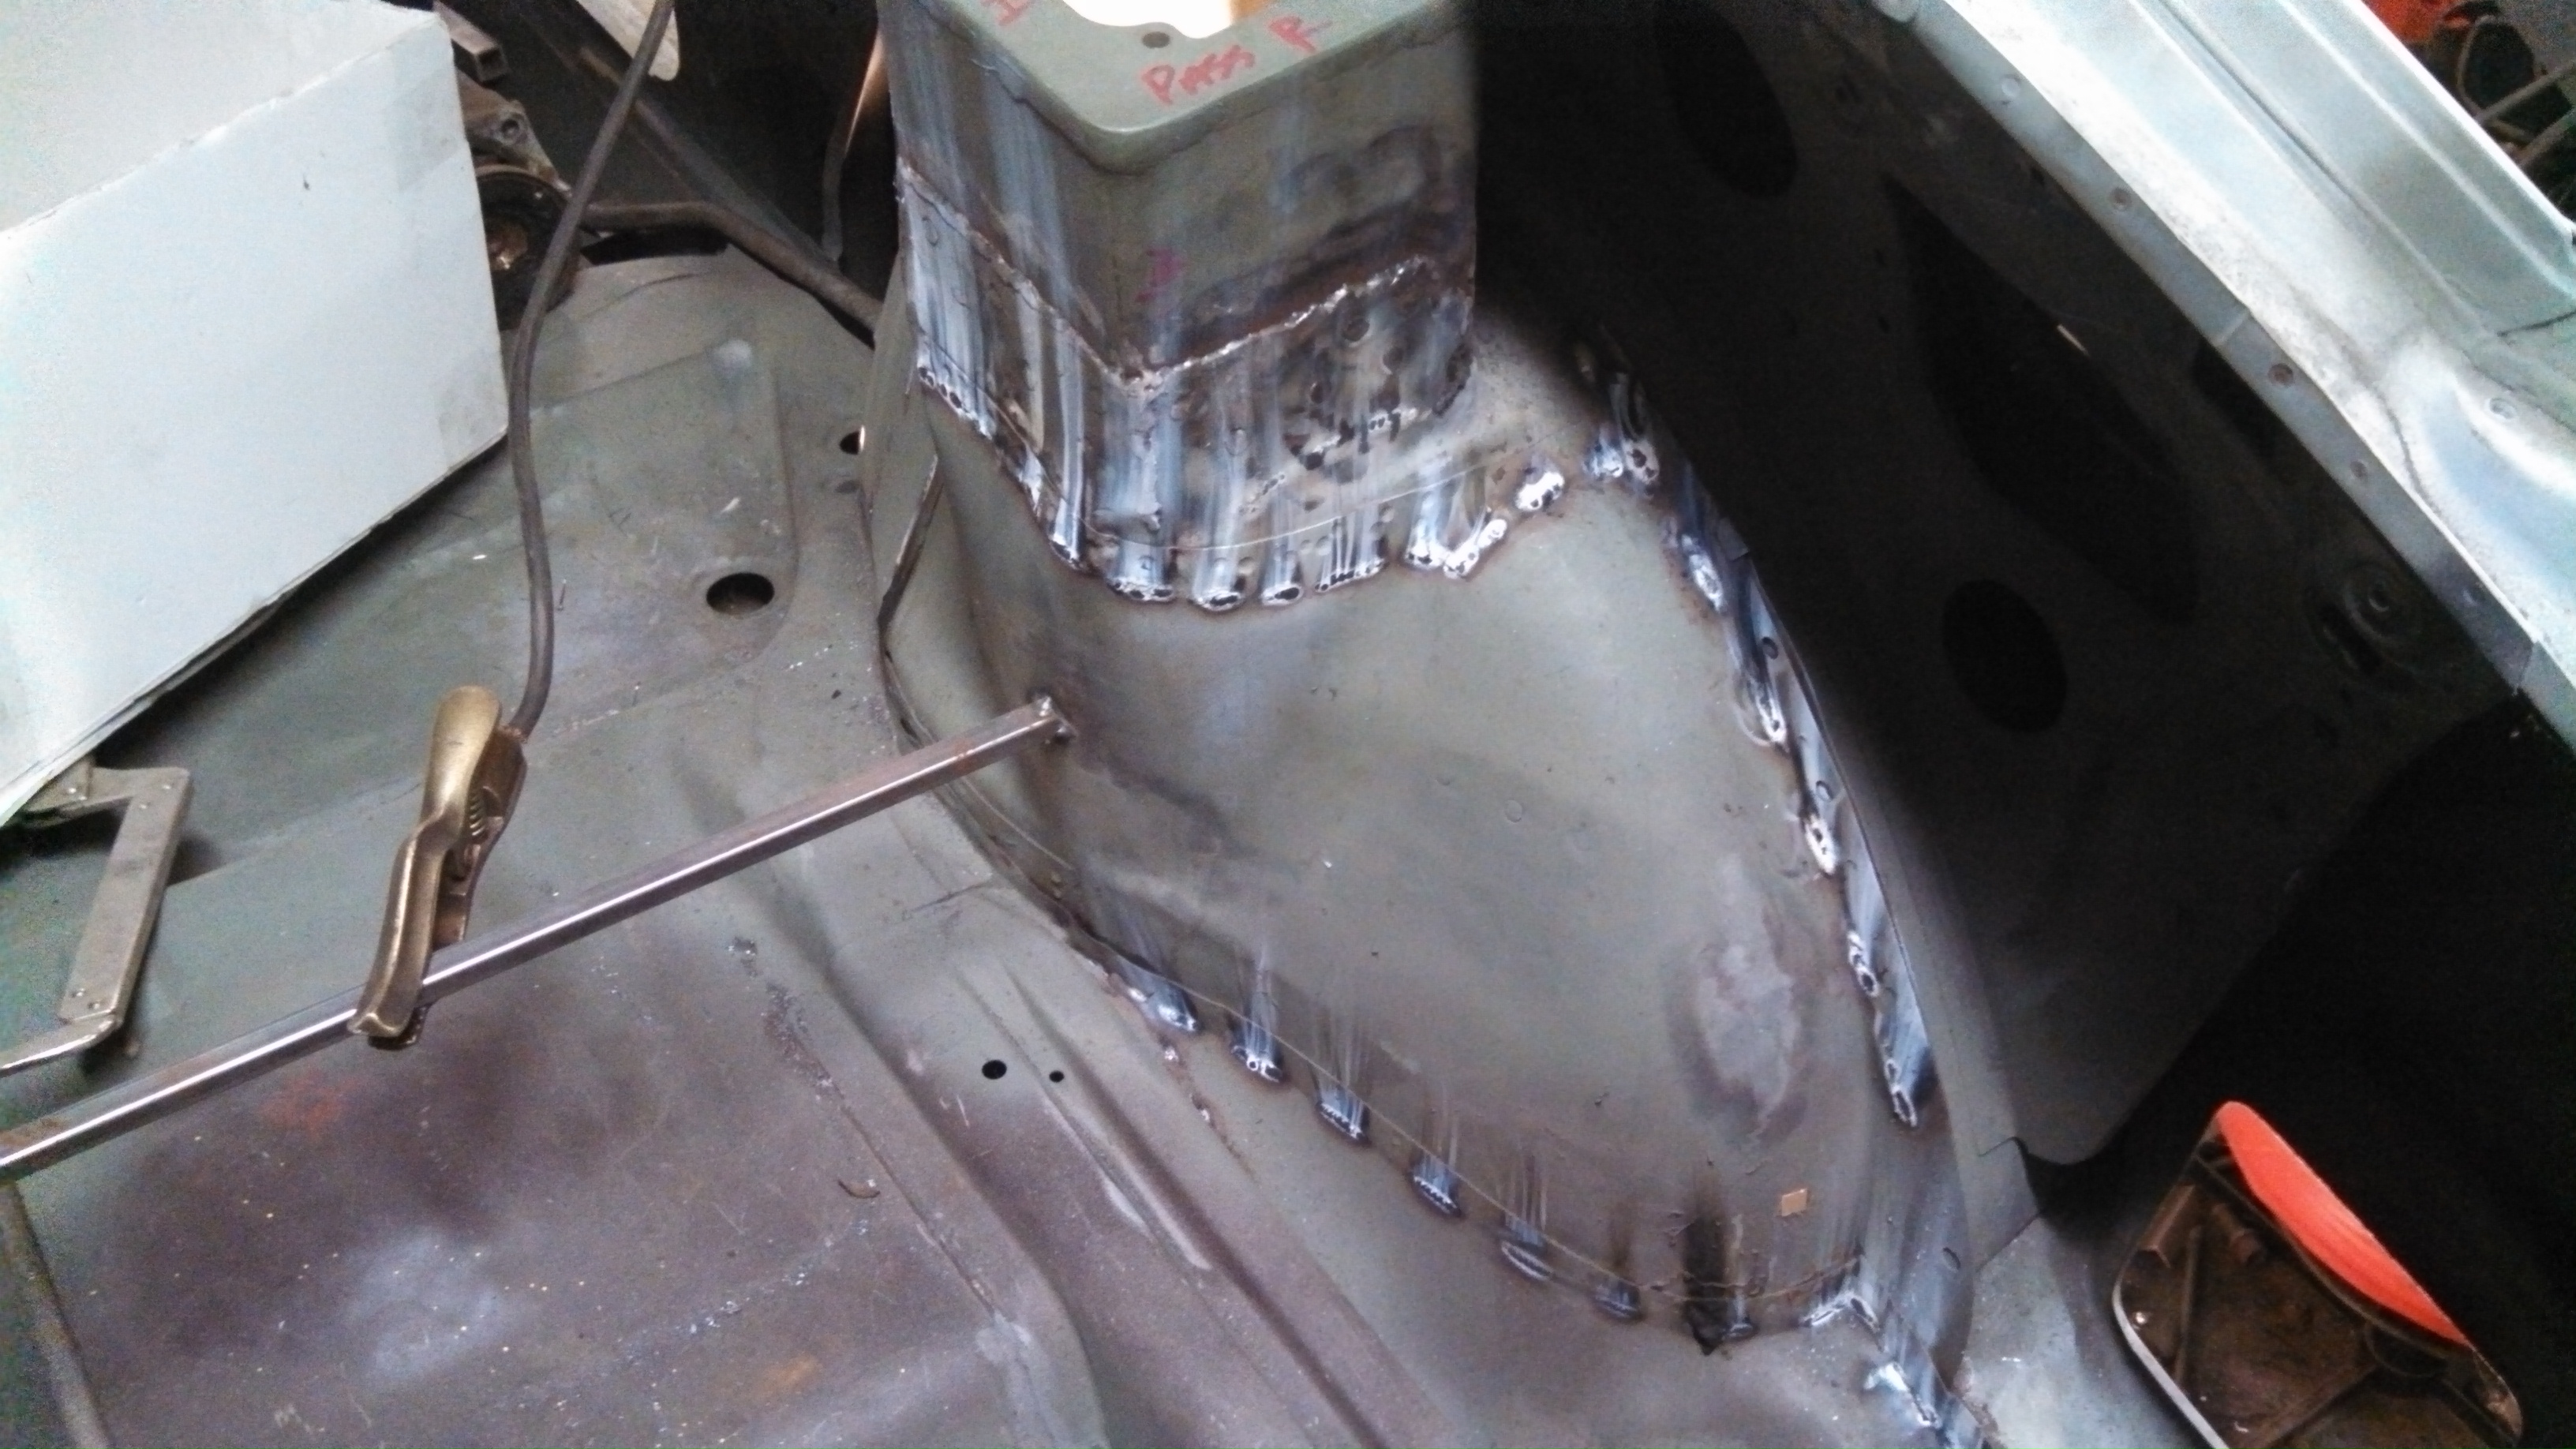
- seam stitched inner pass rear wheel well.jpg (1.41 MiB) Viewed 39155 times
Then I did the in-cabin side of the wheel wells. I took awhile but it really does stiffen the chassis up. I have a few tiny rust repair patches to make in the back and it will all get seamsealed.
- seam stiched pass rear wheel well.jpg (1.73 MiB) Viewed 39155 times
- seam stitched driver rear wheel well.jpg (1.7 MiB) Viewed 39155 times
Re: 24vVR6T CQ Project: EATSGTR, chassis FAB
Posted: Fri Sep 13, 2013 12:39 am
by my2000apb
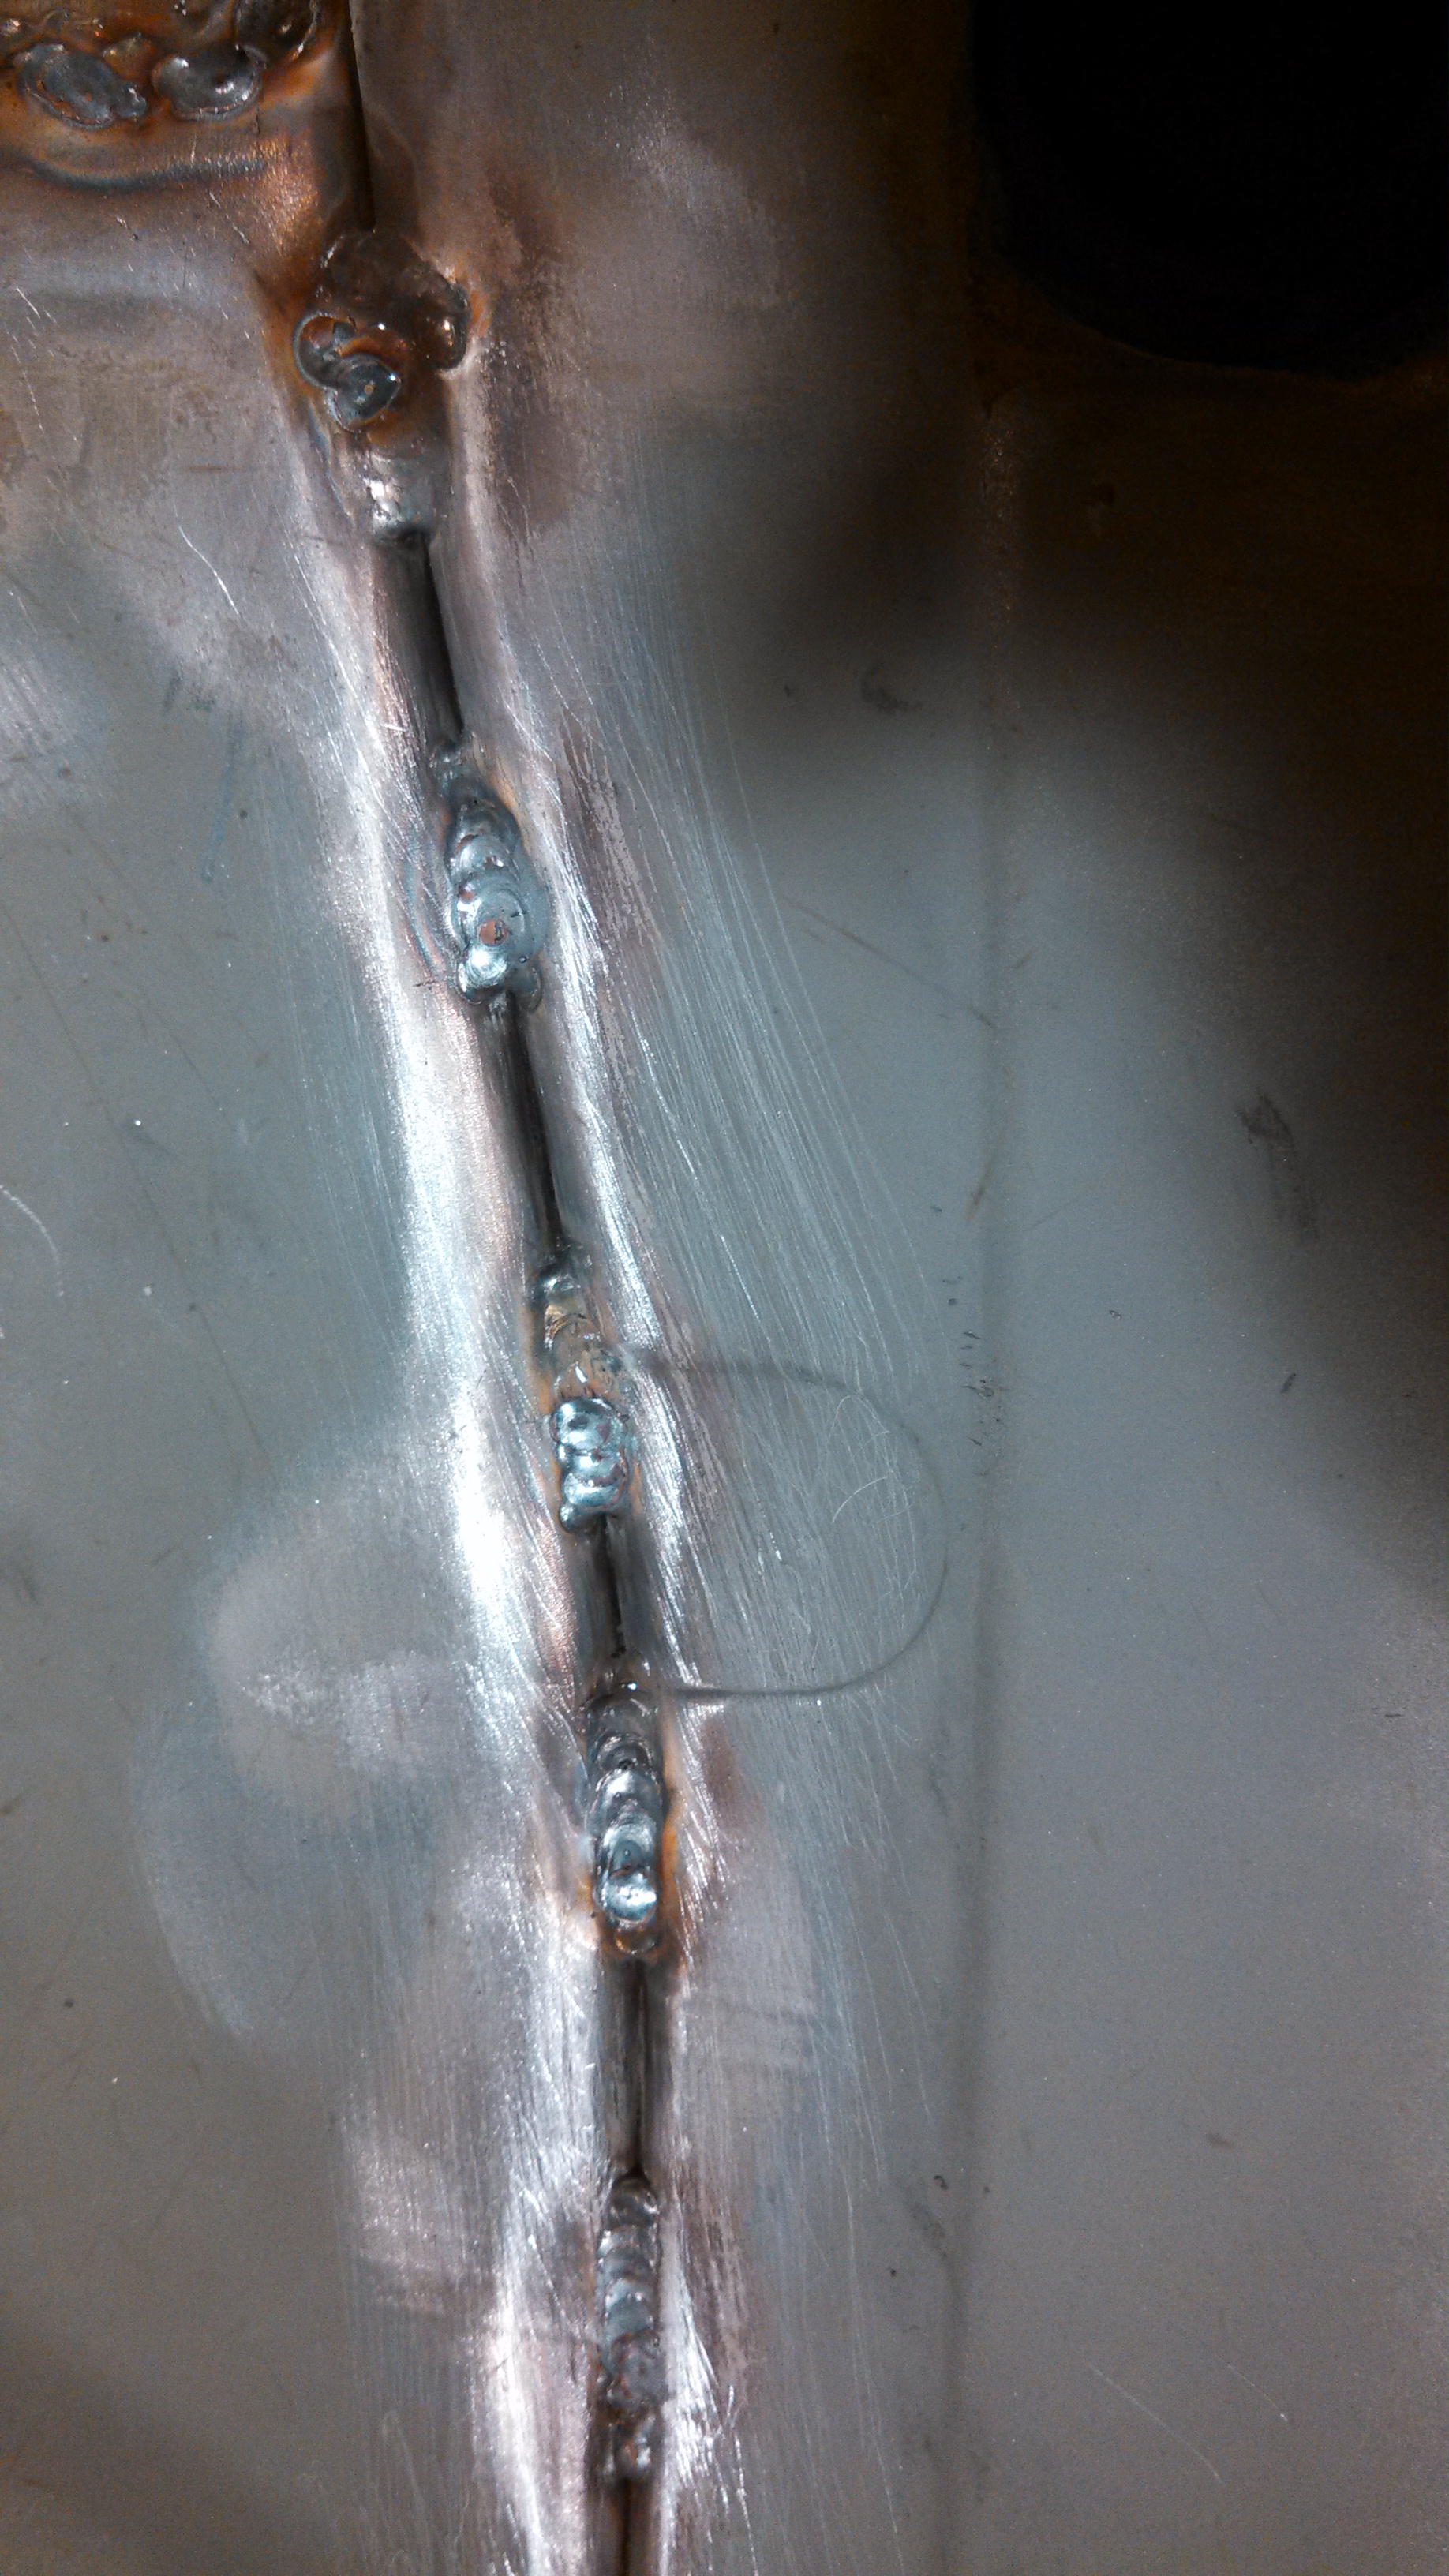
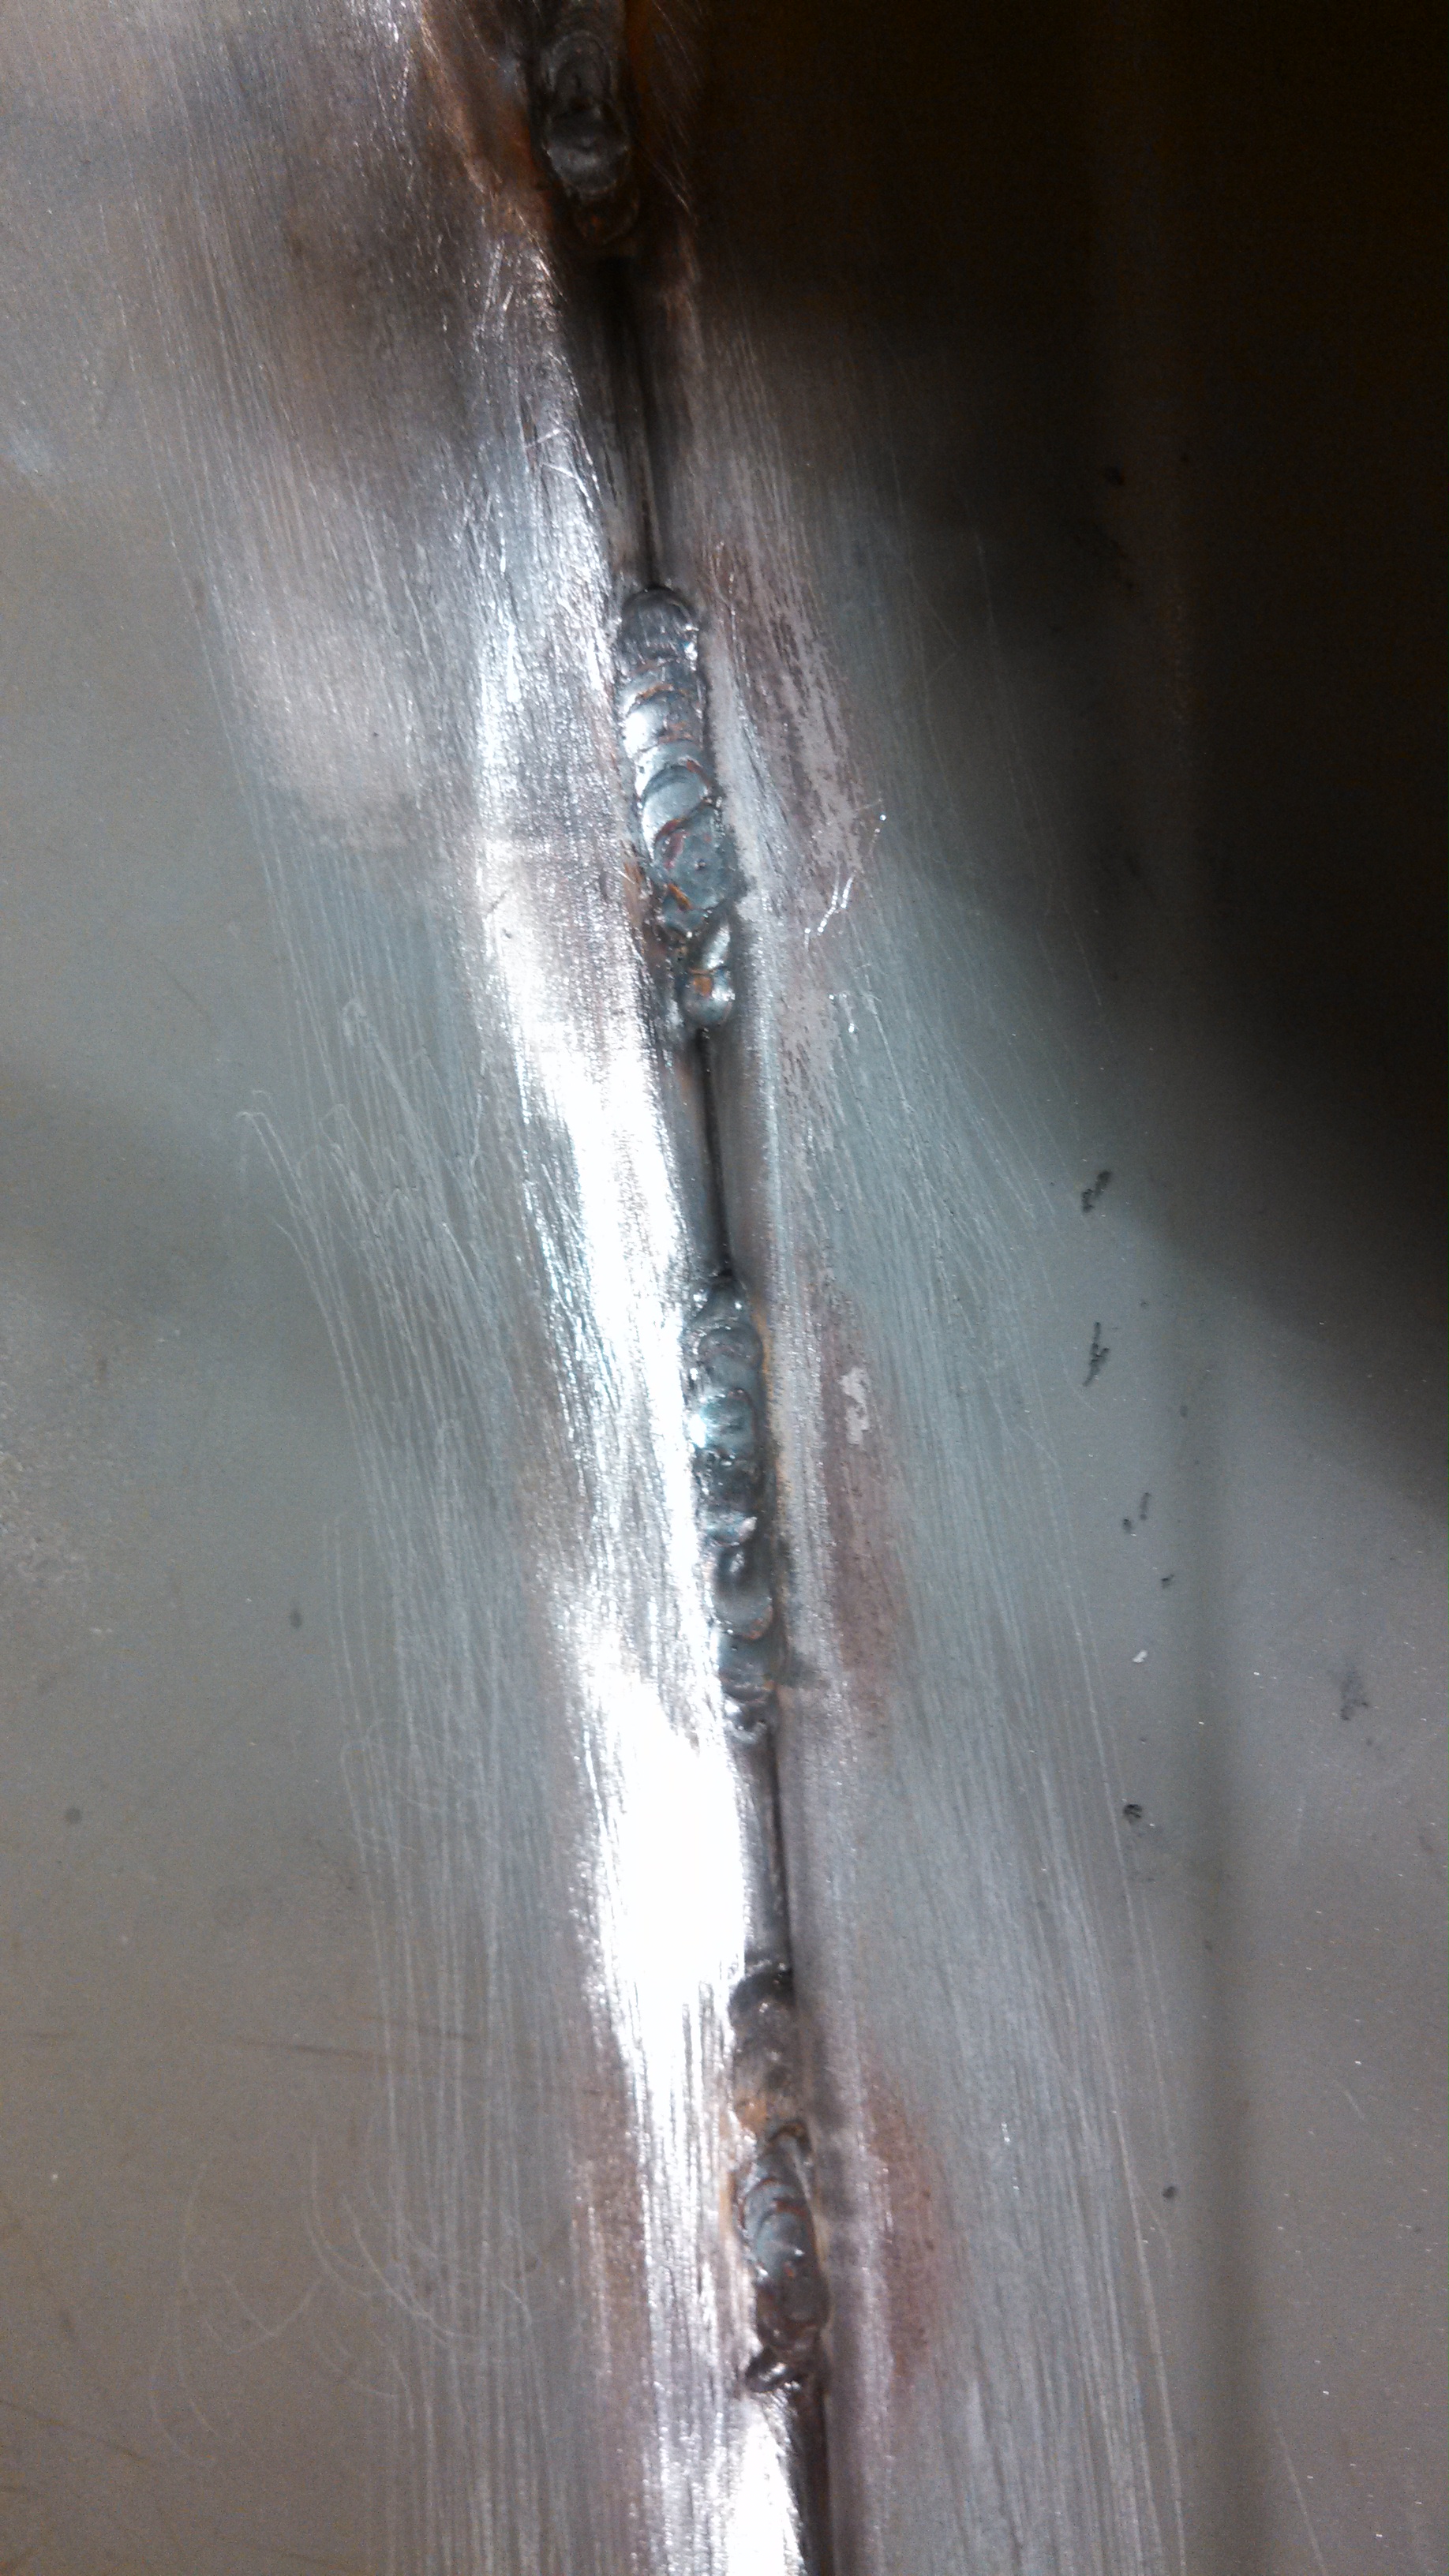
MORE!
And some weld detail
- seam stiched wheel wells detail.jpg (1.51 MiB) Viewed 39155 times
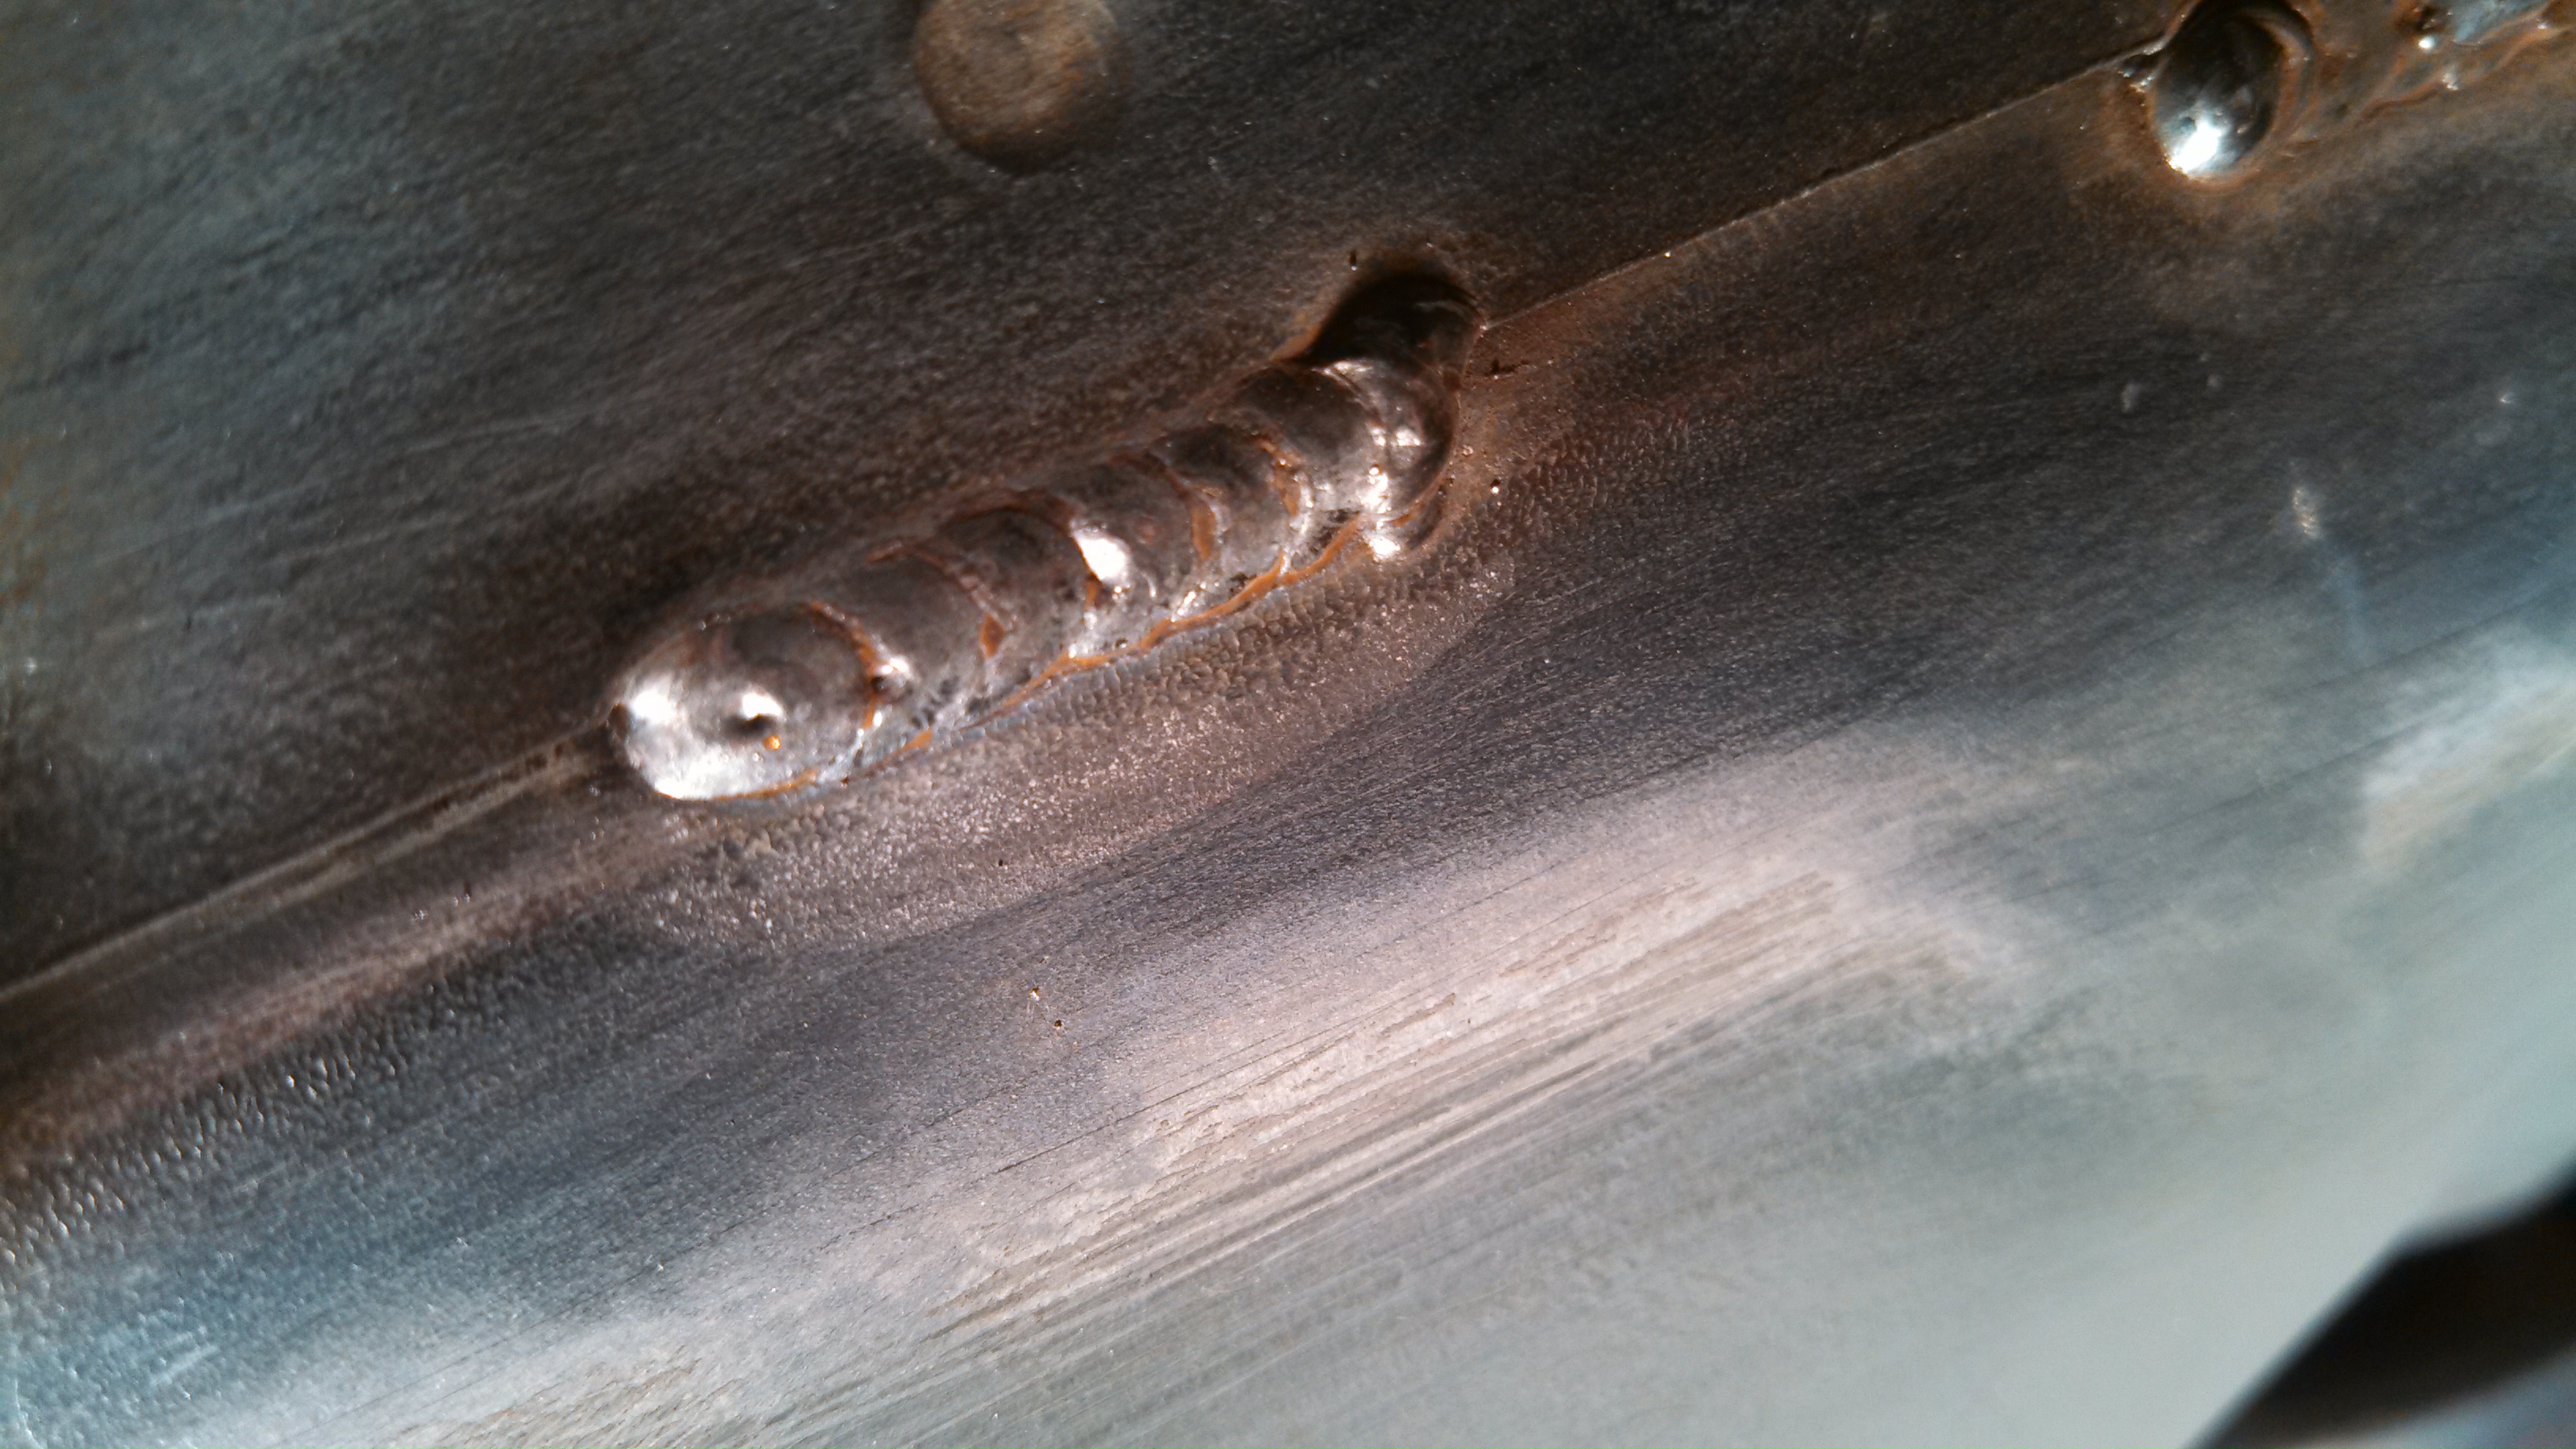
- seam stitched wheel wells detail2.jpg (1.61 MiB) Viewed 39155 times
This rounded off flapper disc has been a great discovery, it was the perfect tool to clean up the undersides of the rear strut towers.
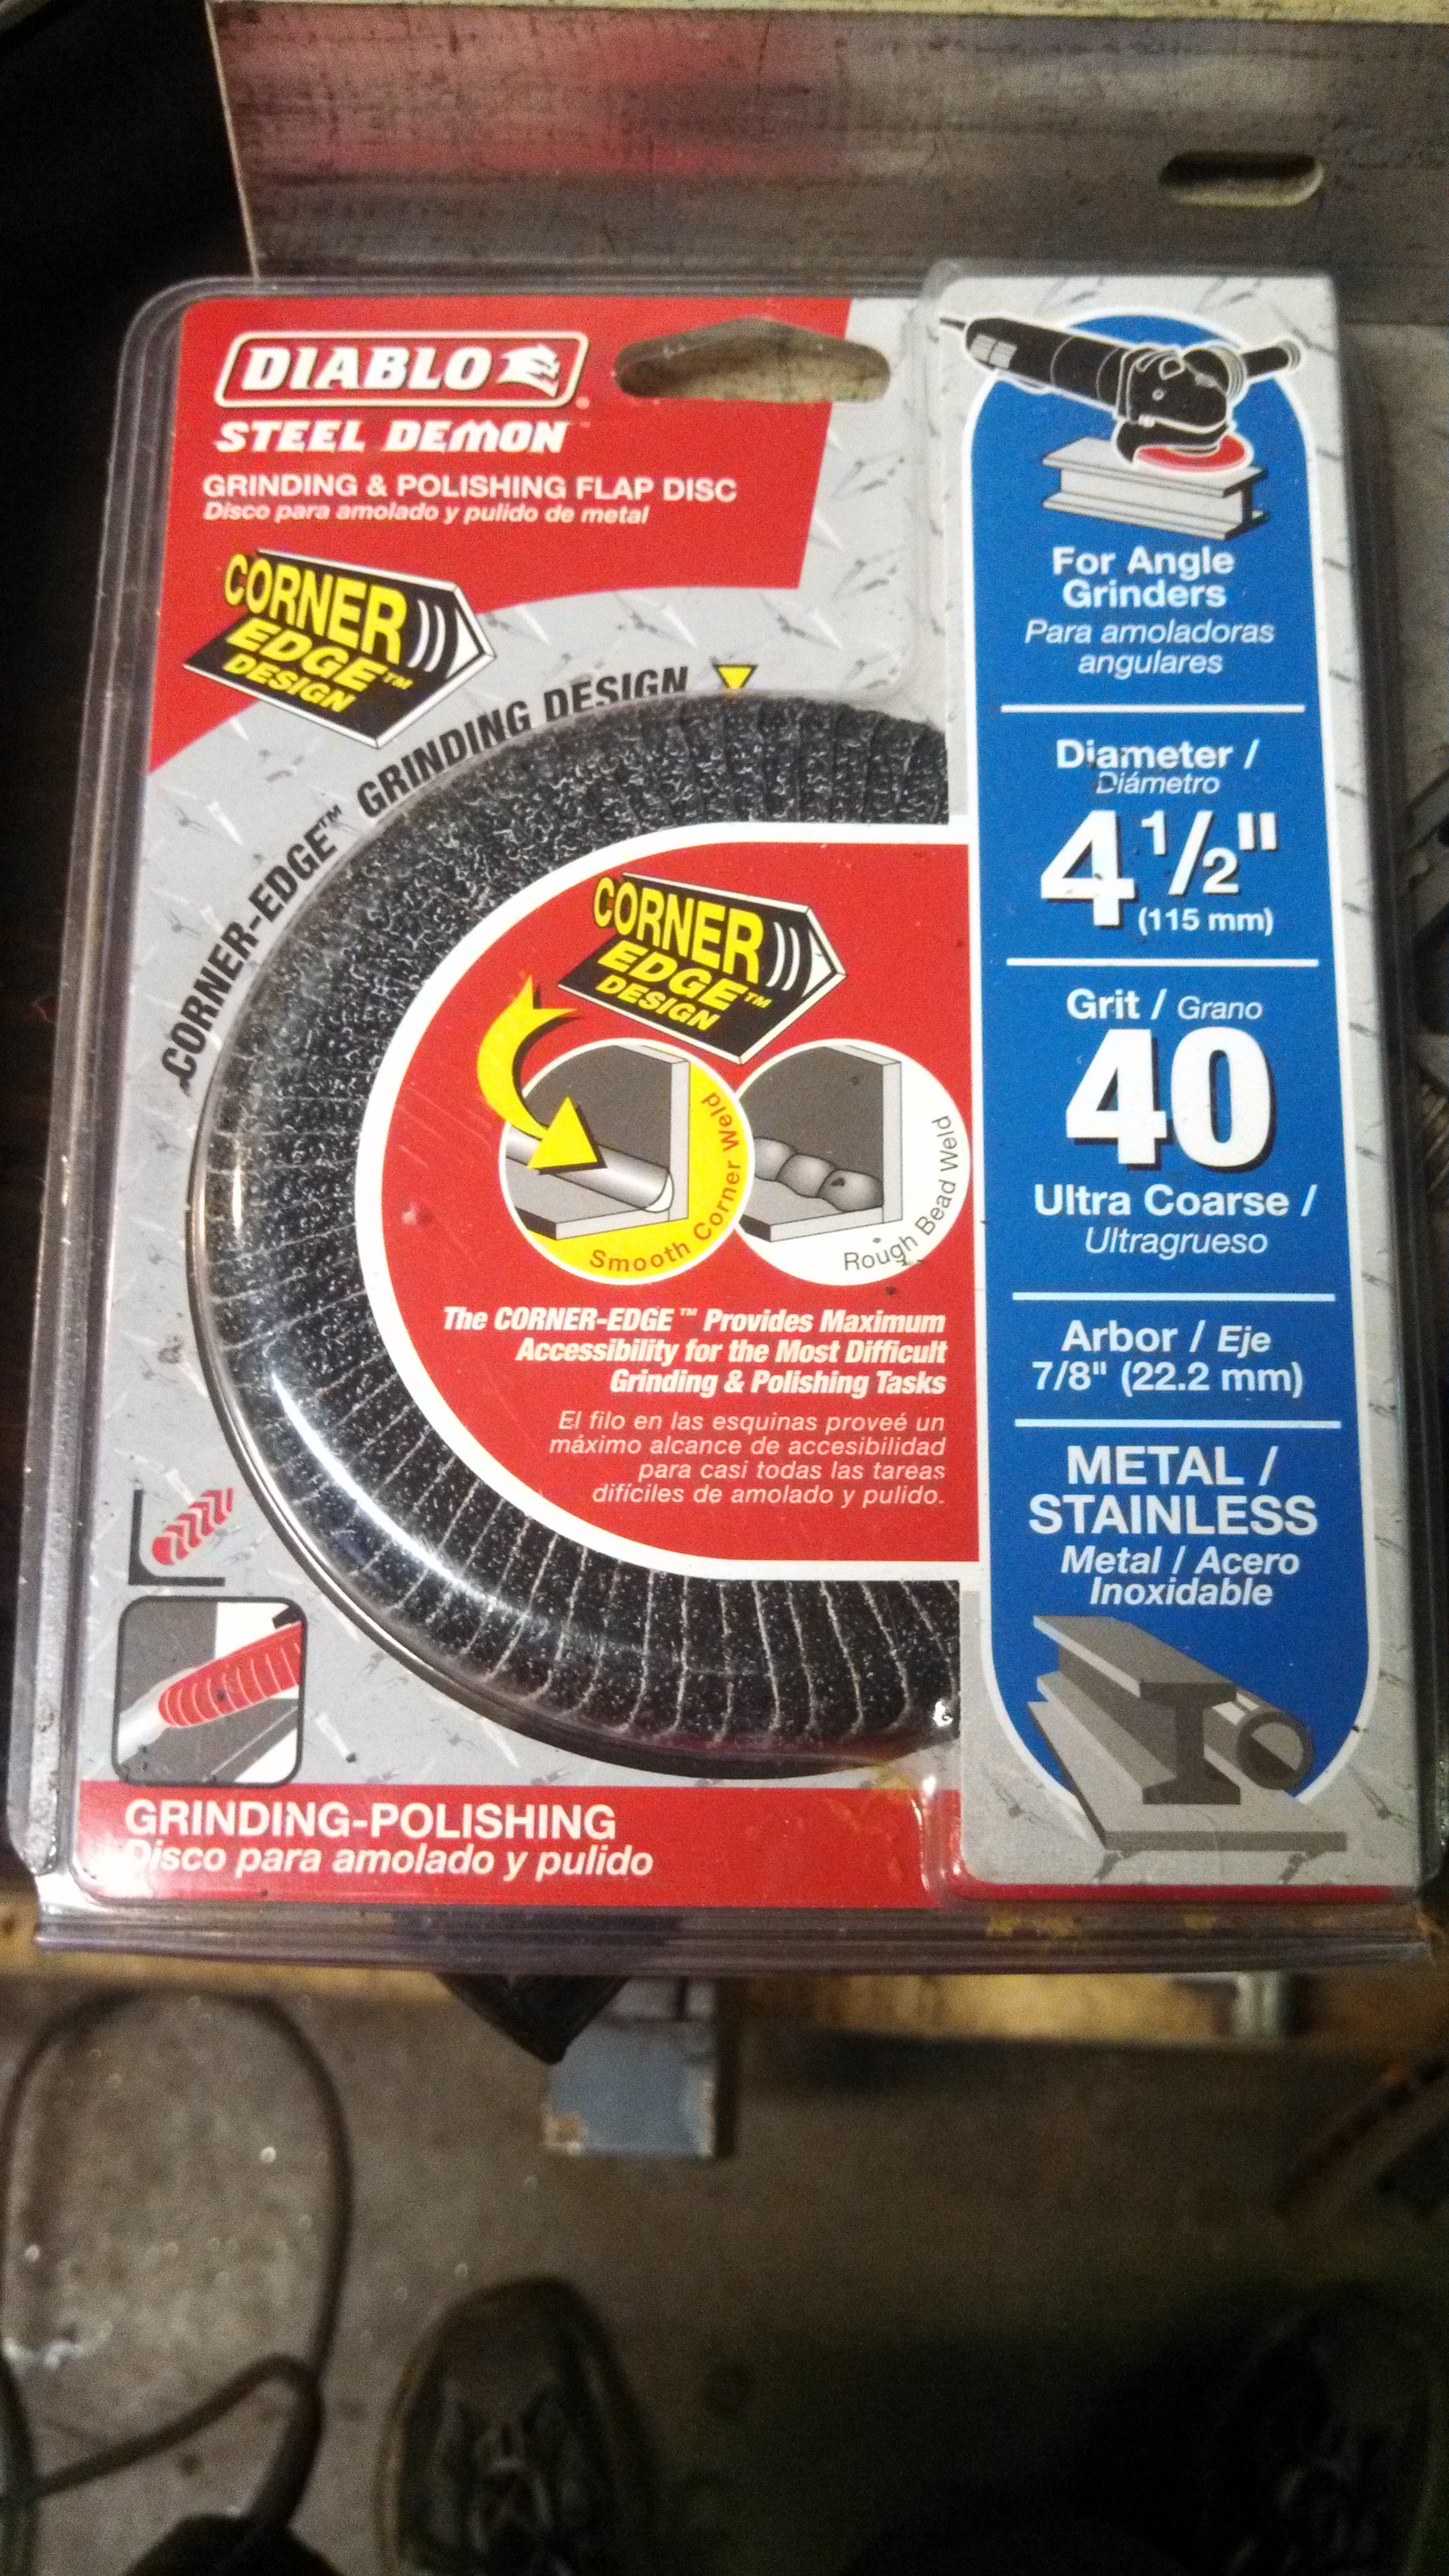
- rounded flapper disc.jpg (2.33 MiB) Viewed 39155 times
Im going to relieve the DP area a bit more, I can fit a 4” as it is, but I want to run a smoother path and it will only help with access to other components.

- soon to be relieved for more DP room.jpg (1.2 MiB) Viewed 39155 times
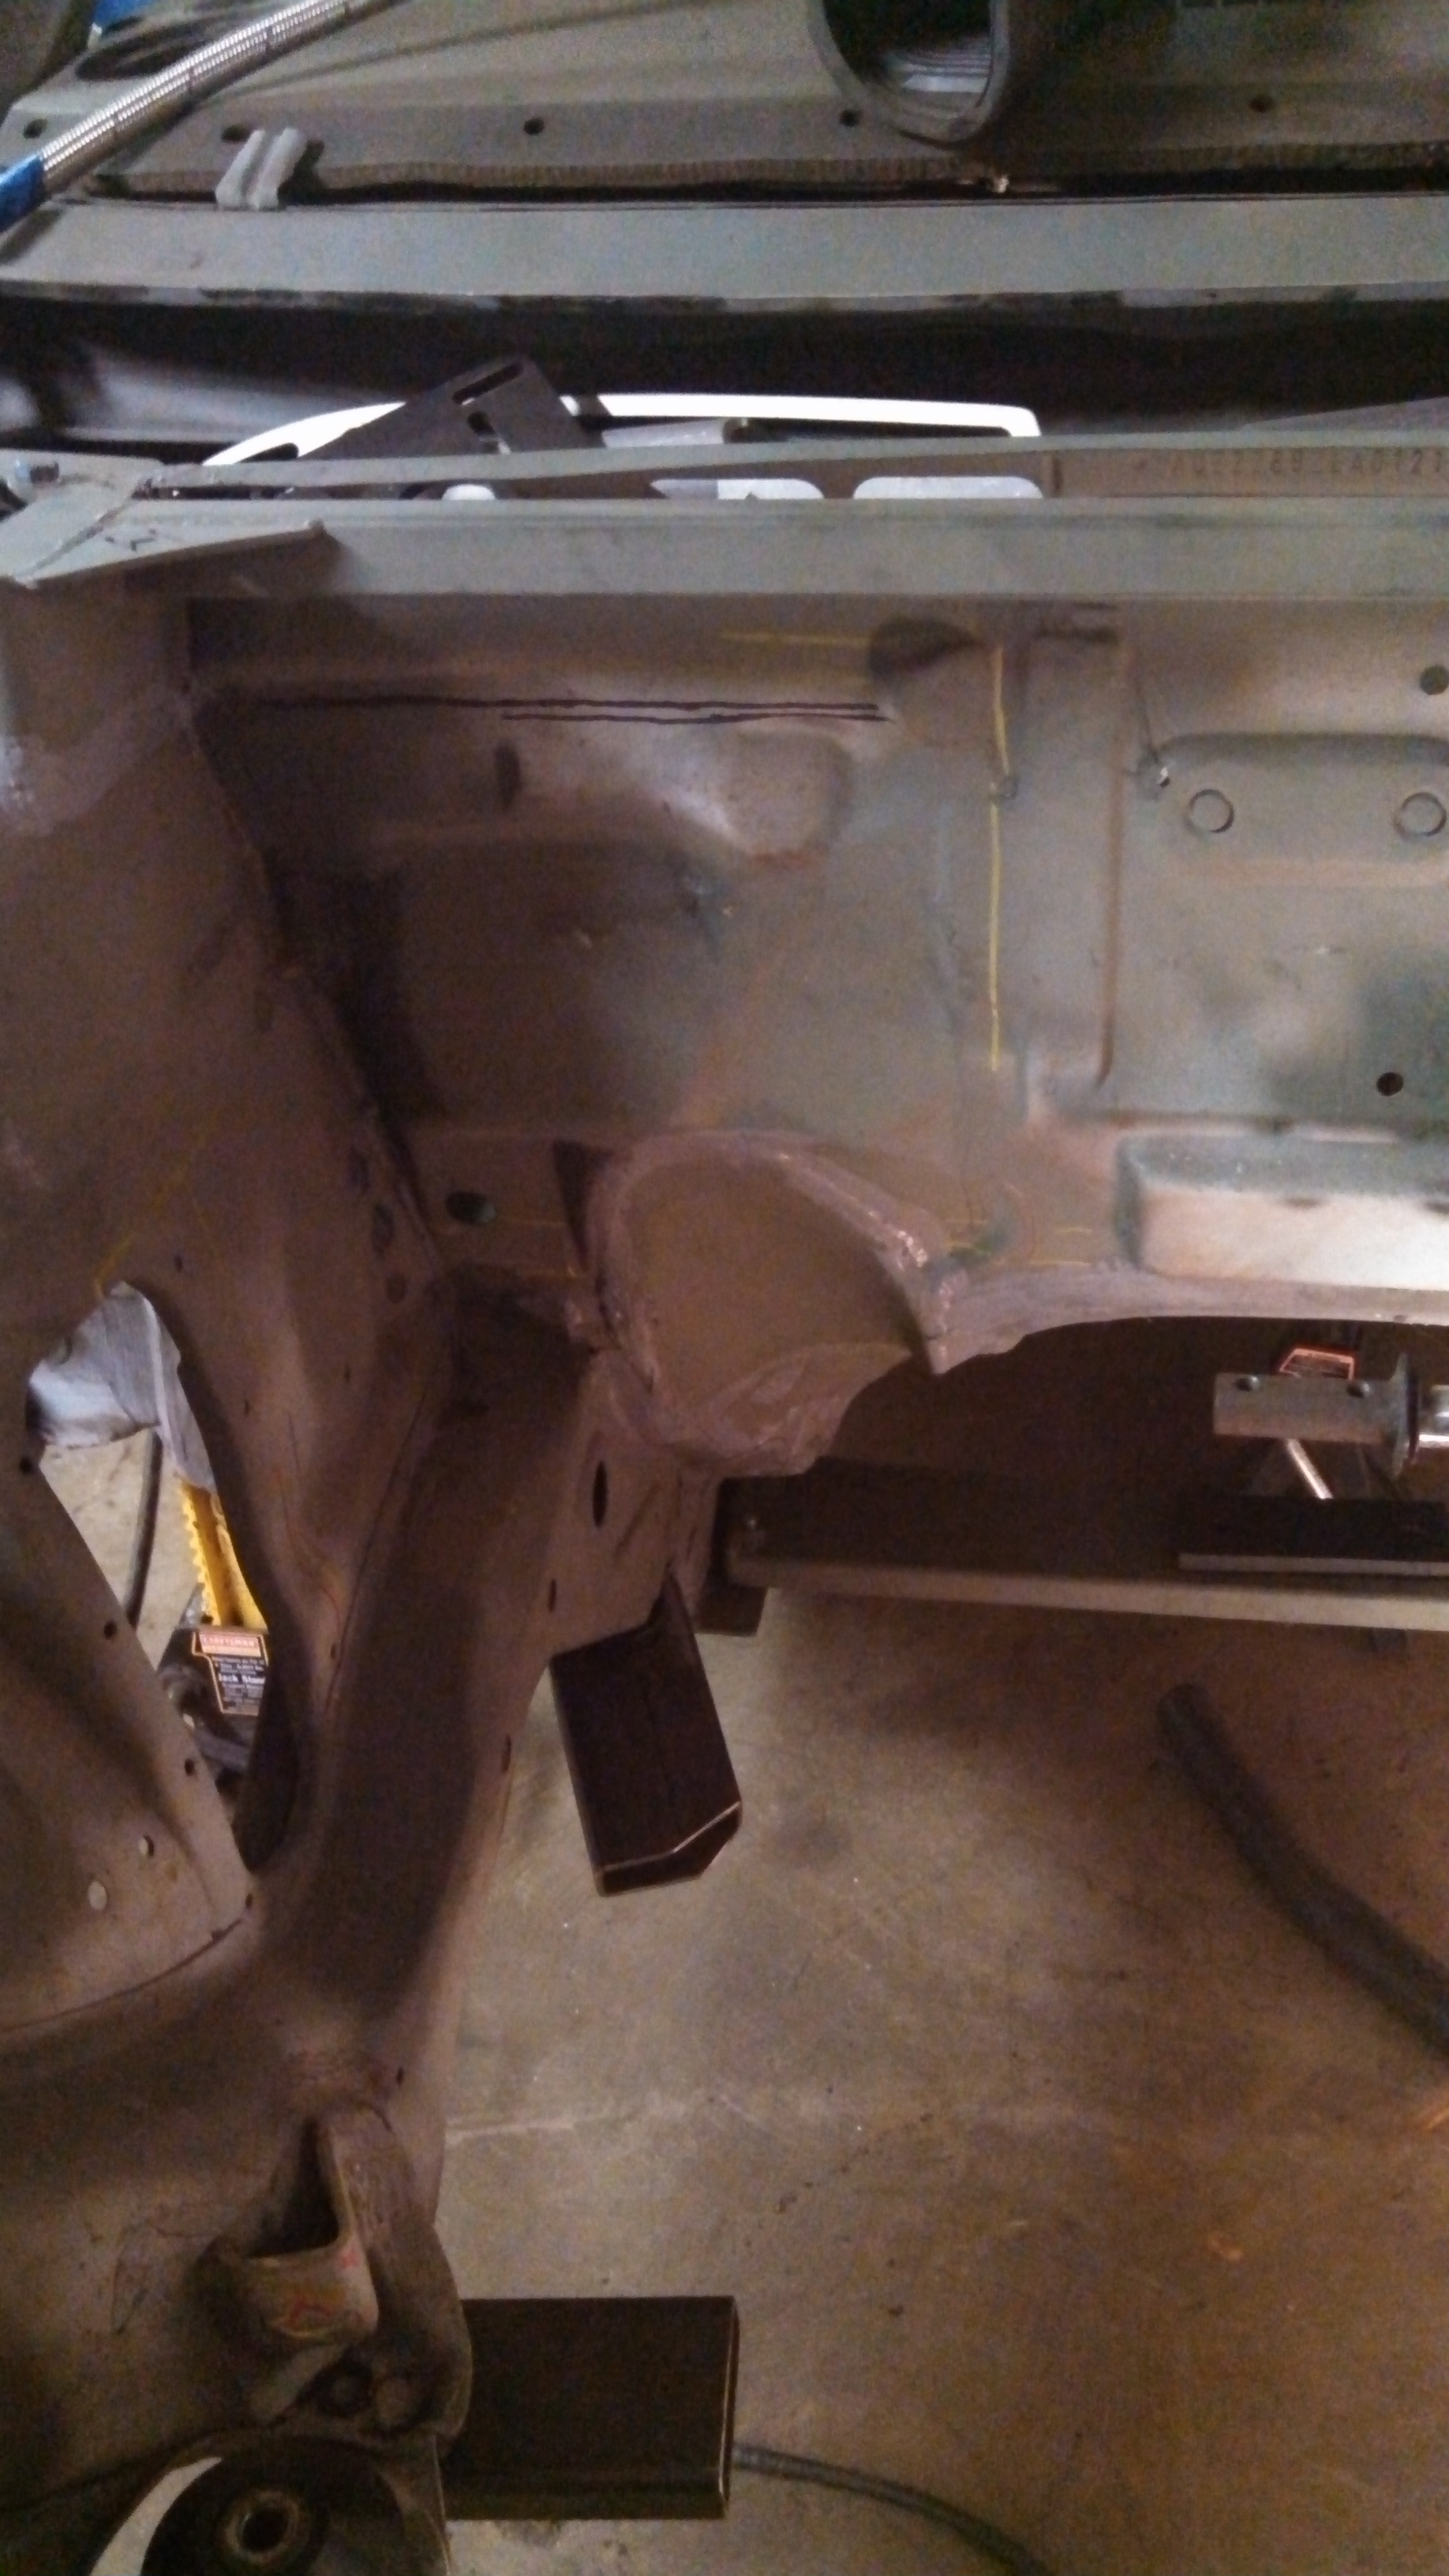
- soon to be relieved for more DP room2.jpg (1.28 MiB) Viewed 39155 times
Re: 24vVR6T CQ Project: EATSGTR, chassis FAB
Posted: Fri Sep 13, 2013 12:47 am
by my2000apb
UPDATE!!!
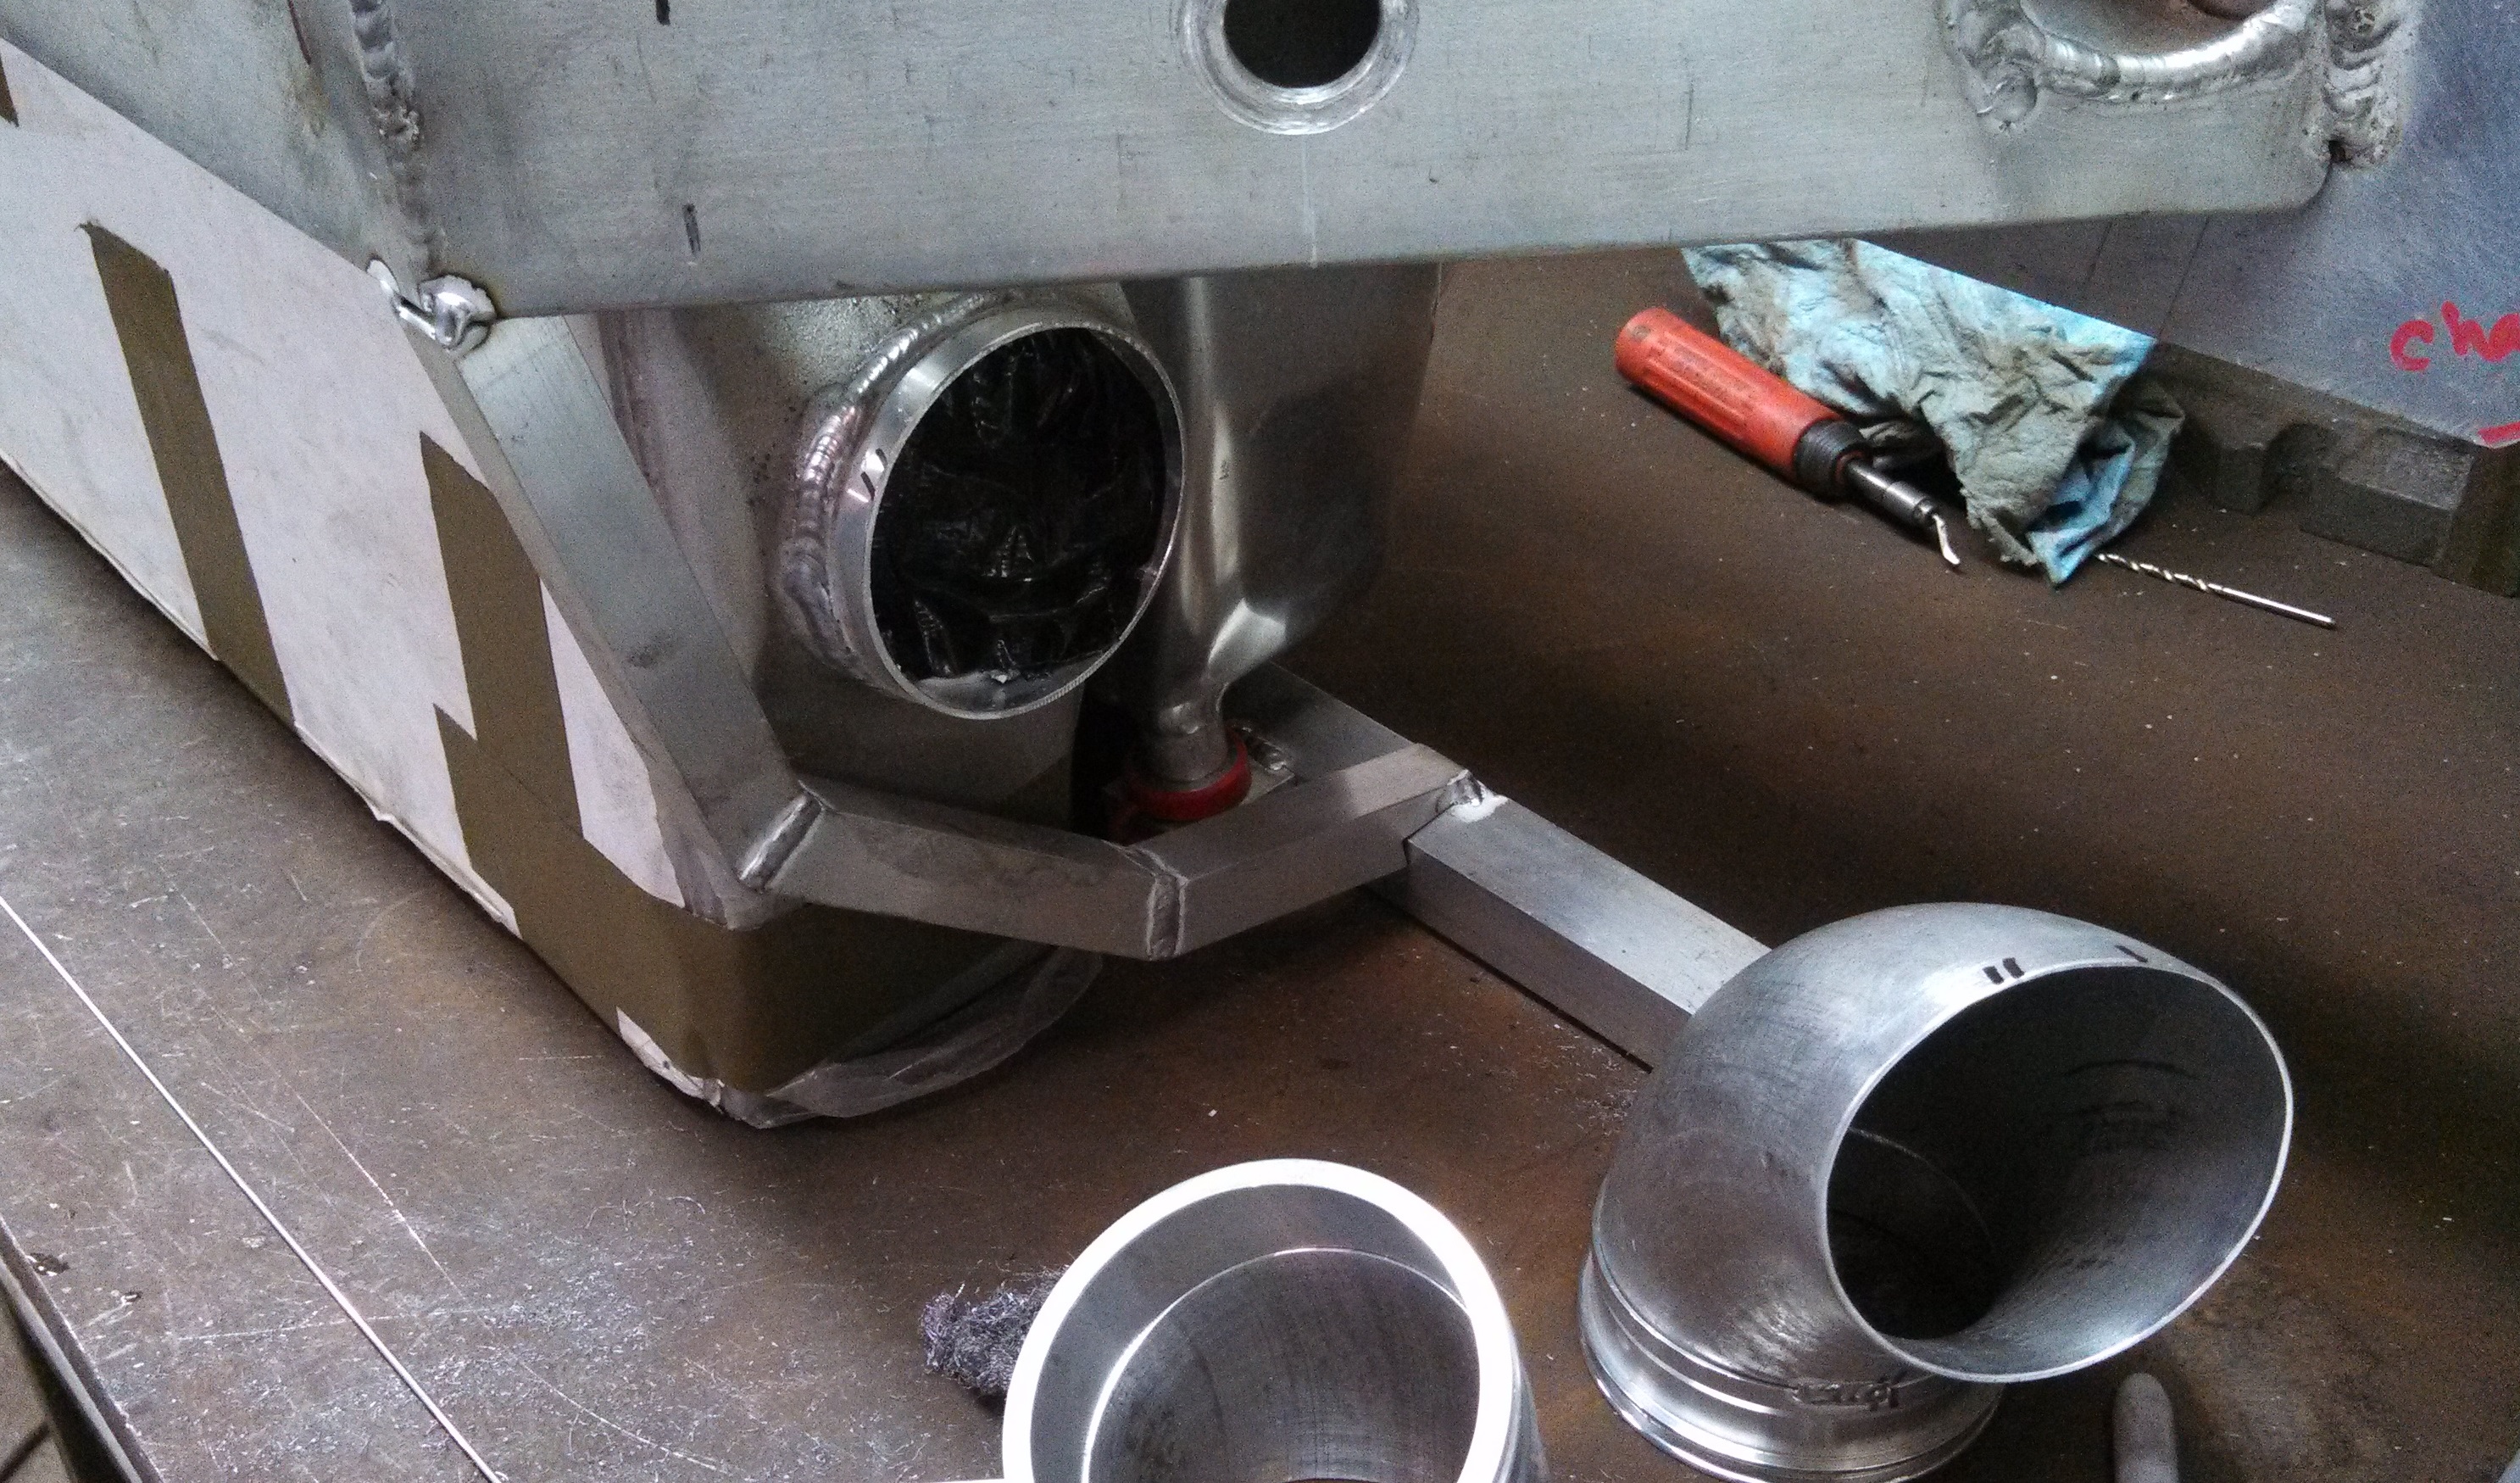
I also got a chance to work on the front cross-member. I made up some IC cradles out of some square stock, notched them and prepped them for welding.
- front crossmember IC cradles ready for welding.jpg (1.9 MiB) Viewed 39155 times
Note the notch where it joins the lower bar, its quite strong this way.
- front crossmember IC cradles joint detail.jpg (1.89 MiB) Viewed 39155 times
The IC upper mounts through the main bar. The lower will mount off a triangle tab welded to the vertical portion, and I can use the red silicone mounts there as well. I will add m8 female bosses to the IC at just the right height to fit well with the silicone snap grommets.
I had Ryan tack them up before I left.

- front crossmember IC cradles tacked on.jpg (1.81 MiB) Viewed 39155 times
- front crossmember IC cradles tacked on2.jpg (1.97 MiB) Viewed 39155 times
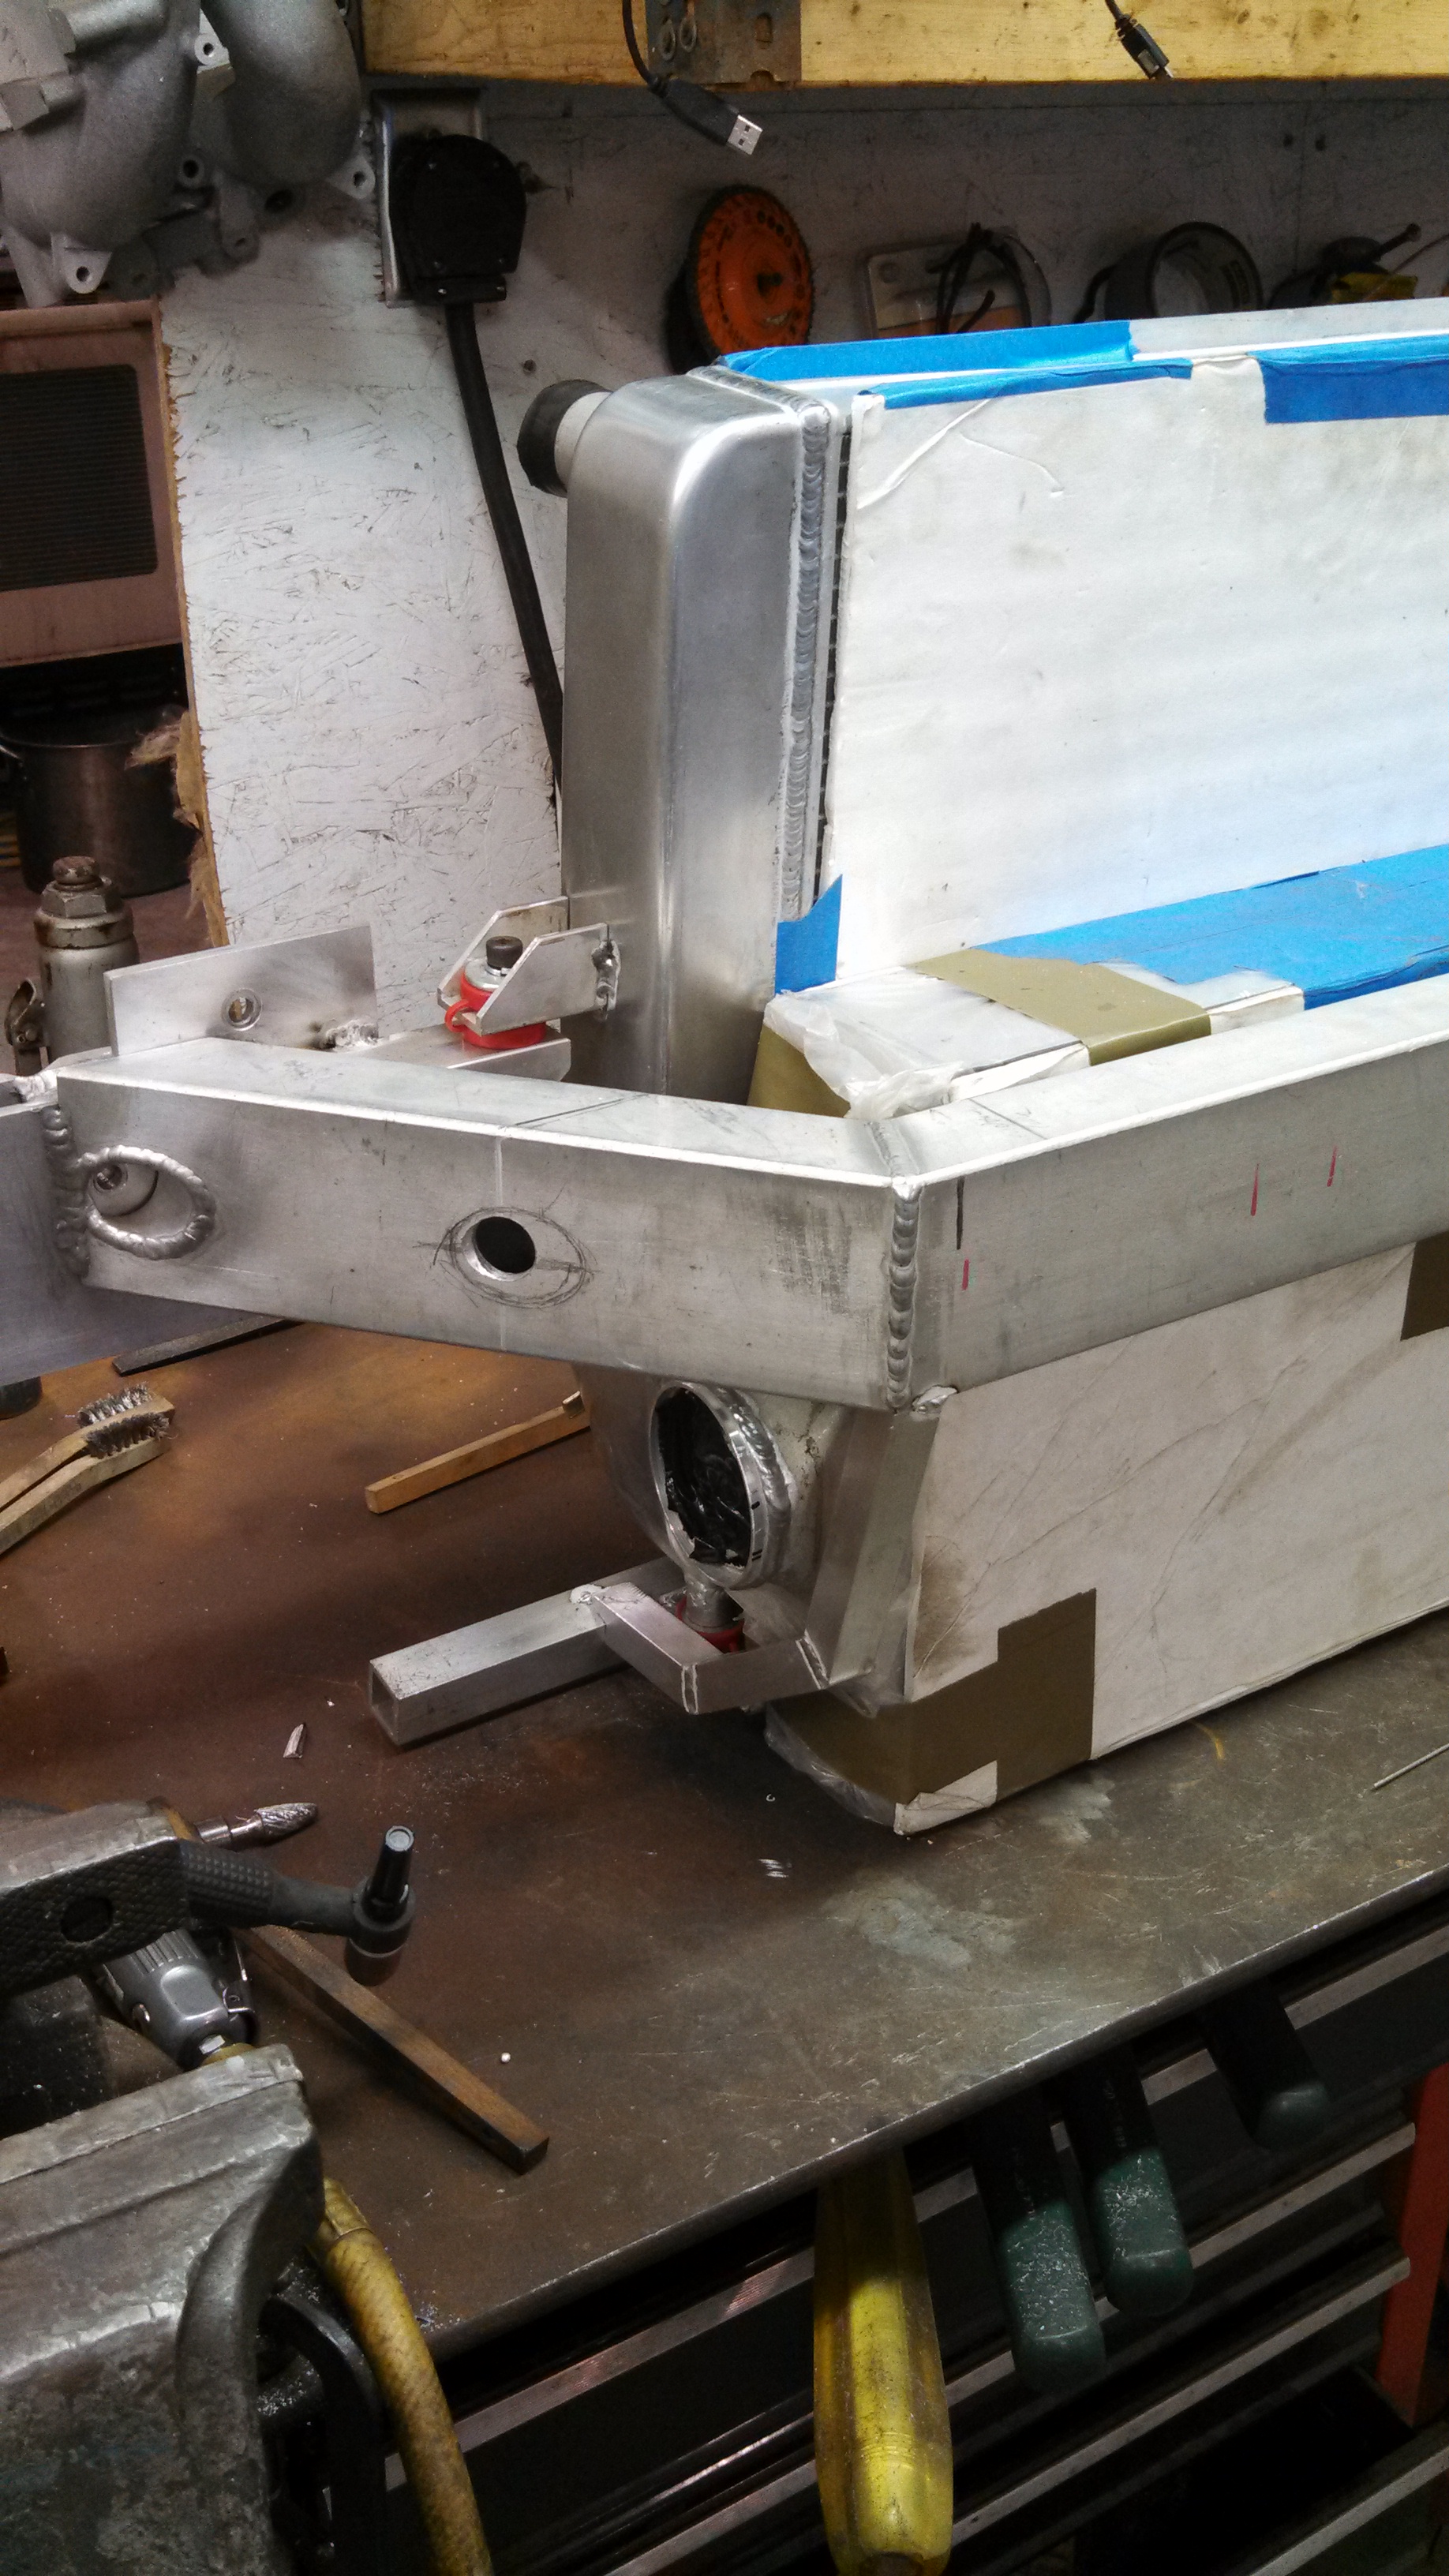
- front x member coming together.jpg (1.67 MiB) Viewed 39155 times
Re: 24vVR6T CQ Project: EATSGTR, chassis FAB
Posted: Fri Sep 13, 2013 12:52 am
by my2000apb
MORE!
I also left Ryan @ Higbee Fab. a bunch of other stuff I had prepped. The Vanjen clamp flanges are ready to be welded to the short bends and welded to the IC endtanks.
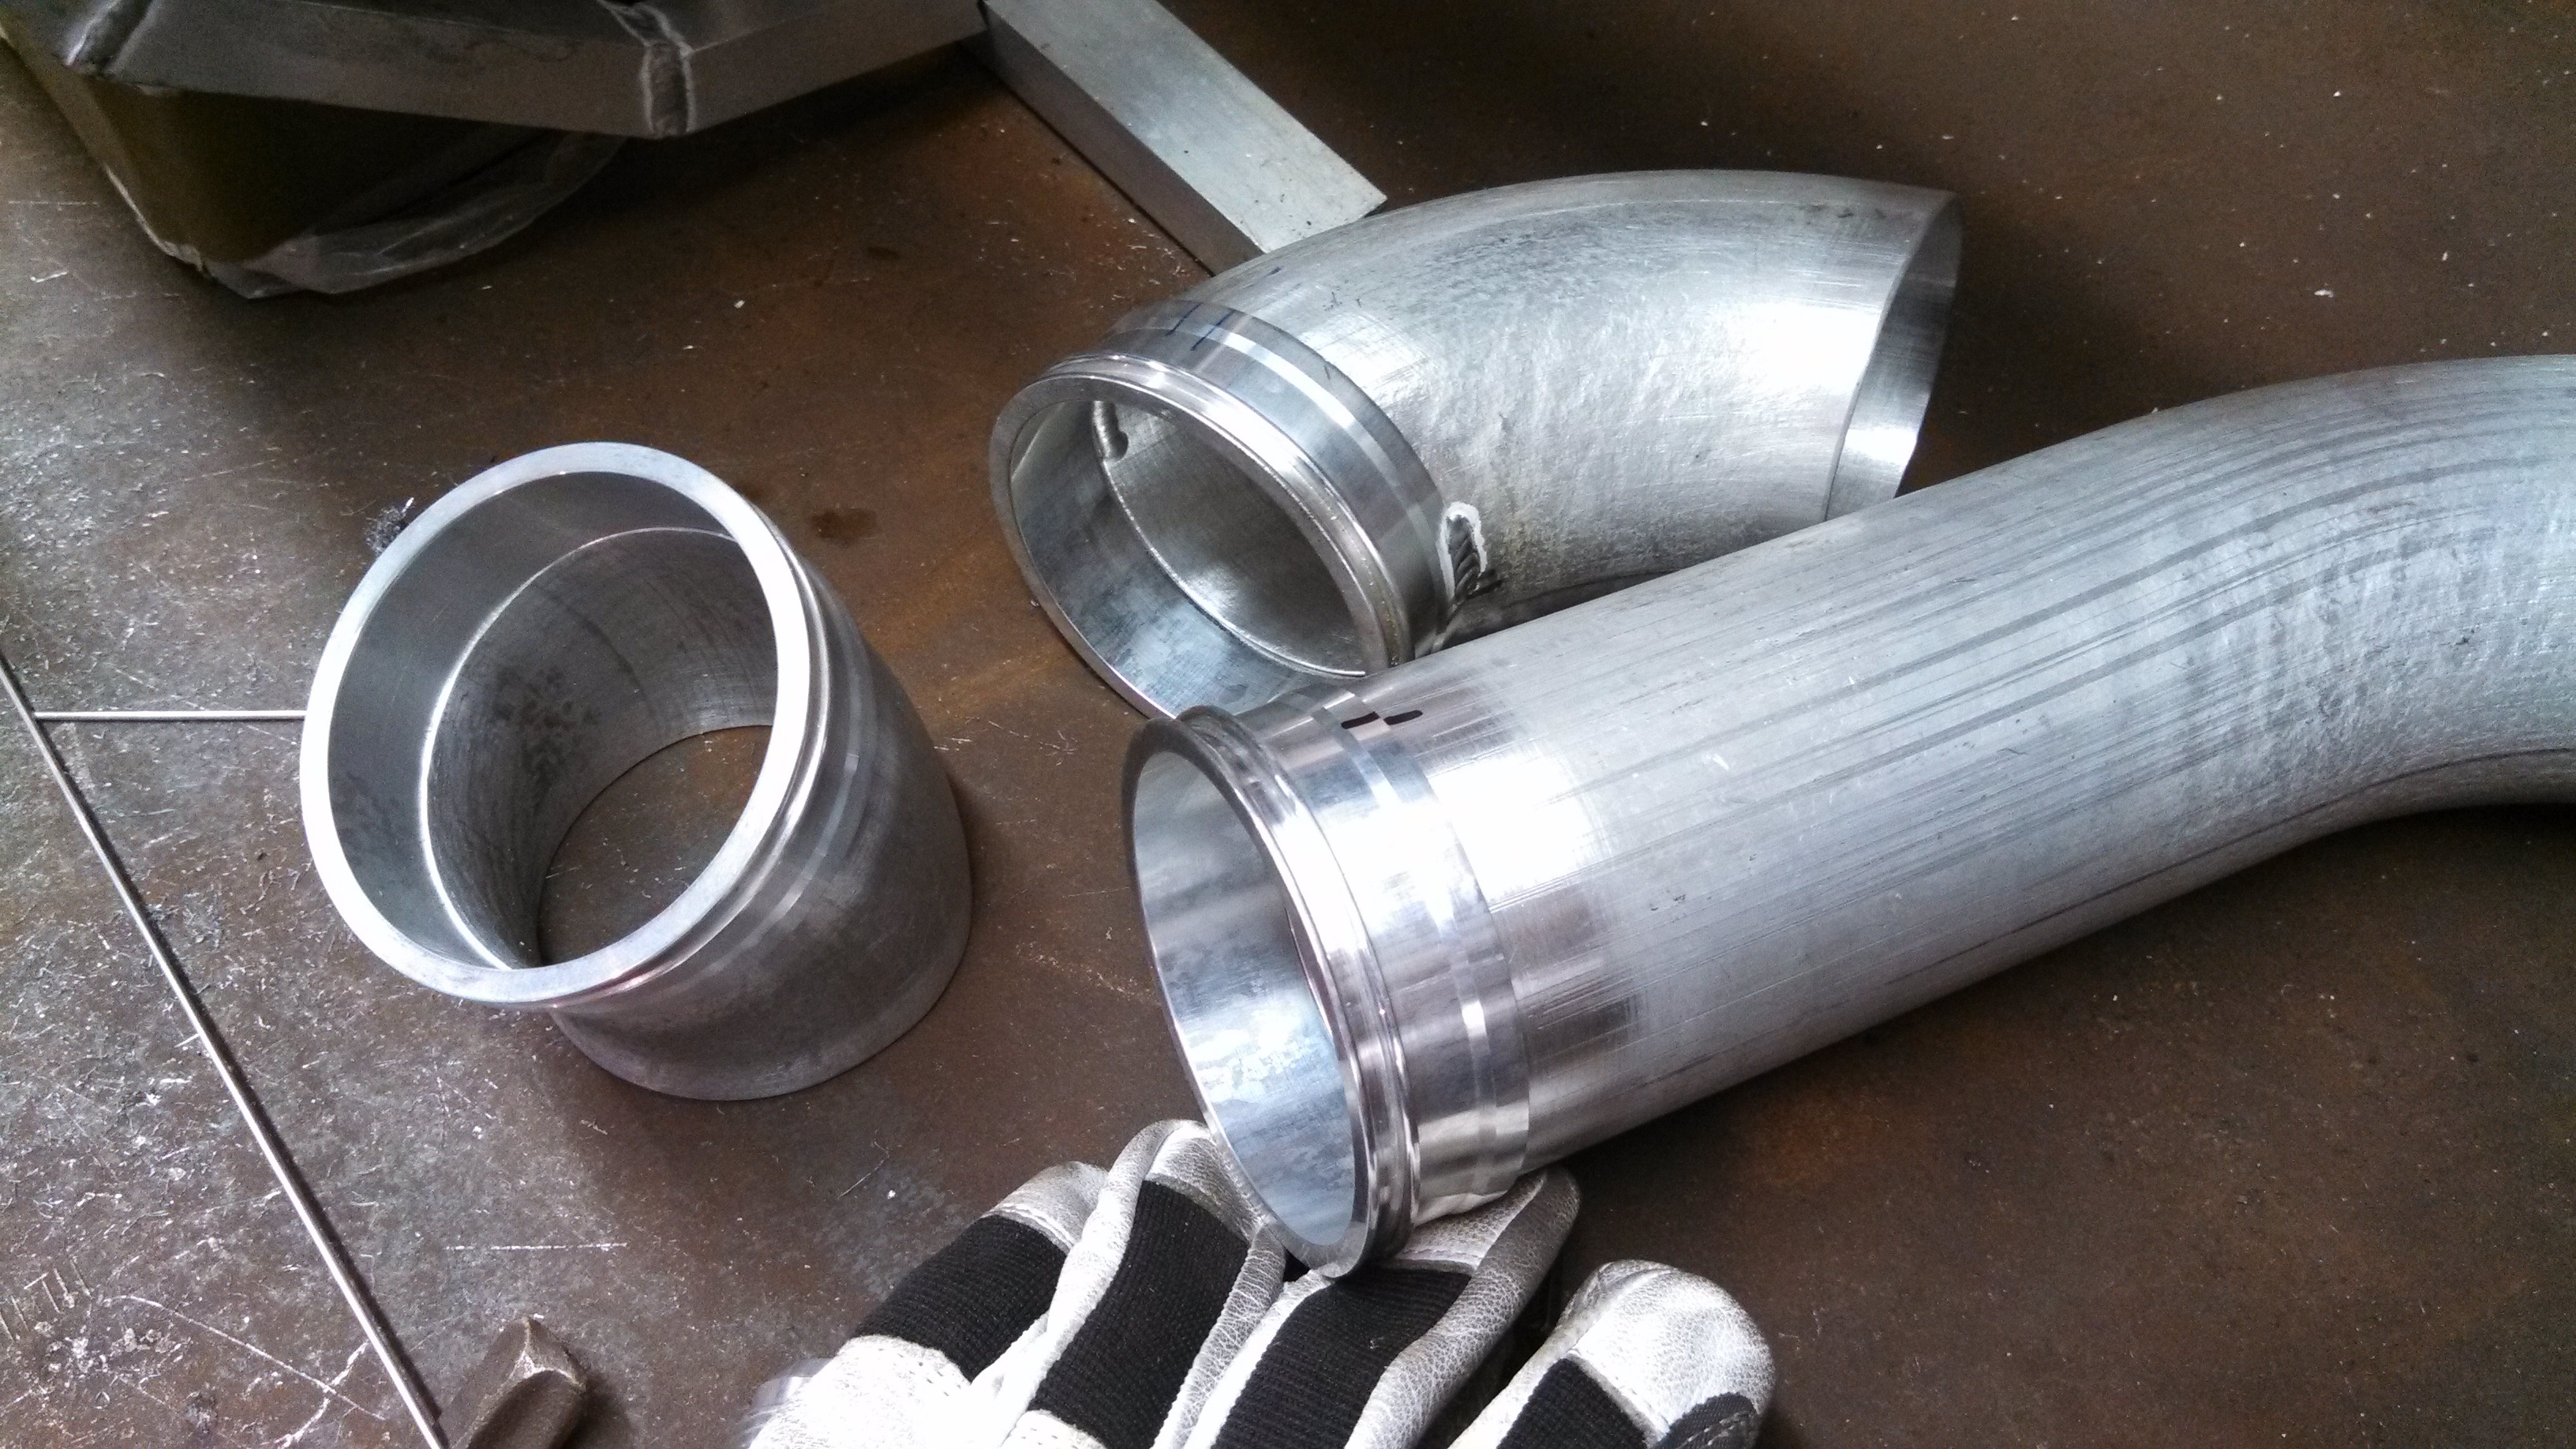
- vanjen flanges ready for seam welding.jpg (1.94 MiB) Viewed 39213 times
Also, the 16AN male to 1” aluminum elbow for the turbo oil drain into the oil pan.
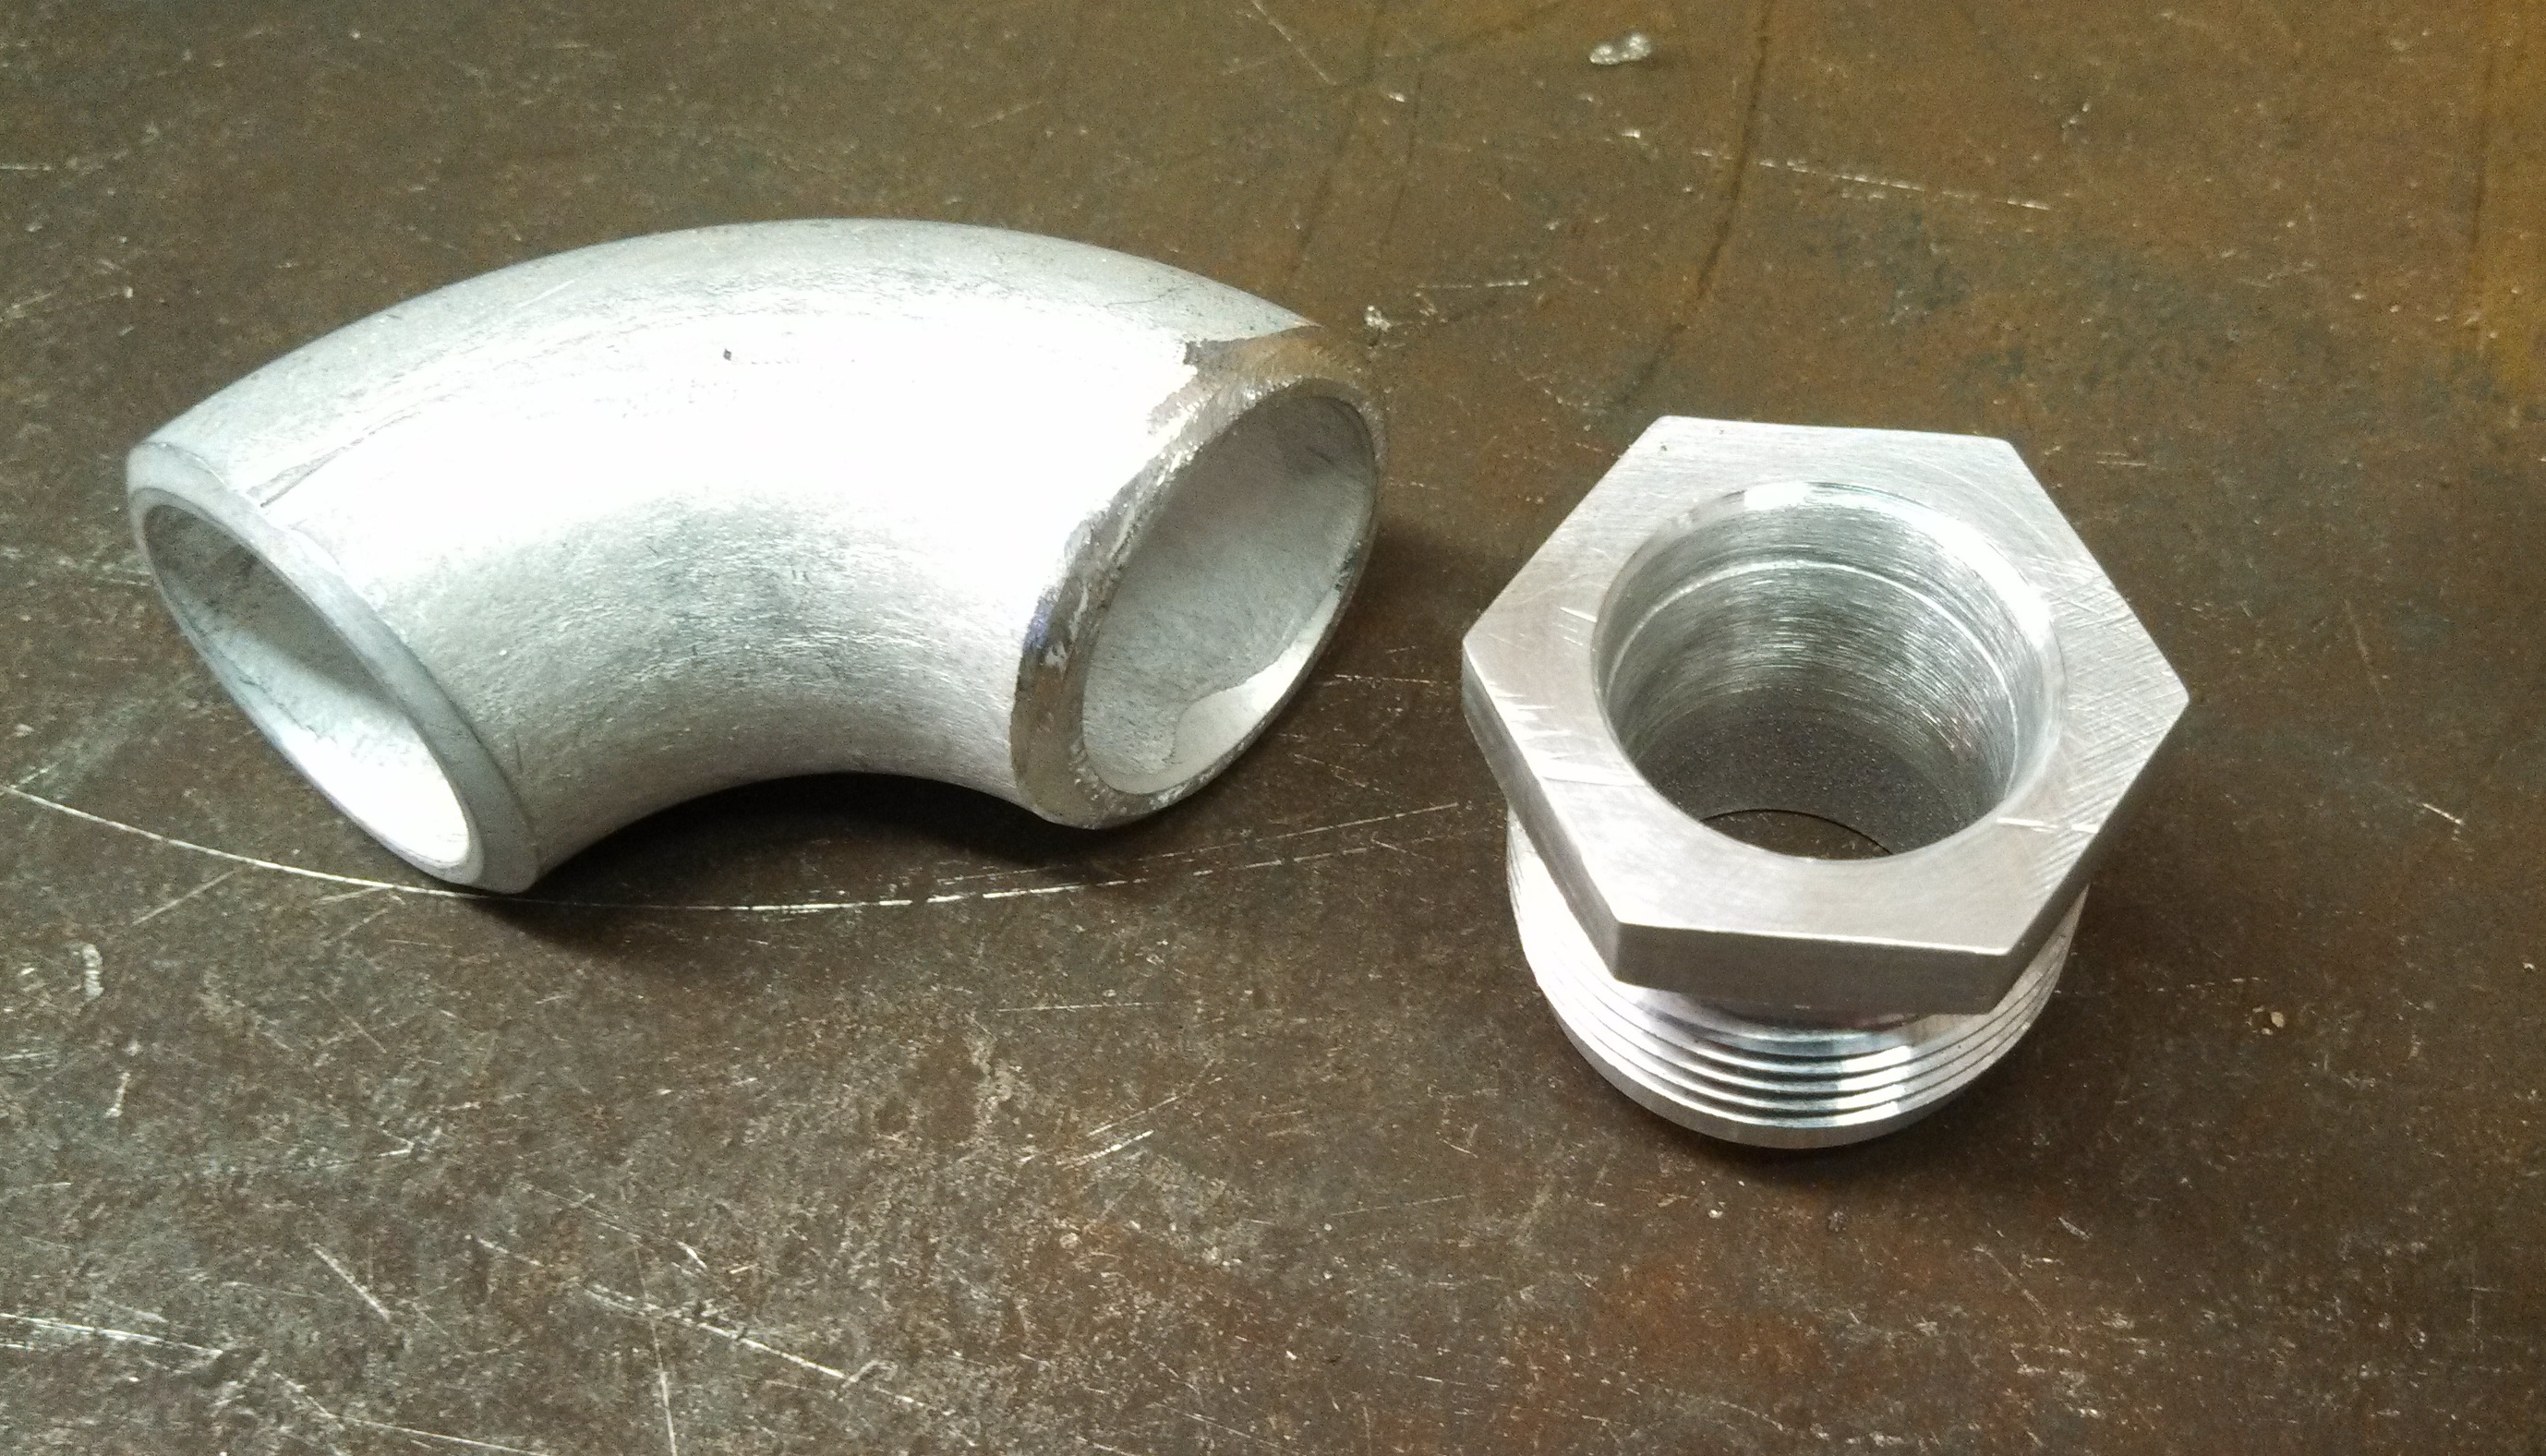
- 16an turbo oil drain and elbow to pan.jpg (1.51 MiB) Viewed 39213 times
Also getting the DP seamed up so far, and the INNER portion of the IM seam welded! I got the inside all cleaned up with some new alu. specific carbide bits and its ready for seaming.
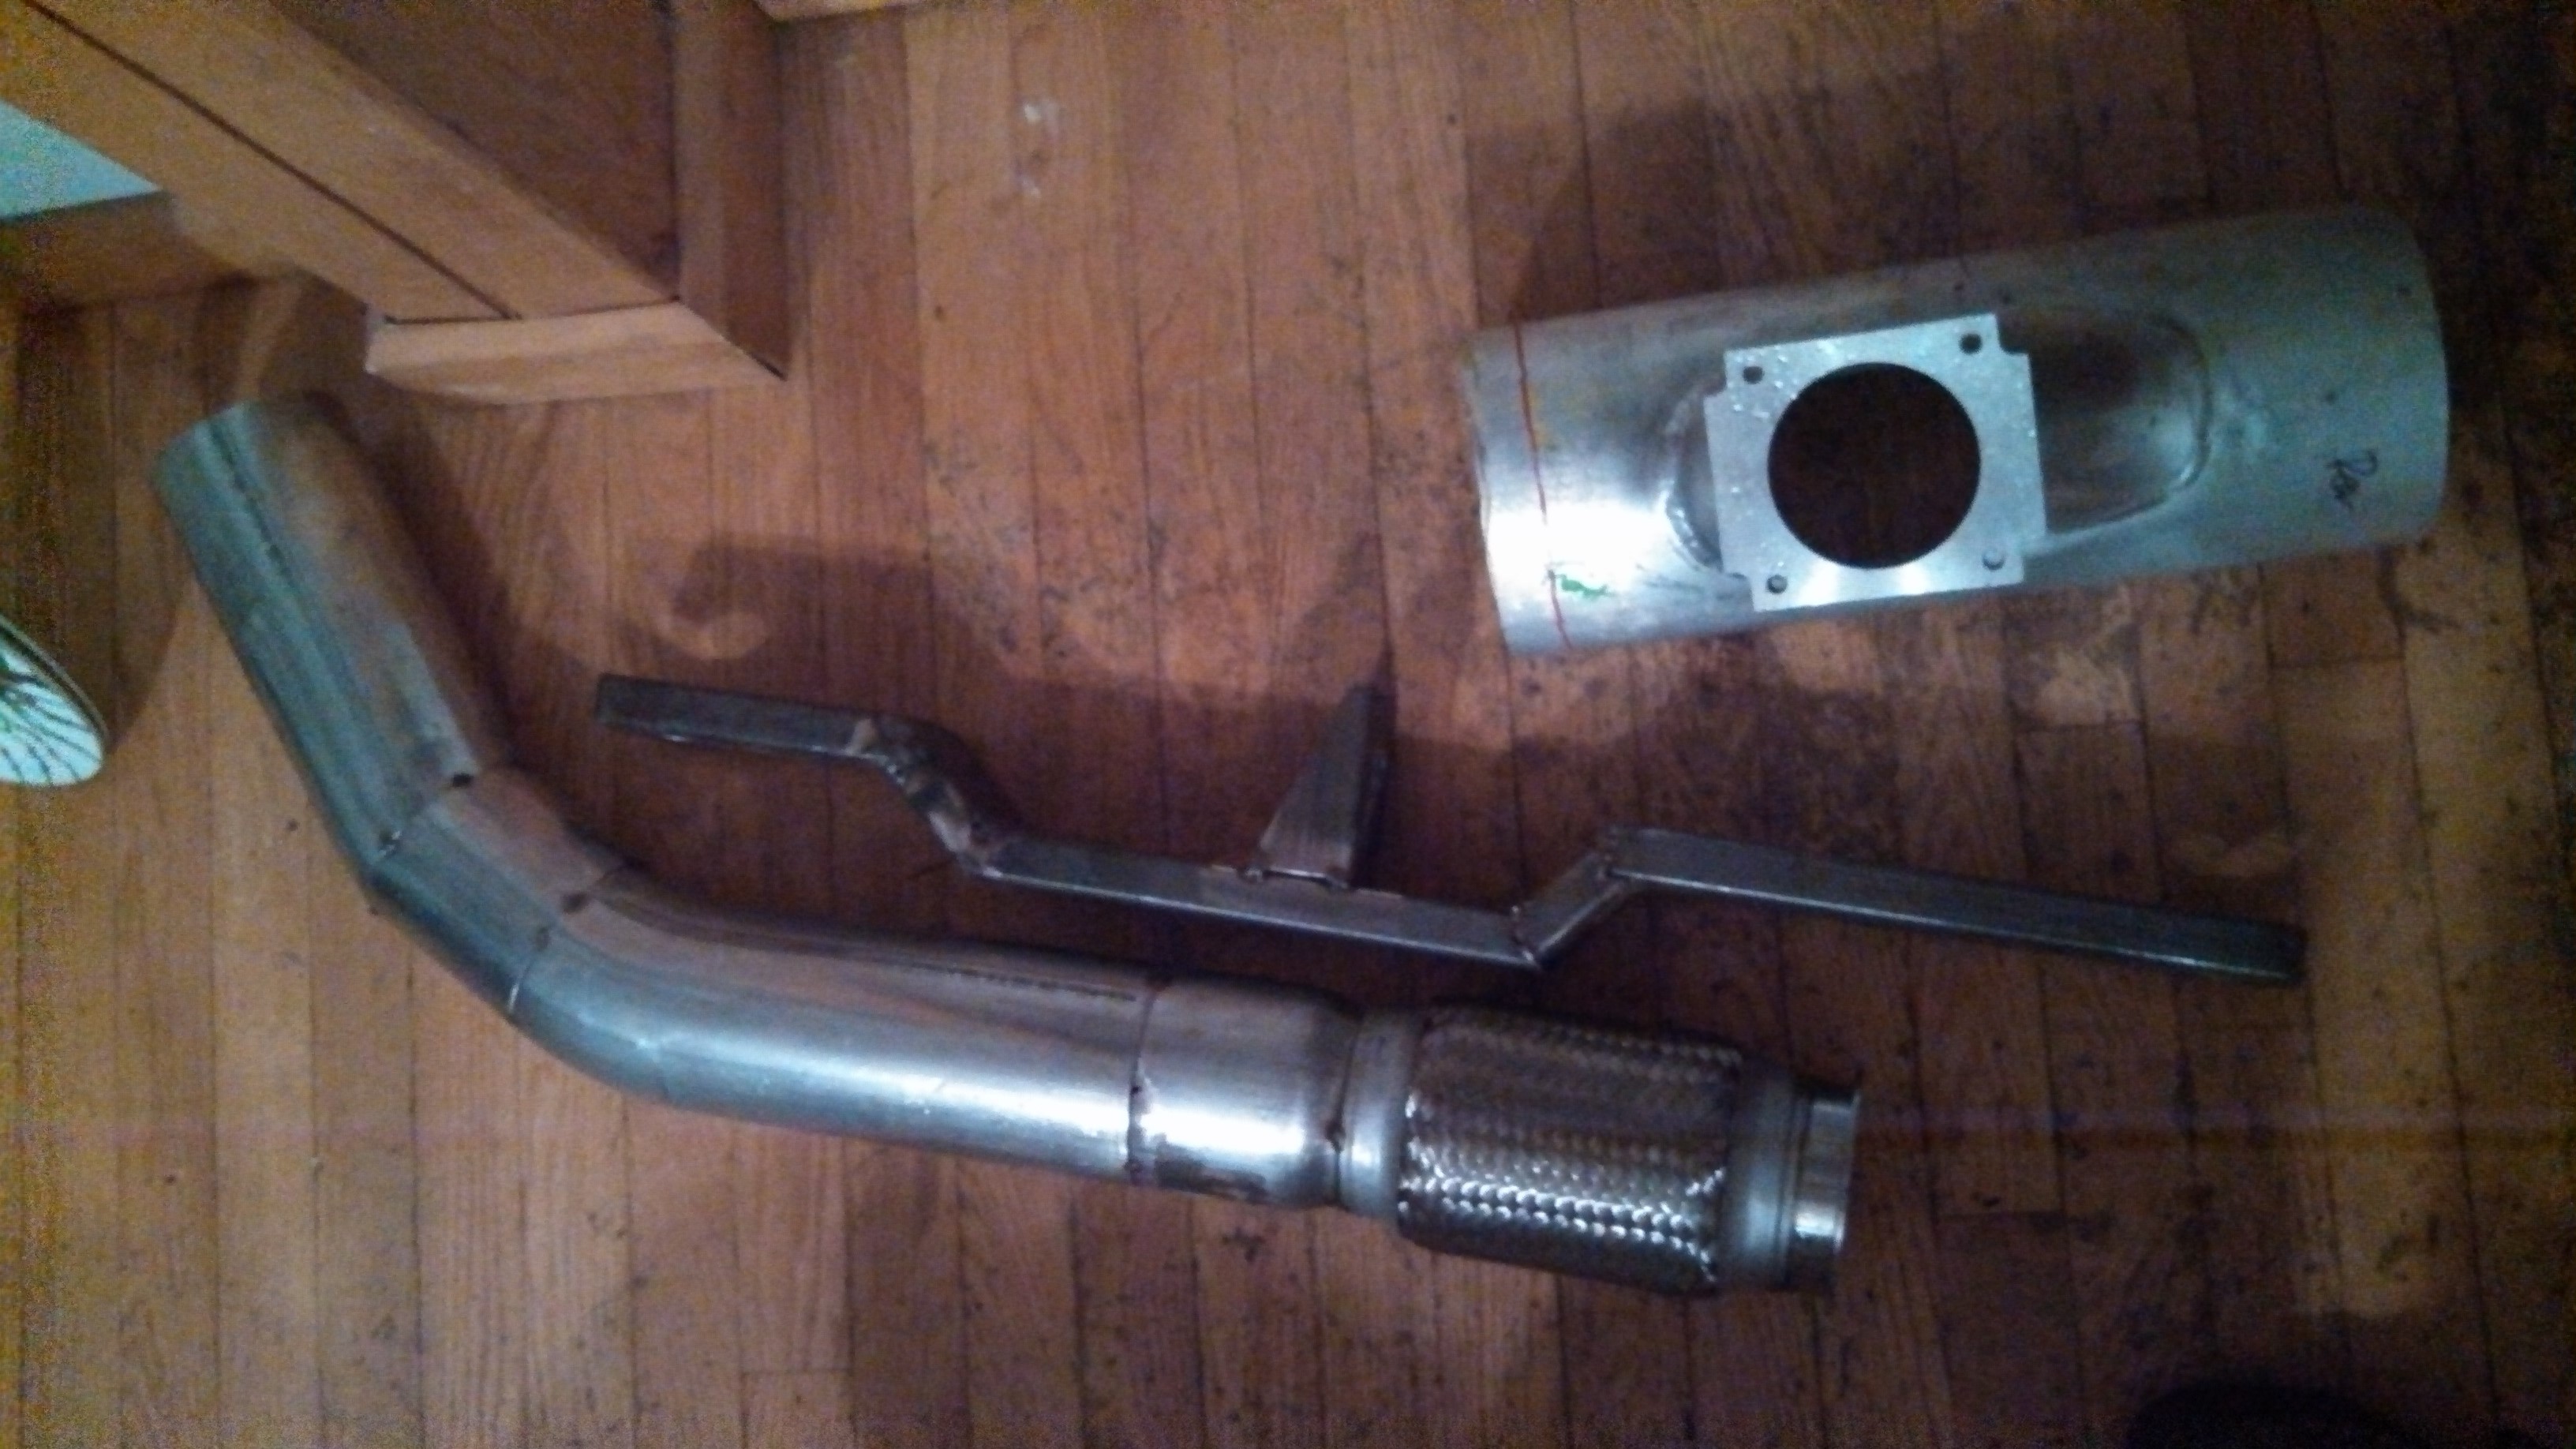
- more parts dropped off for seam welding.jpg (914 KiB) Viewed 39213 times
Re: 24vVR6T CQ Project: EATSGTR, chassis FAB
Posted: Fri Sep 13, 2013 12:57 am
by my2000apb
Re: 24vVR6T CQ Project: EATSGTR, chassis FAB
Posted: Fri Sep 13, 2013 1:02 am
by my2000apb
and lastly, Ryan sent me a teaser pic of some stuff he got welded up. Lookin’ good!
Hopefully I can pick up the front cross-member this weekend and get that finished up.
And I should be able to get some of the subframe tubes bent up at Haydn’s this weekend! Templates are ready to go. Woohoo! Epic progress continues!
Re: 24vVR6T CQ Project: EATSGTR, chassis FAB
Posted: Fri Sep 13, 2013 10:39 am
by EDIGREG
nice work tim!!
Re: 24vVR6T CQ Project: EATSGTR, chassis FAB
Posted: Fri Sep 13, 2013 11:24 am
by highlander69
Looking great !!!

Cheers,
Craig
Re: 24vVR6T CQ Project: EATSGTR, chassis FAB
Posted: Sat Sep 14, 2013 9:10 pm
by SEStone
Re: 24vVR6T CQ Project: EATSGTR, chassis FAB
Posted: Sun Sep 15, 2013 12:09 am
by loxxrider
Looks great Tim.
On the seam stitching, did you just grind the original seam sealer out, weld, then put seam sealer back over it? I need to repair some rust in that area in my 635 and wasn't exactly sure how to go about it. So grind out, weld, then put sealer there again?
Re: 24vVR6T CQ Project: EATSGTR, chassis FAB
Posted: Mon Sep 16, 2013 1:55 pm
by my2000apb
loxxrider wrote:Looks great Tim.
On the seam stitching, did you just grind the original seam sealer out, weld, then put seam sealer back over it? I need to repair some rust in that area in my 635 and wasn't exactly sure how to go about it. So grind out, weld, then put sealer there again?
yeah, a long thin wire wheel to get it all out of the seams, a little propane torch and a wire brush help get it out of the little cracks too, the big thing is to constantly wire brush it off as you stitch, the welding heat makes the oem sealer soft and melts out back between the seams. weld, brush,weld brush etc
then grind, wire wheel, etch prime, seamseal and reprime, paint
Re: 24vVR6T CQ Project: EATSGTR, chassis FAB
Posted: Mon Sep 16, 2013 3:08 pm
by DE80q
This is and awesome project! I love all the fab work. Keep it up! I hope one day I can come up there and see all these projects you have going on!
Re: 24vVR6T CQ Project: EATSGTR, chassis FAB
Posted: Thu Sep 19, 2013 9:07 am
by my2000apb
DE80q wrote:This is and awesome project! I love all the fab work. Keep it up! I hope one day I can come up there and see all these projects you have going on!
thanks, I'm forced into the fab work based on what I want, no one makes a 24v vr6t kit for a b3 lmao
Carlisle 2015 it'll be down there, unless someone wants to send me 10k$ where as I'd finish it sooner haha
Re: 24vVR6T CQ Project: EATSGTR, chassis FAB
Posted: Thu Sep 19, 2013 12:50 pm
by WOMBAT
and you think you're only $10k away.... BWAHAHAHAHAHA!
(revisit this next year)