This is a full project post I made on another board. It has the entire project start to finish on it, including BBQ6. Enjoy...
I've owned my '90 Coupe Quattro for around four or five years. It was bought as a replacement for my old 80Q, which had begun to fall apart after years of hard use and a 20vt engine swap. It received the rebuilt motor from that car, along with the standalone EFI, coilover suspension, upgraded brakes, and a host of other goodies. I made it fast but it definitely wasn't pretty. The driver side door and fender were mangled together from the previous owner. A beat up B4 hood was installed, and a tattered fiberglass RS4 bumper made its way for a bare plastic Rieger RS2 replica.

I moved down to Phoenix two years ago, and shortly after out of boredom and wanting to do something, I swapped on a straight driver side door and fender. The fender was pearl white, and the door was faded OEM single stage tornado red. A step up, but the car was now five different colors and that needed to go. Quotes from body shops to repair and respray everything came in at $4-5k, which was just unrealistic given the position I was in at the time (and frankly, still am).
Thankfully, I became very good friends with two people shortly after moving down. I had known Jason for more than 10 years off of the corner-carvers.com message boards, and had met him once prior on a trip to Phoenix years ago. He is an Audi nerd and a very smart guy. He had recently done some major collision repair to the quarter panel on his low mile '99 Mustang Cobra, which turned out to be a better finish than the rest of the car. After getting to know Jason, I got to meet Val and Savannah Ivanitski in the search for Coupe parts. They're a young couple who met racing the Pikes Peak hill climb, with Val running in a 4.2 A4 and Savannah running a 20vt CQ the year prior to meeting them. They had just moved to AZ as well, and sold the COupe so I bought some leftover parts. Val owned an UrQ in need of some rust repair and paint work, so I volunteered to get dirty to learn the process and bond with my new friends.
A couple months later, the UrQ was patched up and had been resprayed in his garage. Between the two of them, they owned the sundry tools needed, and the actual process itself was fairly straight forward to pick up. Prep is important, keeping clean is important, and you can fix the inevitable defects later. Sold! In June 2014, I went to a local auto body store (Space Age Paint in Mesa, AZ...open late 7 days a week!), bought a few sanding blocks and a bunch of sand paper, and went to town.
Based on the UrQ, I went around the car opening up things that seemed questionable. Areas of rust, paint that had flaked off, weird body lines. I knew this car had been repainted before after finding some accident damage.
I immediately found two big areas of filler. One I never would have guessed in front of the drivers rear tire. I found the backside of this panel, and verified that there was probably a skim coat of filler filling a small wave of damage. Sanded down to metal to get rid of any rust and this was good to go.
 Untitled
 by
sam stone, on Flickr
The other on the rear pan in the dead center back of the car was going to be a huge pain. The body line always looked funny, and rust had begun to creep out of the top. I found filler after sanding through the paint. And more filler. And more. Finally I got a wire wheel and assaulted the rear of the car, striping down to metal. There was 3/8" of filler covering up a hackjob repair of a big dent. Someone had tried to pound the dent out with a pick, making matters worse as it stretched an easily repairable dent into a big mess of metalworking.
 Untitled
 by
sam stone, on Flickr
 Untitled
 by
sam stone, on Flickr
 Untitled
 by
sam stone, on Flickr
 Untitled
 by
sam stone, on Flickr
 Untitled
 by
sam stone, on Flickr
This was going to be interesting...
I removed all of the trim, and hit the rest of the car with 180 grit to knock off the outer layer of paint/clear/whatever to get to a solid substrate to begin applying new stuff. The hood was in rough shape, with some rust, rock chips, and heavily damaged paint, so I ended up sanding the entire thing down to bare metal. All of this was in late July into August in Phoenix, so progress consisted of 60-90min at a time sweating my ass off in a 105F garage after dark sucking in paint dust. The angst, and colossal mess began here...
 Untitled
 by
sam stone, on Flickr
 Untitled
 by
sam stone, on Flickr
 Untitled
 by
sam stone, on Flickr
I picked up a book 'The Keys to Metal Bumping' and a $25 hammer and dolly set from Harbor Freight to begin work on that back panel. It turns out that if you're in far enough to be going paint work, fixing metal is not too difficult and actually pretty enjoyable. There are some relatively simple principles to it that involve learning how the dent was formed, and then working your way out from the 'last' damage to the 'first' damage. With that and a couple hours' work, I began to make some great progress flattening out the rear of the car.
 Untitled
 by
sam stone, on Flickr
 Untitled
 by
sam stone, on Flickr
 Untitled
 by
sam stone, on Flickr
I got bold enough to lay a skim coat of filler in preparation to spray the car with high build primer last September.
Jason graciously volunteered his garage, so on Saturday I went over there with a few hundred bucks in supplies and a couple quarts of high build primer to apply to the car. This was an eye-opener into just how much work is involved in spraying a car. I thought I had the car ready to go shy of 1-2hr of work, but almost 12hr of work went by until we had everything masked and were ready to spray.
 Untitled
 by
sam stone, on Flickr
First down was etching primer over the hood and any other bare metal areas. This primer has acid in it that helps it bond directly to bare metal and give a solid substrate for subsequent primer/paint to adhere to. We sprayed this from U-Pol cans.
 Untitled
 by
sam stone, on Flickr
Finally, at something like 1am, we began shooting primer. High Build Primer is basically liquid body filler. It is primer designed to lay on thick, depositing enough material that minor suface imperfections can be simply sanded out and leaving a smooth, solid surface designed for paint to adhere to. It's very thick stuff, and unfortunately we ran into issues spraying it. With everything we had invested to that point, I decided to forge ahead and do the whole car, which may or may not have been a good idea. Regardless, we got it done, and at 4am I had a car that was a solid color for the first time ever.
 Untitled
 by
sam stone, on Flickr
 Untitled
 by
sam stone, on Flickr
The issues we had spraying had left us with an uneven. The primer was spraying on in particles rather than as an aerosol liquid, so the surface had a texture like sand paper. I forged ahead, applying a guide coat and then wet sanding with 320->400->600 on a block to smooth things out.
 Untitled
 by
sam stone, on Flickr
The guide coat is meant to give a contrast to let you know when you have sanded all of the low spots out. It can serve to indicate low spots like dents, waves, or scratches, but with my rough primer finish it indicated porosity in the primer. You've gotta sand until all the black specs are gone, even if it means going all the way through the primer...
 Untitled
 by
sam stone, on Flickr
This sanding process went on forever. It was very tedious, messy, unrewarding work. I spent probably six months working on-and-off on the car just sanding down all of the original high build primer. As I gained experience, I got better and better at detecting and fixing issues. They say your best panel is always your last, and for a while I was basically working in circles around the car trying to improve upon earlier work I had done.
 Untitled
 by
sam stone, on Flickr
 Untitled
 by
sam stone, on Flickr
 Untitled
 by
sam stone, on Flickr
 Untitled
 by
sam stone, on Flickr
 Untitled
 by
sam stone, on Flickr
Around late June, I began to get a goal in mind. Battle Born Quattro is an annual event held in mid October in Las Vegas. Hosted largely at my good friend Hank Iroz's shop, it is attended by several long time friends and dozens of old school 5cyl Audis. My friend Jim Green was working on a 07K 5cyl swap into his widebody B3 90Q, and he and Hank supplied some solid motivation. I had to make the event this year...

Based on this new experience, I revisited the back panel I had metalworked, filled, and primed. Block sanding had revealed that there were some low spots, and more significantly some high spots in my work--ridges in the metal were poking through the layers of filler and primer. I ended up sanding this completely down to metal, working things out, filling, and sanding this a couple of times over before I was happy I finally nailed it though, with a very fine layer of glaze filler and no high or low spots on the block.
 Untitled
 by
sam stone, on Flickr
 Untitled
 by
sam stone, on Flickr
 Untitled
 by
sam stone, on Flickr
 Untitled
 by
sam stone, on Flickr
I also began to go over the other parts of the car with new layers of primer, trying to give a consistent substrate I could lay paint over. I was worried about different color substrates bleeding through the basecoat giving a patchy appearance, and obsessed about minute details of surface finish. Since I didn't have an air compressor, I was spraying automotive primer from spray cans. This actually worked out ok, depending on conditions, but caused my lots of problems later on. I spent a week or two and probably $80 in primer getting this side perfect, with no red bleeding through.
 Untitled
 by
sam stone, on Flickr
 Untitled
 by
sam stone, on Flickr
 Untitled
 by
sam stone, on Flickr
 Untitled
 by
sam stone, on Flickr
 Untitled
 by
sam stone, on Flickr
I went to repeat the process on the passenger side, which had been 'done' for 4-5 months. I wanted to cover up the red, and had some major work to do smoothing out some minor defects.
All of this sanding is done 'wet' to keep the sand paper from loading up with dust. You take a spray bottle and fill it with water and a drop of plain dish detergent. The dish soap lowers the surface tension of the water, allowing it to 'flow' better and cleaning the paper and the sanding surface better. It soaks up all of the sanding dust from the primer, causing it to run down to the ground in a big muddy puddle. These puddles then dry out and form all kinds of dust if you rustle them with your foot or move the plastic around. Microfiber towels work best for wiping down panels, but quickly get soaked in muddy water, which dries and turns to dust. Picking up a towel after it's been soiled with dust makes a dust cloud.
This dust and mess was by far the worst part of this project. Painting a car in a garage is not a big deal because you can just wrap everything in plastic and you're done in a day or two--your stuff is no worse for the wear. This dust gets everywhere and sticks to the floor. I started the project in an apartment garage, where I just let it run onto the concrete floor expecting to be able to sweep it up later on. Which was a problem, because you could never really sweep or blow it clean--I probably would have had to pressure wash it. They seal coated the apartment parking lot while I was working on this, and I would walk out of the garage at the end of the night and leave perfect grey footprints for a solid quarter mile back to my apartment. Those footprints wouldn't even wash off of the nice new blacktop when it rained...oops. We moved to a house in late 2014, and I put a big tarp down on the garage floor before I started anything. This worked great, and made clean up super easy.
 Untitled
 by
sam stone, on Flickr
 Untitled
 by
sam stone, on Flickr
 Coupe Quattro Refinish Project
 by
sam stone, on Flickr
I started to have big problems (or so I thought). It was mid to late August at this point, with daytime temps over 110 and nighttime temps when I was working of 100-105. I was having problems sanding through my primer and running into a very weird porous texture underneath. I was dealthy afraid of that porous texture absorbing basecoat, resulting in a ghost image of the porous area being visible.
 Coupe Quattro Refinish Project
 by
sam stone, on Flickr
I repeatedly sanded this all the way down, and reprimered and sanded. I tried different brands and types of primer. Finally I came to realize that the hot weather was causing the issue. The primer was drying so fast when it sprayed that the outer 'shell' would seal over before the solvents had time to evaporate from the deeper layers of primer. The solvents form voids and eventually disperse over a longer period of time. The only real solution I had available was cooler weather. Thankfully, in early September we had three cool nights below 90F where I made some hay and got a solid surface down. This issue probably cost me 1.5-2wks of work and $150 in materials and gas running to the store to try and fix it.
 Untitled
 by
sam stone, on Flickr
 Untitled
 by
sam stone, on Flickr
 Coupe Quattro Refinish Project
 by
sam stone, on Flickr
 Coupe Quattro Refinish Project
 by
sam stone, on Flickr
Somewhere along the line, my RS2 replica bumper received some flexible primer and got some rock chips filled before being wet sanded perfectly smooth.
 Untitled
 by
sam stone, on Flickr
 Untitled
 by
sam stone, on Flickr
 Untitled
 by
sam stone, on Flickr
The door trims also got block sanded smooth. It was shocking to see how uneven these were. They were also a pain in the ass, because they're made of some kind of plastic core coated in fiberglass or paper mache or something weird. They tend to flake apart around the edges, requiring the damage to be picked apart and sealed with glaze or filler to keep them from coming apart further.
 Untitled
 by
sam stone, on Flickr
Finally, with three weeks to go before BBQ6, we hit zero hour on the paint project and it was time to go. I had actually debated having a pro shop spray the paint to make sure that project went well. However, I got a couple quotes for over $2k labor and materials to spray a prepped car brought to them. I'd gotten quotes earlier in the project for 1/2 to 2/3s that amount, so it seemed high and I simply hadn't budgeted that much, so I stuck with the DIY route, expecting more work to be involved on the back end fixing imperfections.
I went to Space Age and picked up a gallon of Matrix Premium Basecoat along with a gallon of Matrix MS-52 Euro clear. I did the factory LY5D tornado red color, with the shade matched to an original piece of trim off the car. With some fresh 3M respirator inserts, everything came to around $850 for paint, clear, and the associated hardener/reducers.
Val and Jason rolled over early in the day on Sunday, and we got to work prepping the car and masking everything off. We cleaned the car, moved it outside to clean the garage, moved the car in, and cleaned it again. The garage got masked and an air flow scheme devised using 3x box fans and some HVAC filters to control overspray and fumes outside.
 Untitled
 by
sam stone, on Flickr
 Untitled
 by
sam stone, on Flickr
 Coupe Quattro Refinish Project
 by
sam stone, on Flickr
By about 3pm, we were ready to begin spraying basecoat.
 12019941_10103490739132693_6045026430885103708_n
 by
sam stone, on Flickr
 Untitled
 by
sam stone, on Flickr
We got through two or three coats of basecoat when we realized we had some issues to take care of. There were some runs and some areas reacting oddly with something in the primer. Not wanting to risk all that prep work for a substandard spray job, I pulled the plug for the day to let things cure and allow some work to be done before we finished spraying later that week. It's worth noting that it was 105F that day, and we were standing in a garage full of 1200w halogen lights wearing Tyvek suits. We sweat gallons of fluids out...
The next day, Psycho Sanding Sam began block sanding some problem areas in the hood, driver's door, rear quarter, and wing/decklid. I delicately block sanded these with 600, getting them flattened out and ready to respray. As the social media ribbing crept in that I couldn't paint something without sanding it off immediately thereafter, I may have gone a little Braveheart in pursuit of a smooth finish...
 Untitled
 by
sam stone, on Flickr
I dare someone to replace the MNAudi front page picture with that.
Since we had passed the recoat time for the basecoat (meaning the paint had cured enough so that subsequent coats could not chemically bond to it), the entire car got hit with a grey Scotchbrite pad to rough up the surface. On Wednesday night, Val came over and we finished the job.
 Untitled
 by
sam stone, on Flickr
 Untitled
 by
sam stone, on Flickr
 Untitled
 by
sam stone, on Flickr
 Coupe Quattro Refinish Project
 by
sam stone, on Flickr
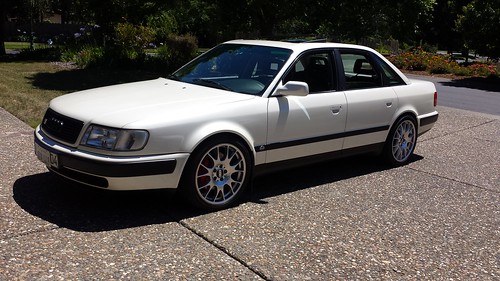
Four total coats of base and four coats of base later, the car was painted. I almost couldn't believe it. Finally!
I had to let it sit for a few days while work events took my attention. Once that was done, I could take a closer look at things. The car had some issues with runs, dirt/bugs, and fairly severe orange peel over many sections of the car. While I was happy it was red, and had anticipated the need to fix imperfections, this seemed like another huge task. Regardless, I hadn't poured so much time, money, and effort into something just to get mediocre results, so it had to be done.
 Coupe Quattro Refinish Project
 by
sam stone, on Flickr
With two weeks to go before BBQ6, I spent the week taking care of some mechanical issues with the car. I replaced the coilover sleeves and perches, as the old ones had seized with an uneven ride height that was prone to causing tire rub. 245/40r18 Sumitomo HTRZIII tires went on as well. They're competent and dirt cheap, which was what I was after having spent so much money on the refinishing project, and uncertain of the condition of the suspension/setup in the near future. I ended up having to roll the front fenders slightly to clear them. Clearances were tested by installing the suspension with no spring and compressing it until the bumpstop was bottomed out. Check out my stance, yo.
 Untitled
 by
sam stone, on Flickr
 Coupe Quattro Refinish Project
 by
sam stone, on Flickr
 Untitled
 by
sam stone, on Flickr
 Coupe Quattro Refinish Project
 by
sam stone, on Flickr
My QRS spherical front top mounts got moved to the rear, and camber/caster adjustable offset mounts went in at the front. Along with that went new tie rod adjusters, to facilitate an alignment done at work by my friend Nick. We got the car leveled and corner balanced. I was only able to hit around -1.6deg of camber in the front, but got to 3.25deg caster on each side which is a big upgrade from before. If I track the car it will probably need more camber for tire wear and grip, but for now on the street the car has a great front end on it.
 Untitled
 by
sam stone, on Flickr
I also fixed a couple coolant leaks, fixed a radiator mount, and welded up a header crack. It got an oil change as well. The car ran like a top after mostly sitting for over a year. With this all done, I put the front end together for the first time. This was pretty special, I walked around grinning for a long time when this started to go together.
 Coupe Quattro Refinish Project
 by
sam stone, on Flickr
 Untitled
 by
sam stone, on Flickr
 Coupe Quattro Refinish Project
 by
sam stone, on Flickr
On the Sunday before BBQ6, I went over to Jason's with the goal of working out the defects in the clearcoat. In his very well-lit garage, we saw we had a lot of work to do and got down to it. The hoot and roof were first, being the largest flat panels. We initially went over these with a progression of 1500, 2000, and 3000 grit sand paper on a block before moving on to rubbing compound with a foam pad on a DA. The sand paper levels out the orange peel and runs, and the DA polishes out the scratches and gives you a clear reflection. This was getting results, but was extremely labor intensive. Jason whipped out a rotary buffer with a coarse wool pad and rubbing compound. This was super effective at taking care of sanding scratches, saving a huge amount of time. It enabled us to sand the car with 1500 and then buff the remainder out before polishing, skipping a number of steps with nearly identical results. We went through the process on these two panels and got some stunning early results. After arriving at 10am, I got home at 12:30am.
 Untitled
 by
sam stone, on Flickr
 Coupe Quattro Refinish Project
 by
sam stone, on Flickr
 Untitled
 by
sam stone, on Flickr
Monday night was a similar story, 6pm to 12am after work. Tuesday night was off, but we were back at it Wednesday after my good friend Brian May arrived into town for the weekend. That night stretched on until I arrived home at 4:30am Thursday morning. We started to make major inroads and the car was looking really, really good and the finish line was in sight.
 Untitled
 by
sam stone, on Flickr
Thursday night, we were at it again at 6pm. It was supposed to be an early night, sanding and polishing the bumper and some other things. It turned out to be a great night, albeit way too long once again. We not only polished the car, but installed all of the trim and most of the interior panels. After 60+ man hours of work that week, the final results were truly stunning. I was completely over the moon.
 Untitled
 by
sam stone, on Flickr
Brian and I headed back home around 3am and got a few hours of sleep before waking up to head out to Las Vegas. It was really warm and humid Friday morning while we cleaned the car and packed up.
 12079657_10106803738979480_2435081994337664979_n
 by
sam stone, on Flickr
We hit the road around 11, and found ourselves in heavy winds and rain about 90 minutes outside of Phoenix. The car ran and drove great with the exception of the windows being adjusted poorly in the door seals, causing major wind noise at speed. Annoying, but we did ok and made it to Vegas in a little over four hours.
Friday night was spent as a meet'n'greet at Iroz. I got to say hi to a number of familiar faces I've talked with online for years and years, and check out their cars. There were a trio of GTX30R-powered Coupes there, including the cleanest old Audi build I've ever seen in Nate S' pearl white car. Brian and I packed it in early to try and catch up on sleep.
Saturday morning was a group drive from the Aliante Hotel to Cars and Coffee in Henderson. It was so cool being in a convoy with a bunch of old Audis for once! CnC was a bit dead, but after an hour or two we rolled over to get gas and hang out at Audi Henderson for lunch and another gathering. We took on 4gal of race gas at the pump, and turned up the boost and timing a little for the afternoon drive. Good times were had at the dealer, and we headed over to the Valley of Fire for what I thought was the coolest part of the event.
If you're ever in Vegas, I highly recommend taking a trip through the park. Not only is an escape from the hellscape of Las Vegas, but it's also an awesome scenic tour. I believe we ended up driving over 50 miles through the park over a couple hours' time. We spent the first part of the tour following two UrQ and Alex's 7A Coupe GT. I had to remind myself, 'when is the next time that is ever going to happen?'.
 Untitled
 by
sam stone, on Flickr
 Untitled
 by
sam stone, on Flickr
 Untitled
 by
sam stone, on Flickr
Fast 4000s were the featured marque apparently. Wiley's, Jeffs, and Ben's are all serious cars and were very patriotic in their color schemes.
 Untitled
 by
sam stone, on Flickr
Brian and I were just getting going as the lone B3 on the drive.
 Coupe Quattro Refinish Project
 by
sam stone, on Flickr
After a pitstop for group photos, the pace began to ratchet up a bit as the big power cars consolidated together in line. Fun times were had with Philip's 20vt 5ktq, Ben's 20vt 4ktq, Wiley's 20vt 4ktq, and Jeff's 20vt 4ktq. Jeff lost an intercooler hose clamp, which brought the drive to a halt as repairs were made.
 Untitled
 by
sam stone, on Flickr
We made a few pit stops in the stunning landscape to chat and let everyone catch up and cool down.
 Untitled
 by
sam stone, on Flickr
After that, I ended up at the head of the group and it was ON. We got a bit separated from the rest, but Ben and Wiley stayed close behind for the last 10-15mi as we hammered through the twisty roads out of the mountains and into the valley. I collected a few rock chips after trading the lead off to Ben, but I'll take them as battle scars from one of the most fun drives I've ever done. At this point I was over the moon. Beautiful landscape, great roads, awesome handling car with tons of power and no issues...what a great day!
 Coupe Quattro Refinish Project
 by
sam stone, on Flickr
 Coupe Quattro Refinish Project
 by
sam stone, on Flickr
Saturday night was a banquet, which we dipped out of early to go see the Monster Energy Cup supercross race which happened to be in town. We got into that free as we got there towards the end, and saw a good race on a ridiculous course.
Sunday, we slept in and hung out at Iroz for a couple hours. I contemplated Hank's offer of throwing the car on the rollers to do some tuning and see how it stacks up to the others, but all I saw from that was dollar signs, horsepower, and broken 01A when 300 miles from home. I'll be back, for sure. We left around noon and made a pit stop at the Hoover Dam. Brian had never been, and it blows me away each time I visit. We went back home via Flagstaff, a couple hours out of the way but I wanted to try making the Black River Canyon north of Sedona before the sun went out. We didn't get there in time and headed down the mountain back to Phoenix.
I cleaned the car this week and did a post mortem after the event. I've got a rear diff leak and something from either the transmission or my catch can leaving some drips on the ground. All in all, if that's all that's wrong with my 25 year old car that I let sit for a year, then beat the hell out of for 1500 miles in a week, I'll take it.
Maintenance aside, the car is far from done. There is more work to be done polishing out the paint. I have some things I'd like to do to the front bumper, adding some black vinyl to continue the trim line and installing grilles. The list goes on and on, who knows if this car will ever be 'done'. But in the meanwhile, I'm looking forward to participating in the active Arizona car scene, getting out and enjoying the wonderful roads and landscapes this part of the country has to offer.
Lastly, this project would absolutely not have been possible without the help of a few people. Thank you to Val and Jason for all of your massive efforts and gracious contributions in tools, materials, beer and pizza to this. Thank you to Heather for putting up with this for a year and a half. Thank you to Brian for taking a week out of your busy unemployment schedule to come stay up late working your ass off on my car before hanging around with a bunch of old Audi nerds for three days. Thank you to Nick M. for the alignment. Thank you to Chris at Elite Auto Finishes for the advice, and bunch of people at Space Age Paint for advice and materials to get this done.
Sam